
AL1917C User's Guide
Page 1
Table of Contents Safety Rules Electrical Safety Installation Safety Cleaning Safety SPECIAL NOTES ON LCD MONITORS Components and Accessories Usage Installation Guide Adjustment of Display Operation Adjustment of Screen Attachment Plug and Play Power Saver Troubleshooting Technical Specifications Display Mode 1 1 1 1 1 2 2 2 3 4 6 6 7 7 7 8 9
Table of Contents Safety Rules Electrical Safety Installation Safety Cleaning Safety SPECIAL NOTES ON LCD MONITORS Components and Accessories Usage Installation Guide Adjustment of Display Operation Adjustment of Screen Attachment Plug and Play Power Saver Troubleshooting Technical Specifications Display Mode 1 1 1 1 1 2 2 2 3 4 6 6 7 7 7 8 9

AL1917C User's Guide
Page 2
... image or turning off the Power Switch and then turn it dry and wipe the surface of your LCD display gently. It is recommended to avoid electric shock, or dropping. It may flicker during initial use . If you are allowed to open the LCD display case. ‹ Only hold the plug, not the power cable, when you connect the plug to the nature of the fluorescent light, the screen...
... image or turning off the Power Switch and then turn it dry and wipe the surface of your LCD display gently. It is recommended to avoid electric shock, or dropping. It may flicker during initial use . If you are allowed to open the LCD display case. ‹ Only hold the plug, not the power cable, when you connect the plug to the nature of the fluorescent light, the screen...
AL1917C User's Guide
Page 3
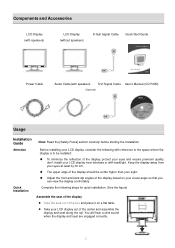
... LCD Display (with speakers) LCD Display (without speakers) D-Sub Signal Cable Quick Start Guide Power Cable Audio Cable(with speakers) DVI Signal Cable User's Manual (CD-ROM) (Optional) Usage Installation Guide Attention Quick Installation Note: Read the [Safety Rules] section carefully before starting the installation Before installing your LCD display, consider the following steps for quick installation: (See the figure) Assemble the seat of the display z Take the seat out of the display based on a flat table. Complete the following with backlight. Keep the display...
... LCD Display (with speakers) LCD Display (without speakers) D-Sub Signal Cable Quick Start Guide Power Cable Audio Cable(with speakers) DVI Signal Cable User's Manual (CD-ROM) (Optional) Usage Installation Guide Attention Quick Installation Note: Read the [Safety Rules] section carefully before starting the installation Before installing your LCD display, consider the following steps for quick installation: (See the figure) Assemble the seat of the display z Take the seat out of the display based on a flat table. Complete the following with backlight. Keep the display...
AL1917C User's Guide
Page 4
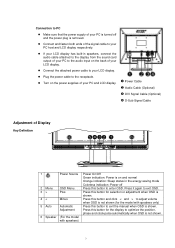
... adjust volume when OSD is not shown (for the model with speakers only) 5 Auto Automatic Press this button for the display to optimize the position, phase and clock pulse automatically when OSD is removed. X Power Cable Y Audio Cable (Optional) Z DVI Signal Cable (Optional) [ D-Sub Signal Cable Adjustment of Display Key Definition 1 Power Source Power On/Off Green indication: Power is on the back of your PC is turned off 2 Menu OSD Menu Press this button to enter OSD. Connection to PC z Make sure that the power supply of...
... adjust volume when OSD is not shown (for the model with speakers only) 5 Auto Automatic Press this button for the display to optimize the position, phase and clock pulse automatically when OSD is removed. X Power Cable Y Audio Cable (Optional) Z DVI Signal Cable (Optional) [ D-Sub Signal Cable Adjustment of Display Key Definition 1 Power Source Power On/Off Green indication: Power is on the back of your PC is turned off 2 Menu OSD Menu Press this button to enter OSD. Connection to PC z Make sure that the power supply of...
AL1917C User's Guide
Page 5
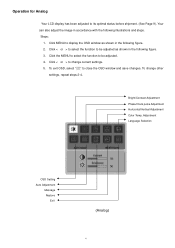
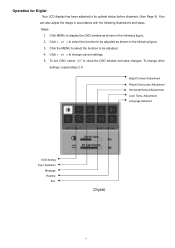
... the following figure. 2. Click the MENU to select the function to change other settings, repeat steps 2-4. Click < or > to be adjusted as shown in the following illustrations and steps. Steps: 1. To exit OSD, select " " to its optimal status before shipment. (See Page 9). Bright/Contract Adjustment Phase/Clock pulse Adjustment Horizontal/Vertical Adjustment Color Temp. Operation for Analog Your LCD display has been adjusted to close the OSD window and save changes.
... the following figure. 2. Click the MENU to select the function to change other settings, repeat steps 2-4. Click < or > to be adjusted as shown in the following illustrations and steps. Steps: 1. To exit OSD, select " " to its optimal status before shipment. (See Page 9). Bright/Contract Adjustment Phase/Clock pulse Adjustment Horizontal/Vertical Adjustment Color Temp. Operation for Analog Your LCD display has been adjusted to close the OSD window and save changes.
AL1917C User's Guide
Page 6
Click MENU to change other settings, repeat steps 2-4. To exit OSD, select " " to its optimal status before shipment. (See Page 9). To change current settings. 5. Your can also adjust the image in accordance with the following figure. 2. Click < or > to display the OSD window as shown in the following illustrations and steps. Bright/Contract Adjustment Phase/Clock pulse Adjustment Horizontal/Vertical Adjustment Color Temp. Adjustment Language Selection OSD Setting Input Selection Message Restore Exit (Digital) 5 Click < or...
Click MENU to change other settings, repeat steps 2-4. To exit OSD, select " " to its optimal status before shipment. (See Page 9). To change current settings. 5. Your can also adjust the image in accordance with the following figure. 2. Click < or > to display the OSD window as shown in the following illustrations and steps. Bright/Contract Adjustment Phase/Clock pulse Adjustment Horizontal/Vertical Adjustment Color Temp. Adjustment Language Selection OSD Setting Input Selection Message Restore Exit (Digital) 5 Click < or...
AL1917C User's Guide
Page 7
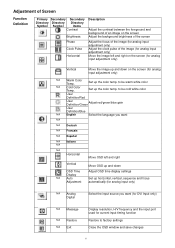
... the screen (for analog input adjustment only) Vertical Move the image up and down Adjust OSD time display settings Set up horizontal, vertical, sequence and focus automatically (for analog input only) N/A Analog Digital Select the input source you want (for DVI Input only) N/A Message N/A Restore N/A Exit Display resolution, H/V frequency and the input port used for analog input adjustment only) N/A Warm Color Temp. to factory settings Close the OSD window and save changes 6 to be cold white color User Definition/Red User Definition/Green Adjust red/green/blue gain User...
... the screen (for analog input adjustment only) Vertical Move the image up and down Adjust OSD time display settings Set up horizontal, vertical, sequence and focus automatically (for analog input only) N/A Analog Digital Select the input source you want (for DVI Input only) N/A Message N/A Restore N/A Exit Display resolution, H/V frequency and the input port used for analog input adjustment only) N/A Warm Color Temp. to factory settings Close the OSD window and save changes 6 to be cold white color User Definition/Red User Definition/Green Adjust red/green/blue gain User...
AL1917C User's Guide
Page 8
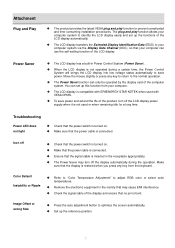
... latest VESA plug and play function allows your computer can use the self-setting function of the product, turn off the LCD display power supply when it is bent. Troubleshooting Power LED does not light ‹ Check that the power switch is turned on . ‹ Make that the power cable is connected. ‹ Ensure that the signal cable is inserted in the receptacle appropriately. ‹ The Power Saver may cause EMI interference. ‹ Check the signal cable...
... latest VESA plug and play function allows your computer can use the self-setting function of the product, turn off the LCD display power supply when it is bent. Troubleshooting Power LED does not light ‹ Check that the power switch is turned on . ‹ Make that the power cable is connected. ‹ Ensure that the signal cable is inserted in the receptacle appropriately. ‹ The Power Saver may cause EMI interference. ‹ Check the signal cable...
AL1917C User's Guide
Page 9
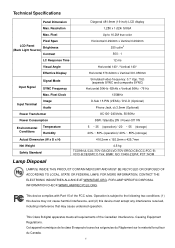
... color Pixel Span LCD Panel Brightness (Back Light Source) Contrast Horizontal 0.294mm x Vertical 0.294mm 250 cd/m2 500 : 1 LC Response Time 12 ms Visual Angle Horizontal 140° / Vertical 140° Effective Display Horizontal 376.32mm x Vertical 301.056mm Input Signal Signal Mode SYNC Frequency Simulated video frequency: 0.7 Vpp, 75Ω (separate SYNC and composite SYNC) Horizontal 30kHz~82kHz x Vertical 56Hz ~76 Hz Max. This device complies with Part 15 of the Canadian Interference- FOR LAMP SPECIFIC DISPOSAL INFORMATION CHECK...
... color Pixel Span LCD Panel Brightness (Back Light Source) Contrast Horizontal 0.294mm x Vertical 0.294mm 250 cd/m2 500 : 1 LC Response Time 12 ms Visual Angle Horizontal 140° / Vertical 140° Effective Display Horizontal 376.32mm x Vertical 301.056mm Input Signal Signal Mode SYNC Frequency Simulated video frequency: 0.7 Vpp, 75Ω (separate SYNC and composite SYNC) Horizontal 30kHz~82kHz x Vertical 56Hz ~76 Hz Max. This device complies with Part 15 of the Canadian Interference- FOR LAMP SPECIFIC DISPOSAL INFORMATION CHECK...

AL1917T User's Guide
Page 1
TABLE OF CONTENTS Special notes on LCD monitors 1 Introduction 2 Features 2 Unpacking 3 Attaching/Removing the base 4 Screen position adjustment 4 Connecting the power cord 5 Safety precaution 5 Cleaning your monitor 5 Preset modes 6 Power saving 7 DDC ...7 Installation 8 User controls 9 Troubleshooting 13 Specification 14
TABLE OF CONTENTS Special notes on LCD monitors 1 Introduction 2 Features 2 Unpacking 3 Attaching/Removing the base 4 Screen position adjustment 4 Connecting the power cord 5 Safety precaution 5 Cleaning your monitor 5 Preset modes 6 Power saving 7 DDC ...7 Installation 8 User controls 9 Troubleshooting 13 Specification 14
AL1917T User's Guide
Page 3
...-based and ergonomically designed display, compatible with the most stringent environmental scheme of displaying crisp and vibrant color graphics with VGA, SVGA, XGA, SXGA (non-interlaced), and most Macintosh compatible color video cards. · The monitor is also compliant with most analog RGB (Red, Green, Blue) display standards, including PS/V, PS/2, optional for purchasing model AL1917, a high performance 19-inch color TFT LCD monitor. For horizontal scan frequencies between 30 KHz and 81 KHz, and vertical...
...-based and ergonomically designed display, compatible with the most stringent environmental scheme of displaying crisp and vibrant color graphics with VGA, SVGA, XGA, SXGA (non-interlaced), and most Macintosh compatible color video cards. · The monitor is also compliant with most analog RGB (Red, Green, Blue) display standards, including PS/V, PS/2, optional for purchasing model AL1917, a high performance 19-inch color TFT LCD monitor. For horizontal scan frequencies between 30 KHz and 81 KHz, and vertical...

AL1917T User's Guide
Page 6
... below guidelines when cleaning the monitor. · Always unplug the monitor before cleaning. · Use a soft cloth to wipe the screen and cabinet front and sides. · Apply a small quantity of alcohol to a soft cloth to rain, excessive moisture, or dust. · Do not cover the ventilation slots or openings of H05VV-F cord and plug rated 10 A, 250 V. No user-adjustment is the...
... below guidelines when cleaning the monitor. · Always unplug the monitor before cleaning. · Use a soft cloth to wipe the screen and cabinet front and sides. · Apply a small quantity of alcohol to a soft cloth to rain, excessive moisture, or dust. · Do not cover the ventilation slots or openings of H05VV-F cord and plug rated 10 A, 250 V. No user-adjustment is the...

AL1917T User's Guide
Page 8
... into "Power Saving" mode by the amber-color power LED. E-7 The recovery time from the display controller, as indicated by the control signal from Active OFF state back to Plug and Play with your system if your installation easier, the monitor is able to ON state is a communication protocol through which the monitor automatically informs the host system about its capabilities, for example, supported resolutions and...
... into "Power Saving" mode by the amber-color power LED. E-7 The recovery time from the display controller, as indicated by the control signal from Active OFF state back to Plug and Play with your system if your installation easier, the monitor is able to ON state is a communication protocol through which the monitor automatically informs the host system about its capabilities, for example, supported resolutions and...
AL1917T User's Guide
Page 13
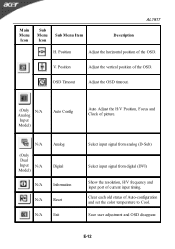
... Adjust the H/V Position, Focus and Clock of the OSD. Position Adjust the vertical position of picture. E-12 N/A (Only Dual Input N/A Model) Analog Digital N/A Information N/A Reset N/A Exit Select input signal from analog (D-Sub) Select input signal from digital (DVI) Show the resolution, H/V frequency and input port of the OSD. Save user adjustment and OSD disappear. Main Menu Icon Sub Menu Icon Sub Menu Item Description AL1917 H. Position Adjust the horizontal position of current input timing. V. Clear each old status of Auto-configuration and set the color...
... Adjust the H/V Position, Focus and Clock of the OSD. Position Adjust the vertical position of picture. E-12 N/A (Only Dual Input N/A Model) Analog Digital N/A Information N/A Reset N/A Exit Select input signal from analog (D-Sub) Select input signal from digital (DVI) Show the resolution, H/V frequency and input port of the OSD. Save user adjustment and OSD disappear. Main Menu Icon Sub Menu Icon Sub Menu Item Description AL1917 H. Position Adjust the horizontal position of current input timing. V. Clear each old status of Auto-configuration and set the color...
AL1917T User's Guide
Page 14
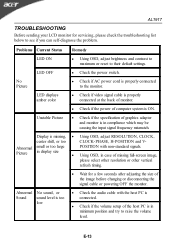
... signals. · Using OSD, in display size POSITION with the host PC is connected. · Check if the volume setup of the image before changing or disconnecting the signal cable or powering OFF the monitor. Abnormal Picture small or too large in case of missing full-screen image, please select other resolution or other vertical refresh timing. · Wait for servicing, please check the troubleshooting list below to their default settings. Problems Current Status Remedy LED ON · Using OSD, adjust brightness and contrast...
... signals. · Using OSD, in display size POSITION with the host PC is connected. · Check if the volume setup of the image before changing or disconnecting the signal cable or powering OFF the monitor. Abnormal Picture small or too large in case of missing full-screen image, please select other resolution or other vertical refresh timing. · Wait for servicing, please check the troubleshooting list below to their default settings. Problems Current Status Remedy LED ON · Using OSD, adjust brightness and contrast...
AL1917X User's Guide
Page 6
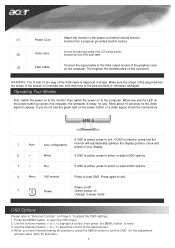
... green light on Orange: in shape. Power Power on/off Green: power on the power button or a video signal, check the connections . When you do not see the LED on the connector WARNING: The D-Sub 15 pin plug of the VGA cable is active, press to select or adjust OSD options. 4 Press to view OSD. To adjust the OSD settings : 1. Use the buttons marked < or >, to highlight a control, then press the MENU button to open the OSD menu. 2. Attach the monitor to the power cord...
... green light on Orange: in shape. Power Power on/off Green: power on the power button or a video signal, check the connections . When you do not see the LED on the connector WARNING: The D-Sub 15 pin plug of the VGA cable is active, press to select or adjust OSD options. 4 Press to view OSD. To adjust the OSD settings : 1. Use the buttons marked < or >, to highlight a control, then press the MENU button to open the OSD menu. 2. Attach the monitor to the power cord...

AL1917X User's Guide
Page 9
...); TUV/GS; FCC(USA); VCCI (Japan); Recall Recall to factory default settings General Specification Item Display Max Resolution Pixel Pitch Color Brightness Contrast Ratio Response Time View Angle of Horizontal View Angle of Vertical Speaker Power Button Control Buttons Video In Sync Plug & Play EMI and Safety Power Source Power Consumption During Normal Operation Power Consumption During Active off Operation Dimension (W_H_D) Weight (Net/ Gross) Specification 19-inch Flat panel active-matrix TFT LCD 1280 x 1024 @75Hz 0.294 mm X 0.294 mm 16...
...); TUV/GS; FCC(USA); VCCI (Japan); Recall Recall to factory default settings General Specification Item Display Max Resolution Pixel Pitch Color Brightness Contrast Ratio Response Time View Angle of Horizontal View Angle of Vertical Speaker Power Button Control Buttons Video In Sync Plug & Play EMI and Safety Power Source Power Consumption During Normal Operation Power Consumption During Active off Operation Dimension (W_H_D) Weight (Net/ Gross) Specification 19-inch Flat panel active-matrix TFT LCD 1280 x 1024 @75Hz 0.294 mm X 0.294 mm 16...
AL1917X User's Guide
Page 11
... LCD Monitor's synchronous range (Horizontal: 24 ~ 80 KHz and Vertical:56 ~ 75 Hz), the OSD will display a message "No Input Signal". Please change to an alternative mode listed in OSD menu again and adjust the monitor screen to the normal PC operating environment. Also, if the signal cable is unclear and unstable, please perform the following steps: 1. Troubleshooting This LCD Monitor has pre-adjusted using factory standard VGA timings. Refer to qualified service personnel if the problems...
... LCD Monitor's synchronous range (Horizontal: 24 ~ 80 KHz and Vertical:56 ~ 75 Hz), the OSD will display a message "No Input Signal". Please change to an alternative mode listed in OSD menu again and adjust the monitor screen to the normal PC operating environment. Also, if the signal cable is unclear and unstable, please perform the following steps: 1. Troubleshooting This LCD Monitor has pre-adjusted using factory standard VGA timings. Refer to qualified service personnel if the problems...

User Manual
Page 6
... the connector Connect the signal cable to theVGA output socket of the graphics card (4) VGA Cable on the power button or a video signal, check the connections . 1 AUTO 2 4 MENU OSD Menu Power If OSD isactiv e, press to select or adjust OSD options. If OSD is active, press to exit. When you have finished making all selections, press the MENU button to the monitor, then switch the power on the computer. Power on/off Green: power on Orange: in shape. Press to open the OSD menu...
... the connector Connect the signal cable to theVGA output socket of the graphics card (4) VGA Cable on the power button or a video signal, check the connections . 1 AUTO 2 4 MENU OSD Menu Power If OSD isactiv e, press to select or adjust OSD options. If OSD is active, press to exit. When you have finished making all selections, press the MENU button to the monitor, then switch the power on the computer. Power on/off Green: power on Orange: in shape. Press to open the OSD menu...

User Manual
Page 12
... replace the VGA card,and then repeat steps 1 and 2. If step 2 doesn't work, connect your PC system to "Shut Down Windows" status while you have chosen an output timing that is supported by increment or decrement numbers)until those bars disappear. 3. Caution: Do not attempt to an alternative mode listed in OSD menu again and adjust the monitor screen to see if there's any black vertical...
... replace the VGA card,and then repeat steps 1 and 2. If step 2 doesn't work, connect your PC system to "Shut Down Windows" status while you have chosen an output timing that is supported by increment or decrement numbers)until those bars disappear. 3. Caution: Do not attempt to an alternative mode listed in OSD menu again and adjust the monitor screen to see if there's any black vertical...

