
AL1912 Service Guide
Page 4
... to correct the interference by the party responsible for help. However, there is connected. 4. WARNING: To prevent fire or chock hazard, do not expose the monitor to qualified personnel only. - 4 - Do not open the cabinet. This equipment generates, uses and can be determined by turning the equipment off and on a circuit... will not occur in accordance with the limits for energy efficiency. WARNING: (FOR FCC CERTIFIED MODELS) NOTE: this equipment. These limits are present inside the monitor.
... to correct the interference by the party responsible for help. However, there is connected. 4. WARNING: To prevent fire or chock hazard, do not expose the monitor to qualified personnel only. - 4 - Do not open the cabinet. This equipment generates, uses and can be determined by turning the equipment off and on a circuit... will not occur in accordance with the limits for energy efficiency. WARNING: (FOR FCC CERTIFIED MODELS) NOTE: this equipment. These limits are present inside the monitor.
AL1912 Service Guide
Page 5
...table. If you are not blocked or covered. It could short circuit parts causing a fire or electric shock. Do not place the monitor on the monitor. Never spill liquids on a bed, sofa, rug or similar surface. PRECAUTIONS Do not use a mounting kit approved by the manufacture or... sold with a third (grounding) pin. Do not place the monitor on the monitor cabinet. Please refer all servicing to your home, consult your outlet does not accommodate the three-wire plug, have an electrician install...
...table. If you are not blocked or covered. It could short circuit parts causing a fire or electric shock. Do not place the monitor on the monitor. Never spill liquids on a bed, sofa, rug or similar surface. PRECAUTIONS Do not use a mounting kit approved by the manufacture or... sold with a third (grounding) pin. Do not place the monitor on the monitor cabinet. Please refer all servicing to your home, consult your outlet does not accommodate the three-wire plug, have an electrician install...
AL1912 Service Guide
Page 6
... again to the nature of the LCD screen, an afterimage of 99.99% or more. You may flicker during initial use . SPECIAL NOTES ON LCD MONITORS The following symptoms are normal with LCD...
... again to the nature of the LCD screen, an afterimage of 99.99% or more. You may flicker during initial use . SPECIAL NOTES ON LCD MONITORS The following symptoms are normal with LCD...
AL1912 Service Guide
Page 7
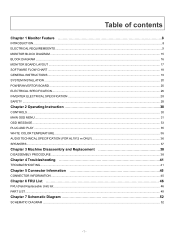
Table of contents Chapter 1 Monitor Feature 8 INTRODUCTION...8 ELECTRICAL REQUIREMEENTS...9 MONITOR BLOCK DIAGRAM ...15 BLOCK DIAGRAM ...16 MONITOR BOARD LAYOUT ...17 SOFTWARE FLOW CHART ...18 GENERAL INSTRUCTIONS ...19 SYSTEM INSTALLATION ...20 POWER/INVERTOR BOARD ...25 ... Instruction 30 CONTROLS ...30 MAIN OSD MENU...31 OSD MESSAGE...33 PLUG AND PLAY ...35 WHITE COLOR TEMPERATURE...36 AUDIO TECHNICAL SPECIFICATION (FOR AL1912 m ONLY 36 SPEAKERS ...37 Chapter 3 Machine Disassembly and Replacement 38 DISASSEMBLY PROCEDURE ...38 Chapter 4 Troubleshooting 41 TROUBLESHOOTING ...41 Chapter 5 ...
Table of contents Chapter 1 Monitor Feature 8 INTRODUCTION...8 ELECTRICAL REQUIREMEENTS...9 MONITOR BLOCK DIAGRAM ...15 BLOCK DIAGRAM ...16 MONITOR BOARD LAYOUT ...17 SOFTWARE FLOW CHART ...18 GENERAL INSTRUCTIONS ...19 SYSTEM INSTALLATION ...20 POWER/INVERTOR BOARD ...25 ... Instruction 30 CONTROLS ...30 MAIN OSD MENU...31 OSD MESSAGE...33 PLUG AND PLAY ...35 WHITE COLOR TEMPERATURE...36 AUDIO TECHNICAL SPECIFICATION (FOR AL1912 m ONLY 36 SPEAKERS ...37 Chapter 3 Machine Disassembly and Replacement 38 DISASSEMBLY PROCEDURE ...38 Chapter 4 Troubleshooting 41 TROUBLESHOOTING ...41 Chapter 5 ...
AL1912 Service Guide
Page 8
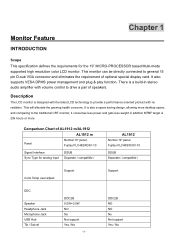
...requirement of speakers. Comparison Chart of AL1912 m/AL1912 AL1912 m Panel Normal 19" panel Fujitsu FLC48SXC8V-10 Signal Interface Sync Type for the 19" MICRO-PROCESSOR based Multi-mode supported high resolution color LCD monitor. Monitor Feature INTRODUCTION Chapter 1 Scope This specification... defines the requirements for analog input DSUB Separate / compatible / AL1912 Normal 19" panel Fujitsu FLC48SXC8V-10 DSUB Separate / compatible /...
...requirement of speakers. Comparison Chart of AL1912 m/AL1912 AL1912 m Panel Normal 19" panel Fujitsu FLC48SXC8V-10 Signal Interface Sync Type for the 19" MICRO-PROCESSOR based Multi-mode supported high resolution color LCD monitor. Monitor Feature INTRODUCTION Chapter 1 Scope This specification... defines the requirements for analog input DSUB Separate / compatible / AL1912 Normal 19" panel Fujitsu FLC48SXC8V-10 DSUB Separate / compatible /...
AL1912 Service Guide
Page 9
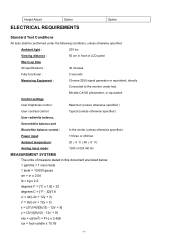
... of LCD panel Warrn up time All specifications : 30 minutes Fully functional : 5 seconds Measuring Equipment : Chroma 2250 signal generator or equivalent, directly Connected to the monitor under the following conditions, unless otherwise specified. Height Adjust Option ELECTRICAL REQUIREMENTS Option Standard Test Conditions All tests shall be performed under test.
... of LCD panel Warrn up time All specifications : 30 minutes Fully functional : 5 seconds Measuring Equipment : Chroma 2250 signal generator or equivalent, directly Connected to the monitor under the following conditions, unless otherwise specified. Height Adjust Option ELECTRICAL REQUIREMENTS Option Standard Test Conditions All tests shall be performed under test.
AL1912 Service Guide
Page 10
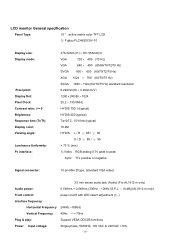
...: 15 pin Mini D type, (standard VGA video) 3.5 mm stereo audio jack (Audio) (For AL1912 m only) Audio power: 0.5Wrms + 0.5Wrms (300Hz - 10kHz (S.P.L. - 10 dB))(AL1912 m only) Front control: power on/off with LED select adjustment (+,-) Interface frequency Horizontal Frequency 24KHz ...--80KHz Vertical Frequency 49Hz ------75Hz Plug & play: Support VESA DDC2B functions Power Input voltage: Single phase, 50/60HZ, 100 VAC to 240VAC ±10% - 10 - LCD monitor...
...: 15 pin Mini D type, (standard VGA video) 3.5 mm stereo audio jack (Audio) (For AL1912 m only) Audio power: 0.5Wrms + 0.5Wrms (300Hz - 10kHz (S.P.L. - 10 dB))(AL1912 m only) Front control: power on/off with LED select adjustment (+,-) Interface frequency Horizontal Frequency 24KHz ...--80KHz Vertical Frequency 49Hz ------75Hz Plug & play: Support VESA DDC2B functions Power Input voltage: Single phase, 50/60HZ, 100 VAC to 240VAC ±10% - 10 - LCD monitor...
AL1912 Service Guide
Page 14
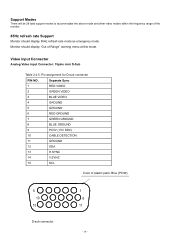
... Modes There will be 28 total support modes to accommodate the above mode and other video modes within the frequency range of the monitor. 85Hz refresh rate Support Monitor should display "Out of plastic parts: Blue (PC99) 5 10 15 D-sub connector 1 6 11 - 14 - Separate Sync 1 RED VIDEO 2 GREEN VIDEO 3 BLUE VIDEO 4 GROUND... GROUND 9 PC5V (+5V DDC) 10 CABLE DETECTION 11 GROUND 12 SDA 13 H.SYNC 14 V.SYNC 15 SCL Color of Range" warning menu at this mode. Monitor should display 85Hz refresh rate mode as emergency mode.
... Modes There will be 28 total support modes to accommodate the above mode and other video modes within the frequency range of the monitor. 85Hz refresh rate Support Monitor should display "Out of plastic parts: Blue (PC99) 5 10 15 D-sub connector 1 6 11 - 14 - Separate Sync 1 RED VIDEO 2 GREEN VIDEO 3 BLUE VIDEO 4 GROUND... GROUND 9 PC5V (+5V DDC) 10 CABLE DETECTION 11 GROUND 12 SDA 13 H.SYNC 14 V.SYNC 15 SCL Color of Range" warning menu at this mode. Monitor should display 85Hz refresh rate mode as emergency mode.
AL1912 Service Guide
Page 15
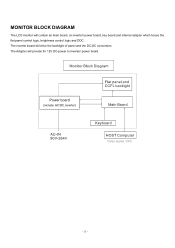
The inverter board will provide thr 12V DC-power to inverter/ power board. Power board (include: AC/DC,inverter) - 15 - The Adapter will drive the backlight of panel and the DC-DC conversion. MONITOR BLOCK DIAGRAM The LCD monitor will contain an main board, an inverter/ power board, key board and internal adapter which house the flat panel control logic, brightness control logic and DDC.
The inverter board will provide thr 12V DC-power to inverter/ power board. Power board (include: AC/DC,inverter) - 15 - The Adapter will drive the backlight of panel and the DC-DC conversion. MONITOR BLOCK DIAGRAM The LCD monitor will contain an main board, an inverter/ power board, key board and internal adapter which house the flat panel control logic, brightness control logic and DDC.
AL1912 Service Guide
Page 19
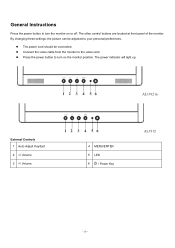
The other control buttons are located at front panel of the monitor. The power indicator will light up. The power cord should be adjusted to turn on or off. Press the power button to the video card. Connect the video cable from the monitor to turn the monitor on the monitor position. By changing these settings, the picture can be connected. General Instructions Press the power button to your personal preferences. AL1912 m External Controls 1 Auto Adjust Key/Exit 2 / Volume 4 MENU/ENTER 5 LED 6 / Power Key AL1912 - 19 -
The other control buttons are located at front panel of the monitor. The power indicator will light up. The power cord should be adjusted to turn on or off. Press the power button to the video card. Connect the video cable from the monitor to turn the monitor on the monitor position. By changing these settings, the picture can be connected. General Instructions Press the power button to your personal preferences. AL1912 m External Controls 1 Auto Adjust Key/Exit 2 / Volume 4 MENU/ENTER 5 LED 6 / Power Key AL1912 - 19 -

AL1912 Service Guide
Page 20
... source. Connect the other end of the signal cable to the LCD Monitor's VGA port. Connect the power cord to the LCD Monitor. Connect the other end of your PC. Make sure connections are secure. Connecting the Audio Cable (For AL1912 m and AL1912 bm) Connect the audio cable to the " LINE OUT " jack on... cable to the VGA port on your PC's audio card or to the front panel's "AUDIO OUT" jack of the signal cable to the LCD Monitor's " AUDIO IN " jack. - 20 -
... source. Connect the other end of the signal cable to the LCD Monitor's VGA port. Connect the power cord to the LCD Monitor. Connect the other end of your PC. Make sure connections are secure. Connecting the Audio Cable (For AL1912 m and AL1912 bm) Connect the audio cable to the " LINE OUT " jack on... cable to the VGA port on your PC's audio card or to the front panel's "AUDIO OUT" jack of the signal cable to the LCD Monitor's " AUDIO IN " jack. - 20 -
AL1912 Service Guide
Page 29
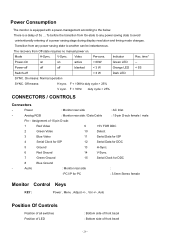
...ISP 12 Serial Data for DDC 5 Ground 13 H-Sync. 6 Red Ground 14 V-Sync. 7 Green Ground 15 Serial Clock for PC : 3.5mm Stereo female Monitor Control Keys KEY : Power , Menu , Adjust +/- , Vol +/-, Auto Position Of Controls Position of all switches Position of LED : Bottom side of front ...bezel : Bottom side of front bezel - 29 - Indicator Rec. Power Consumption The monitor is a delay of 5s ... 7s before the transition from On-state to any power saving state to another can be instantaneous. Transition from...
...ISP 12 Serial Data for DDC 5 Ground 13 H-Sync. 6 Red Ground 14 V-Sync. 7 Green Ground 15 Serial Clock for PC : 3.5mm Stereo female Monitor Control Keys KEY : Power , Menu , Adjust +/- , Vol +/-, Auto Position Of Controls Position of all switches Position of LED : Bottom side of front ...bezel : Bottom side of front bezel - 29 - Indicator Rec. Power Consumption The monitor is a delay of 5s ... 7s before the transition from On-state to any power saving state to another can be instantaneous. Transition from...
AL1912 Service Guide
Page 30
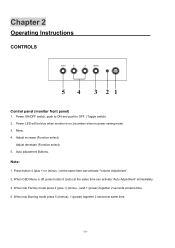
... time. - 30 - Power ON/OFF switch, push to ON and push to OFF. (Toggle switch) 2. be blue when monitor is off, press button 5 (auto) at same time. 5. Chapter 2 Operating Instructions CONTROLS Control panel (monitor front panel) 1. Press button 4 (plus +),(minus -) and 1 (power) together 2 seconds at the same time can activate "Volume Adjustment...
... time. - 30 - Power ON/OFF switch, push to ON and push to OFF. (Toggle switch) 2. be blue when monitor is off, press button 5 (auto) at same time. 5. Chapter 2 Operating Instructions CONTROLS Control panel (monitor front panel) 1. Press button 4 (plus +),(minus -) and 1 (power) together 2 seconds at the same time can activate "Volume Adjustment...

AL1912 Service Guide
Page 33
Hot-Key Menu:(For AL1912 m only) Outline: The description for OSD Message : Item Auto Config Please Wait Input Not Supported Cable Not Connected No Signal Description When User Press Hot-Key "Auto", will show this message, and the monitor do the auto config function. When the video cable is connected, but the is... Adjustment Reset Range Value Volume When the OSD is not connected, will show this message. When the video cable is closed, press Volume of the monitor support range, will be Volume Audio will show this message, then enter power saving. - 33 -
Hot-Key Menu:(For AL1912 m only) Outline: The description for OSD Message : Item Auto Config Please Wait Input Not Supported Cable Not Connected No Signal Description When User Press Hot-Key "Auto", will show this message, and the monitor do the auto config function. When the video cable is connected, but the is... Adjustment Reset Range Value Volume When the OSD is not connected, will show this message. When the video cable is closed, press Volume of the monitor support range, will be Volume Audio will show this message, then enter power saving. - 33 -

AL1912 Service Guide
Page 34
All value shall be editable manually. -color temp default preset No. - 34 - This function shall be located in the center. LOGO: When the monitor is depends on , the LOGO will be showed in 3. Method of Contrast in user menu. Adjusted value of R, G, B gain shall be used for color temp ...
All value shall be editable manually. -color temp default preset No. - 34 - This function shall be located in the center. LOGO: When the monitor is depends on , the LOGO will be showed in 3. Method of Contrast in user menu. Adjusted value of R, G, B gain shall be used for color temp ...
AL1912 Service Guide
Page 35
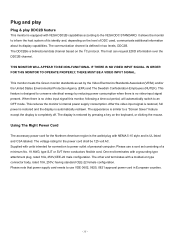
...is defined in European counties. - 35 - The display is restored by reducing power consumption when there is no video input signal this monitor, following a time-out period, will automatically switch to the VESA DDC STANDARD. Supplied with NEMA 5-15 style and is UL listed ...channel. The DDC2Bis a bidirectional data channel based on the I2C protocol. When there is no video-input signal present. This monitor meets the Green monitor standards as set consisting of DDC used, communicate additional information about its display capabilities. One end terminates with a grounding type ...
...is defined in European counties. - 35 - The display is restored by reducing power consumption when there is no video input signal this monitor, following a time-out period, will automatically switch to the VESA DDC STANDARD. Supplied with NEMA 5-15 style and is UL listed ...channel. The DDC2Bis a bidirectional data channel based on the I2C protocol. When there is no video-input signal present. This monitor meets the Green monitor standards as set consisting of DDC used, communicate additional information about its display capabilities. One end terminates with a grounding type ...
AL1912 User's Guide
Page 1
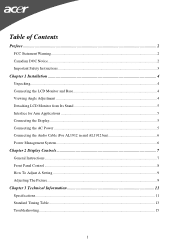
... DOC Notice ...2 Important Safety Instructions...3 Chapter 1 Installation ...4 Unpacking...4 Connecting the LCD Monitor and Base 4 Viewing Angle Adjustment ...4 Detaching LCD Monitor from Its Stand 5 Interface for Arm Applications ...5 Connecting the Display...5 Connecting the AC Power ...5 Connecting the Audio Cable (For AL1912 m and AL1912 bm 6 Power Management System...6 Chapter 2 Display Controls 7 General Instructions...7 Front Panel Control...
... DOC Notice ...2 Important Safety Instructions...3 Chapter 1 Installation ...4 Unpacking...4 Connecting the LCD Monitor and Base 4 Viewing Angle Adjustment ...4 Detaching LCD Monitor from Its Stand 5 Interface for Arm Applications ...5 Connecting the Display...5 Connecting the AC Power ...5 Connecting the Audio Cable (For AL1912 m and AL1912 bm 6 Power Management System...6 Chapter 2 Display Controls 7 General Instructions...7 Front Panel Control...

AL1912 User's Guide
Page 2
... protected by the party responsible for accuracy; No part of this document is subject to assist users in setting up and using the LCD Monitor. These limits are reserved. Cet appareil numérique de la classe B repecte toutes les exigences du Règlement sur le mat...with the instruction, may be determined by turning the equipment off and on, the user is connected. • Consult the dealer or an experienced monitor technician for a Class B digital device, pursuant to operate the equipment. You are cautioned that interference will not occur in any mechanical, electronic ...
... protected by the party responsible for accuracy; No part of this document is subject to assist users in setting up and using the LCD Monitor. These limits are reserved. Cet appareil numérique de la classe B repecte toutes les exigences du Règlement sur le mat...with the instruction, may be determined by turning the equipment off and on, the user is connected. • Consult the dealer or an experienced monitor technician for a Class B digital device, pursuant to operate the equipment. You are cautioned that interference will not occur in any mechanical, electronic ...
AL1912 User's Guide
Page 3
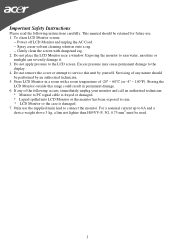
... above 3 kg, a line not lighter than H05VV-F, 3G, 0.75 mm2 must be retained for future use the supplied main lead to connect the monitor. Spray a non-solvent cleaning solution onto a rag. -- Do not apply pressure to the display. 4. Only use . 1. Gently clean the screen... Safety Instructions Please read the following occurs, immediately unplug your monitor and call an authorized technician. * Monitor to PC signal cable is frayed or damaged. * Liquid spilled into LCD Monitor or the monitor has been exposed to rain. * LCD Monitor or the case is damaged. 7. This manual should be...
... above 3 kg, a line not lighter than H05VV-F, 3G, 0.75 mm2 must be retained for future use the supplied main lead to connect the monitor. Spray a non-solvent cleaning solution onto a rag. -- Do not apply pressure to the display. 4. Only use . 1. Gently clean the screen... Safety Instructions Please read the following occurs, immediately unplug your monitor and call an authorized technician. * Monitor to PC signal cable is frayed or damaged. * Liquid spilled into LCD Monitor or the monitor has been exposed to rain. * LCD Monitor or the case is damaged. 7. This manual should be...
AL1912 User's Guide
Page 4
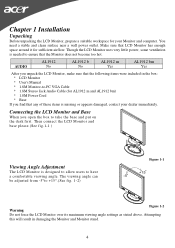
... take the base and put on the desk first. AUDIO AL1912 No AL1912 b No AL1912 m Yes AL1912 bm Yes After you find that any of these items is needed to ensure that the following items were included in damaging the Monitor and Monitor stand. 4 The viewing angle can be adjusted from -5°...;to -PC VGA Cable * 1.8M Stereo Jack Audio Cable (for AL1912 m and AL1912 bm) * 1.8M Power Cord * Base If you unpack the LCD Monitor, make sure that the Monitor does not become too hot. Though the LCD Monitor uses very little power, some ventilation is missing or appears damaged, contact ...
... take the base and put on the desk first. AUDIO AL1912 No AL1912 b No AL1912 m Yes AL1912 bm Yes After you find that any of these items is needed to ensure that the following items were included in damaging the Monitor and Monitor stand. 4 The viewing angle can be adjusted from -5°...;to -PC VGA Cable * 1.8M Stereo Jack Audio Cable (for AL1912 m and AL1912 bm) * 1.8M Power Cord * Base If you unpack the LCD Monitor, make sure that the Monitor does not become too hot. Though the LCD Monitor uses very little power, some ventilation is missing or appears damaged, contact ...


