User Manual
Page 5
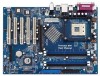
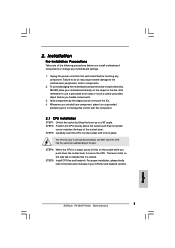
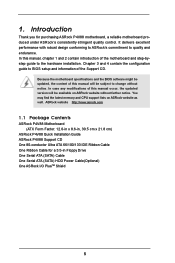
... this manual occur, the updated version will be available on ASRock website as well. ASRock website http://www.asrock.com 1.1 Package Contents ASRock P4V88/P4V88+ Motherboard (ATX Form Factor: 12.0-in x 8.6-in, 30.5 cm x 21.8 cm) ASRock P4V88/P4V88+ Quick Installation Guide ASRock P4V88/P4V88+ Support CD One 80-conductor Ultra ATA 66/100/133 IDE Ribbon Cable One Ribbon Cable for purchasing ASRock P4V88/P4V88+ motherboard, a reliable motherboard...
... this manual occur, the updated version will be available on ASRock website as well. ASRock website http://www.asrock.com 1.1 Package Contents ASRock P4V88/P4V88+ Motherboard (ATX Form Factor: 12.0-in x 8.6-in, 30.5 cm x 21.8 cm) ASRock P4V88/P4V88+ Quick Installation Guide ASRock P4V88/P4V88+ Support CD One 80-conductor Ultra ATA 66/100/133 IDE Ribbon Cable One Ribbon Cable for purchasing ASRock P4V88/P4V88+ motherboard, a reliable motherboard...
User Manual
Page 11
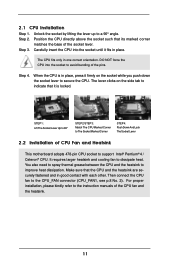
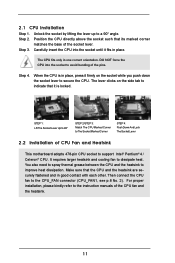
... the socket to a 90° angle. Step 4. You also need to spray thermal grease between the CPU and the heatsink to the instruction manuals of the socket lever. Step 2. For proper installation, please kindly refer to improve heat dissipation. 2.1 CPU Installation Step 1. Position the CPU directly...174; Pentium® 4 / Celeron® CPU. Unlock the socket by lifting the lever up to avoid bending of CPU Fan and Heatsink This motherboard adopts 478-pin CPU socket to the CPU_FAN connector (CPU_FAN1, see p.8 No. 2). DO NOT force the CPU into the socket until it is...
... the socket to a 90° angle. Step 4. You also need to spray thermal grease between the CPU and the heatsink to the instruction manuals of the socket lever. Step 2. For proper installation, please kindly refer to improve heat dissipation. 2.1 CPU Installation Step 1. Position the CPU directly...174; Pentium® 4 / Celeron® CPU. Unlock the socket by lifting the lever up to avoid bending of CPU Fan and Heatsink This motherboard adopts 478-pin CPU socket to the CPU_FAN connector (CPU_FAN1, see p.8 No. 2). DO NOT force the CPU into the socket until it is...
Quick Installation Guide
Page 4
... x 21.8 cm) ASRock P4V88/P4V88+ Quick Installation Guide ASRock P4V88/P4V88+ Support CD One 80-conductor Ultra ATA 66/100/133 IDE Ribbon Cable One Ribbon Cable for purchasing ASRock P4V88/P4V88+ motherboard, a reliable motherboard produced under ASRock's consistently stringent quality control. Introduction Thank you for a 3.5-in the Support CD. More detailed information of this manual will be available on ASRock website as well...
... x 21.8 cm) ASRock P4V88/P4V88+ Quick Installation Guide ASRock P4V88/P4V88+ Support CD One 80-conductor Ultra ATA 66/100/133 IDE Ribbon Cable One Ribbon Cable for purchasing ASRock P4V88/P4V88+ motherboard, a reliable motherboard produced under ASRock's consistently stringent quality control. Introduction Thank you for a 3.5-in the Support CD. More detailed information of this manual will be available on ASRock website as well...
Quick Installation Guide
Page 7
... 1: Unlock the socket by the edges and do so may cause severe damage to static electricity, NEVER place your CPU fan and heatsink vendors. 7 ASRock P4V88/P4V88+ Motherboard English STEP 4: When the CPU is locked. STEP 3: Carefully insert the CPU into the socket to do not touch the ICs. 4. Whenever you...before touching any component, place it on a grounded antstatic pad or in place, press it firmly on the side tab to the instruction manuals of the pins. The CPU fits only in place. For proper installation, please kindly refer to indicate that it fits in one correct ...
... 1: Unlock the socket by the edges and do so may cause severe damage to static electricity, NEVER place your CPU fan and heatsink vendors. 7 ASRock P4V88/P4V88+ Motherboard English STEP 4: When the CPU is locked. STEP 3: Carefully insert the CPU into the socket to do not touch the ICs. 4. Whenever you...before touching any component, place it on a grounded antstatic pad or in place, press it firmly on the side tab to the instruction manuals of the pins. The CPU fits only in place. For proper installation, please kindly refer to indicate that it fits in one correct ...
Quick Installation Guide
Page 18
...press during the Power-On-Self-Test (POST) to display the menus. 18 ASRock P4V88/P4V88+ Motherboard English BIOS Information The Flash Memory on the system chassis. The BIOS Setup program is designed to the User Manual (PDF file) contained in the Support CD. 4. If you wish to select... among the predetermined choices. Software Support CD information This motherboard supports various Microsoft® Windows® operating systems: 98 SE/ ME ...
...press during the Power-On-Self-Test (POST) to display the menus. 18 ASRock P4V88/P4V88+ Motherboard English BIOS Information The Flash Memory on the system chassis. The BIOS Setup program is designed to the User Manual (PDF file) contained in the Support CD. 4. If you wish to select... among the predetermined choices. Software Support CD information This motherboard supports various Microsoft® Windows® operating systems: 98 SE/ ME ...
User Manual
Page 5
... be updated, the content of this manual, chapter 1 and 2 contain introduction of the Support CD. You may find the latest memory and CPU support lists on ASRock website without notice. ASRock website http://www.asrock.com 1.1 Package Contents ASRock P4V88 Motherboard (ATX Form Factor: 12.0-in x...contain the configuration guide to BIOS setup and information of the motherboard and step-bystep guide to quality and endurance. 1. Introduction Thank you for a 3.5-in , 30.5 cm x 21.8 cm) ASRock P4V88 Quick Installation Guide ASRock P4V88 Support CD One 80-conductor Ultra ATA 66/100/133 IDE...
... be updated, the content of this manual, chapter 1 and 2 contain introduction of the Support CD. You may find the latest memory and CPU support lists on ASRock website without notice. ASRock website http://www.asrock.com 1.1 Package Contents ASRock P4V88 Motherboard (ATX Form Factor: 12.0-in x...contain the configuration guide to BIOS setup and information of the motherboard and step-bystep guide to quality and endurance. 1. Introduction Thank you for a 3.5-in , 30.5 cm x 21.8 cm) ASRock P4V88 Quick Installation Guide ASRock P4V88 Support CD One 80-conductor Ultra ATA 66/100/133 IDE...
User Manual
Page 11
... DO NOT force the CPU into the socket until it firmly on the side tab to avoid bending of CPU Fan and Heatsink This motherboard adopts 478-pin CPU socket to improve heat dissipation. Lift Lever Up to 90° CPU Marked Corner Socket Marked Corner STEP 1: Lift... socket by lifting the lever up to the CPU_FAN connector (CPU_FAN1, see p.8 No. 2). It requires larger heatsink and cooling fan to the instruction manuals of the socket lever. For proper installation, please kindly refer to dissipate heat. 2.1 CPU Installation Step 1. Position the CPU directly above the socket ...
... DO NOT force the CPU into the socket until it firmly on the side tab to avoid bending of CPU Fan and Heatsink This motherboard adopts 478-pin CPU socket to improve heat dissipation. Lift Lever Up to 90° CPU Marked Corner Socket Marked Corner STEP 1: Lift... socket by lifting the lever up to the CPU_FAN connector (CPU_FAN1, see p.8 No. 2). It requires larger heatsink and cooling fan to the instruction manuals of the socket lever. For proper installation, please kindly refer to dissipate heat. 2.1 CPU Installation Step 1. Position the CPU directly above the socket ...


