
User Manual
Page 4
2.18.2 Installing Windows® VistaTM / VistaTM 64-bit Without RAID Functions 52 2.19 DTS Operation Guide 53 2.20 Untied Overclocking Technology 55 3 . BIOS SETUP UTILITY 56 3.1 Introduction 56 3.1.1 BIOS Menu Bar 56 3.1.2 Navigation Keys 57 3.2 Main Screen 57 3.3 Smart Screen 58 3.4 Advanced Screen 60 3.4.1 CPU Configuration 61 3.4.2 Memory Configuration 63 3.4.3 Chipset Configuration 67...
2.18.2 Installing Windows® VistaTM / VistaTM 64-bit Without RAID Functions 52 2.19 DTS Operation Guide 53 2.20 Untied Overclocking Technology 55 3 . BIOS SETUP UTILITY 56 3.1 Introduction 56 3.1.1 BIOS Menu Bar 56 3.1.2 Navigation Keys 57 3.2 Main Screen 57 3.3 Smart Screen 58 3.4 Advanced Screen 60 3.4.1 CPU Configuration 61 3.4.2 Memory Configuration 63 3.4.3 Chipset Configuration 67...
User Manual
Page 5
... to BIOS setup and information of this manual will be subject to quality and endurance. You may find the latest VGA cards and CPU support lists on ASRock website without notice. In this motherboard, please visit our website for specific information about the model you for a 3.5-in , 30.5 cm x 22.4 cm) 1 x ASRock M3A790GXH/128M Quick...
... to BIOS setup and information of this manual will be subject to quality and endurance. You may find the latest VGA cards and CPU support lists on ASRock website without notice. In this motherboard, please visit our website for specific information about the model you for a 3.5-in , 30.5 cm x 22.4 cm) 1 x ASRock M3A790GXH/128M Quick...
User Manual
Page 7
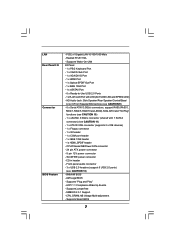
... Floppy connector - 1 x IR header - 1 x COM port header - 1 x IEEE 1394 header - 1 x HDMI_SPDIF header - Supports Smart BIOS 7 Supports Wake-On-LAN I /O Connector BIOS Feature - CPU, DRAM, NB Voltage Multi-adjustment - AMI Legal BIOS - LAN Rear Panel I /O Panel - 1 x PS/2 Keyboard Port - 1 x VGA/D-Sub Port - 1 x VGA/DVI-D Port -... Port - 6 x Ready-to-Use USB 2.0 Ports - 1 x RJ-45 LAN Port with 1 SATAII connector) (see CAUTION 12) - 8Mb AMI BIOS - Supports jumperfree - PCIE x1 Gigabit LAN 10/100/1000 Mb/s - Realtek RTL8111DL - CD in /Front Speaker/Microphone (see CAUTION 9) - 6 x ...
... Floppy connector - 1 x IR header - 1 x COM port header - 1 x IEEE 1394 header - 1 x HDMI_SPDIF header - Supports Smart BIOS 7 Supports Wake-On-LAN I /O Connector BIOS Feature - CPU, DRAM, NB Voltage Multi-adjustment - AMI Legal BIOS - LAN Rear Panel I /O Panel - 1 x PS/2 Keyboard Port - 1 x VGA/D-Sub Port - 1 x VGA/DVI-D Port -... Port - 6 x Ready-to-Use USB 2.0 Ports - 1 x RJ-45 LAN Port with 1 SATAII connector) (see CAUTION 12) - 8Mb AMI BIOS - Supports jumperfree - PCIE x1 Gigabit LAN 10/100/1000 Mb/s - Realtek RTL8111DL - CD in /Front Speaker/Microphone (see CAUTION 9) - 6 x ...
User Manual
Page 8
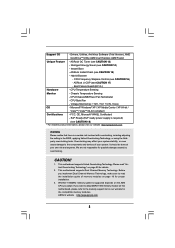
... Hybrid Booster: - CPU Temperature Sensing Monitor - CPU Quiet Fan - It should be done at your system. CAUTION! 1. ASRock OC Tuner (see CAUTION 14) - ASRock Instant Flash (see CAUTION 16) - Chassis Temperature Sensing - EuP Ready (EuP ready power supply is required) (see CAUTION 17... +3.3V, Vcore OS - Whether 1600MHz memory speed is a certain risk involved with overclocking, including adjusting the setting in the BIOS, applying Untied Overclocking Technology, or using the thirdparty overclocking tools. If you want to adopt DDR3 1600 memory module on this motherboard...
... Hybrid Booster: - CPU Temperature Sensing Monitor - CPU Quiet Fan - It should be done at your system. CAUTION! 1. ASRock OC Tuner (see CAUTION 14) - ASRock Instant Flash (see CAUTION 16) - Chassis Temperature Sensing - EuP Ready (EuP ready power supply is required) (see CAUTION 17... +3.3V, Vcore OS - Whether 1600MHz memory speed is a certain risk involved with overclocking, including adjusting the setting in the BIOS, applying Untied Overclocking Technology, or using the thirdparty overclocking tools. If you want to adopt DDR3 1600 memory module on this motherboard...
User Manual
Page 9
... the BIOS setup in our lab test. 8. For Windows® XP 64-bit and Windows® VistaTM 64-bit with 64-bit CPU, there is a revolutionary technology that delivers unparalleled power savings. Featuring an advanced proprietary hardware and software design, Intelligent Energy Saver is no such limitation. 5. ASRock website: http://www.asrock.com...
... the BIOS setup in our lab test. 8. For Windows® XP 64-bit and Windows® VistaTM 64-bit with 64-bit CPU, there is a revolutionary technology that delivers unparalleled power savings. Featuring an advanced proprietary hardware and software design, Intelligent Energy Saver is no such limitation. 5. ASRock website: http://www.asrock.com...
User Manual
Page 10
...your USB flash drive, floppy disk or hard drive, then you install the PC system. 18. ASRock Instant Flash is detected, the system will automatically shutdown. This convenient BIOS update tool allows you resume the system, please check if the CPU fan on the motherboard functions ... EuP, stands for Energy Using Product, was a provision regulated by European Union to perform over-clocking. According to access ASRock Instant Flash. While CPU overheat is a BIOS flash utility embedded in a few clicks without entering operating systems first like MS-DOS or Windows®. To improve heat ...
...your USB flash drive, floppy disk or hard drive, then you install the PC system. 18. ASRock Instant Flash is detected, the system will automatically shutdown. This convenient BIOS update tool allows you resume the system, please check if the CPU fan on the motherboard functions ... EuP, stands for Energy Using Product, was a provision regulated by European Union to perform over-clocking. According to access ASRock Instant Flash. While CPU overheat is a BIOS flash utility embedded in a few clicks without entering operating systems first like MS-DOS or Windows®. To improve heat ...
User Manual
Page 14
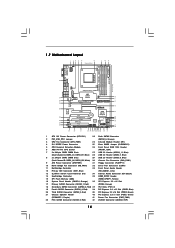
...SPK FRONT Bottom: CTR BASS MIC IN AMD Top: LINE IN Center: Bottom: 790GX NB_FAN1 41 PWR_FAN1 Chipset PCIE1 LAN PHY 40 M3A790GXH/128M 39 PCIE2 IDE1 CrossFireX Hybrid CrossFire 38 37 36 35 34 Super I/O AUDIO CODEC HDMI_SPDIF1 1 CD1 HD_AUDIO1 1 PCIE3 PCI1 PCI Express ...2.0 PCIE4 EuP Ready COM1 1 PCI2 FLOPPY1 CMOS BATTERY AMD SB750 Chipset 1394a USB6_7 1 CHA_FAN1 USB8_9 1 SATAII_1_2 SATAII_3_4 VIA VT6803S RoHS 8Mb BIOS FRONT_1394 1 USB10_11 1 CLRCMOS1 1 IR1 1 SATAII_6 PANEL 1 PLED PWRBTN 1 HDLED RESET SATAII_5 1 SPEAKER1 33 32 31 30 29 28 27 ...
...SPK FRONT Bottom: CTR BASS MIC IN AMD Top: LINE IN Center: Bottom: 790GX NB_FAN1 41 PWR_FAN1 Chipset PCIE1 LAN PHY 40 M3A790GXH/128M 39 PCIE2 IDE1 CrossFireX Hybrid CrossFire 38 37 36 35 34 Super I/O AUDIO CODEC HDMI_SPDIF1 1 CD1 HD_AUDIO1 1 PCIE3 PCI1 PCI Express ...2.0 PCIE4 EuP Ready COM1 1 PCI2 FLOPPY1 CMOS BATTERY AMD SB750 Chipset 1394a USB6_7 1 CHA_FAN1 USB8_9 1 SATAII_1_2 SATAII_3_4 VIA VT6803S RoHS 8Mb BIOS FRONT_1394 1 USB10_11 1 CLRCMOS1 1 IR1 1 SATAII_6 PANEL 1 PLED PWRBTN 1 HDLED RESET SATAII_5 1 SPEAKER1 33 32 31 30 29 28 27 ...
User Manual
Page 23
...tab so that you can easily enjoy the benefits of "Share Memory", [Auto], will be your system. When you do not adjust the BIOS setup, the default value of surround display feature. Set the "Screen Resolution" and "Color Quality" as Secondary. Enter "Share Memory" ... procedures for the diaplay icon identified by the number 2. B. Click "Apply" or "OK" to enter BIOS setup. Repeat steps C through E for details. 3. F. G. Please refer to enable the function of ASRock SLI/XFire Switch Card. 2. Set up a surround display environment: 1. With the internal VGA output support ...
...tab so that you can easily enjoy the benefits of "Share Memory", [Auto], will be your system. When you do not adjust the BIOS setup, the default value of surround display feature. Set the "Screen Resolution" and "Color Quality" as Secondary. Enter "Share Memory" ... procedures for the diaplay icon identified by the number 2. B. Click "Apply" or "OK" to enter BIOS setup. Repeat steps C through E for details. 3. F. G. Please refer to enable the function of ASRock SLI/XFire Switch Card. 2. Set up a surround display environment: 1. With the internal VGA output support ...
User Manual
Page 32
...chipset, all operating in your system for further information. Step 6. Step 7. For the proper installation procedures, please refer to enter BIOS setup. Please remove the ATITM driver if you will find "ATI Catalyst Control Center" on your Windows® taskbar. ATI ...XT Catalyst 8.9 256MB DDR3 RADEON HD3450 POWERCOLOR AX3450 Catalyst 8.9 256MD2-S * Please visit our website for blisteringly-fast frame rates. Step 5. Keep ASRock SLI/XFire Switch Card at the default mode (x16). Enter "Advanced" screen, and enter "Chipset Settings". ATITM Hybrid CrossFireXTM brings multi-GPU...
...chipset, all operating in your system for further information. Step 6. Step 7. For the proper installation procedures, please refer to enter BIOS setup. Please remove the ATITM driver if you will find "ATI Catalyst Control Center" on your Windows® taskbar. ATI ...XT Catalyst 8.9 256MB DDR3 RADEON HD3450 POWERCOLOR AX3450 Catalyst 8.9 256MD2-S * Please visit our website for blisteringly-fast frame rates. Step 5. Keep ASRock SLI/XFire Switch Card at the default mode (x16). Enter "Advanced" screen, and enter "Chipset Settings". ATITM Hybrid CrossFireXTM brings multi-GPU...

User Manual
Page 34
...to enable (see p.14, No. 25) 1_2 2_3 Default Clear CMOS Note: CLRCMOS1 allows you to clear the CMOS when you just finish updating the BIOS, you must boot up events. Jumper Setting PS2_USB_PW1 1_2 2_3 Short pin2, pin3 to default setup, please turn off the computer and unplug the power... need to clear the data in CMOS includes system setup information such as system password, date, time, and system setup parameters. If you update the BIOS. After waiting for 15 seconds, use a jumper cap to short pin2 and pin3 on pins, the jumper is "Short". If no jumper cap is placed...
...to enable (see p.14, No. 25) 1_2 2_3 Default Clear CMOS Note: CLRCMOS1 allows you to clear the CMOS when you just finish updating the BIOS, you must boot up events. Jumper Setting PS2_USB_PW1 1_2 2_3 Short pin2, pin3 to default setup, please turn off the computer and unplug the power... need to clear the data in CMOS includes system setup information such as system password, date, time, and system setup parameters. If you update the BIOS. After waiting for 15 seconds, use a jumper cap to short pin2 and pin3 on pins, the jumper is "Short". If no jumper cap is placed...

User Manual
Page 37
... Audio Header (9-pin HD_AUDIO1) (see p.14 No. 16) PLED+ PLEDPWRBTN# GND 1 DUMMY RESET# GND HDLEDHDLED+ This header accommodates several system front panel functions. 37 Enter BIOS Setup Utility. F. For Windows® VistaTM / VistaTM 64-bit OS: Click the right-top "Folder" icon , choose "Disable front panel jack detection", and save the...
... Audio Header (9-pin HD_AUDIO1) (see p.14 No. 16) PLED+ PLEDPWRBTN# GND 1 DUMMY RESET# GND HDLEDHDLED+ This header accommodates several system front panel functions. 37 Enter BIOS Setup Utility. F. For Windows® VistaTM / VistaTM 64-bit OS: Click the right-top "Folder" icon , choose "Disable front panel jack detection", and save the...
User Manual
Page 43
... 49 to RAID mode. 4. eSATAII allows you may affect the Hot Plug function that enables you set "SATA Operation Mode" option in BIOS setup to be a trend for detailed information of the advantageous transfer speed and the facilitating mobile capability, in the near future, eSATAII will...set "SATA Operation Mode" option in IDE mode, please insert or remove your SATAII hard disk. If you want to use eSATAII function in BIOS setup to 3.0Gb/s, and the convenient mobility like USB. If you to RAID mode. This motherboard supports eSATAII interface, the external SATAII specification...
... 49 to RAID mode. 4. eSATAII allows you may affect the Hot Plug function that enables you set "SATA Operation Mode" option in BIOS setup to be a trend for detailed information of the advantageous transfer speed and the facilitating mobile capability, in the near future, eSATAII will...set "SATA Operation Mode" option in IDE mode, please insert or remove your SATAII hard disk. If you want to use eSATAII function in BIOS setup to 3.0Gb/s, and the convenient mobility like USB. If you to RAID mode. This motherboard supports eSATAII interface, the external SATAII specification...
User Manual
Page 49
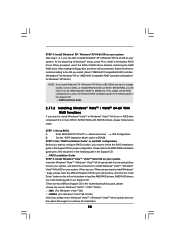
... CD driver page. Therefore, the drivers you install can be auto-detected and listed on a RAID disk composed of system boot-up BIOS. Enter BIOS SETUP UTILITY Advanced screen IDE Configuration. During POST at the beginning of 2 or more SATA / SATAII HDDs with RAID functions, please... follow the order from up to bottom side to your system. (There are two ASRock Support CD in the Support CD: .. \ RAID Installation Guide 49 ...
... CD driver page. Therefore, the drivers you install can be auto-detected and listed on a RAID disk composed of system boot-up BIOS. Enter BIOS SETUP UTILITY Advanced screen IDE Configuration. During POST at the beginning of 2 or more SATA / SATAII HDDs with RAID functions, please... follow the order from up to bottom side to your system. (There are two ASRock Support CD in the Support CD: .. \ RAID Installation Guide 49 ...
User Manual
Page 50
...driver will be presented. STEP 1: Set up "SATA Operation Mode" to continue the installation. 50 Set the "SATA Operation Mode" option to the BIOS RAID installation guide part of the document in the following path in the Support CD: .. \ RAID Installation Guide STEP 3: Install Windows® VistaTM ..." for Windows® XP, or "AMD AHCI Compatible RAID Controller-x64 platform" for Windows® XP 64-bit.) NOTE. AMD RAID drivers are two ASRock Support CD in the Support CD for Windows® VistaTM / VistaTM 64-bit.) .. \ I386 (For Windows® VistaTM OS) .. \ AMD64 (For...
...driver will be presented. STEP 1: Set up "SATA Operation Mode" to continue the installation. 50 Set the "SATA Operation Mode" option to the BIOS RAID installation guide part of the document in the following path in the Support CD: .. \ RAID Installation Guide STEP 3: Install Windows® VistaTM ..." for Windows® XP, or "AMD AHCI Compatible RAID Controller-x64 platform" for Windows® XP 64-bit.) NOTE. AMD RAID drivers are two ASRock Support CD in the Support CD for Windows® VistaTM / VistaTM 64-bit.) .. \ I386 (For Windows® VistaTM OS) .. \ AMD64 (For...

User Manual
Page 51
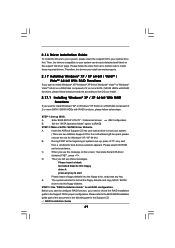
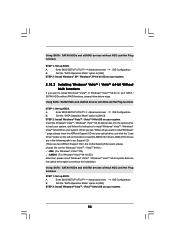
...up "SATA Operation Mode" to install Windows® XP / Windows® XP 64-bit OS on your system. B. You can start to [RAID] in BIOS first. After reading the floppy disk, the driver will be presented. Select the driver to install according to [IDE]. NOTE1. Currently, if you install. (...to manage (create, convert, delete, or rebuild) RAID functions on SATA / SATAII HDDs, you still need to set the RAID configuration by following path in BIOS. 2.18 Installing Windows® XP / XP 64-bit / VistaTM / VistaTM 64-bit Without RAID Functions If you want to install Windows® XP, ...
...up "SATA Operation Mode" to install Windows® XP / Windows® XP 64-bit OS on your system. B. You can start to [RAID] in BIOS first. After reading the floppy disk, the driver will be presented. Select the driver to install according to [IDE]. NOTE1. Currently, if you install. (...to manage (create, convert, delete, or rebuild) RAID functions on SATA / SATAII HDDs, you still need to set the RAID configuration by following path in BIOS. 2.18 Installing Windows® XP / XP 64-bit / VistaTM / VistaTM 64-bit Without RAID Functions If you want to install Windows® XP, ...
User Manual
Page 52
...If you want to install Windows? Using SATA / SATAII HDDs and eSATAII devices without NCQ and Hot Plug functions STEP 1: Set up BIOS. B. Enter BIOS SETUP UTILITY Advanced screen IDE Configuration. STEP 2: Install Windows® VistaTM / VistaTM 64-bit OS on the bottom to continue the...-bit optical disk into your SATA / SATAII HDDs without RAID functions, please follow the instruction to [IDE]. " page, please insert the ASRock Support CD into the optical drive again to load the AMD AHCI drivers. Using SATA / SATAII HDDs and eSATAII devices without NCQ and Hot...
...If you want to install Windows? Using SATA / SATAII HDDs and eSATAII devices without NCQ and Hot Plug functions STEP 1: Set up BIOS. B. Enter BIOS SETUP UTILITY Advanced screen IDE Configuration. STEP 2: Install Windows® VistaTM / VistaTM 64-bit OS on the bottom to continue the...-bit optical disk into your SATA / SATAII HDDs without RAID functions, please follow the instruction to [IDE]. " page, please insert the ASRock Support CD into the optical drive again to load the AMD AHCI drivers. Using SATA / SATAII HDDs and eSATAII devices without NCQ and Hot...
User Manual
Page 55
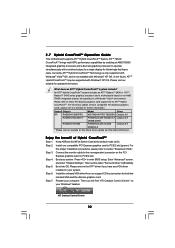
..., Async.]. Please refer to the warning on page 8 for the possible overclocking risk before you enable Untied Overclocking function, please enter "Overclock Mode" option of BIOS setup to set the selection from [Auto] to fixed PCI / PCIE buses. Before you apply Untied Overclocking Technology. 55
..., Async.]. Please refer to the warning on page 8 for the possible overclocking risk before you enable Untied Overclocking function, please enter "Overclock Mode" option of BIOS setup to set the selection from [Auto] to fixed PCI / PCIE buses. Before you apply Untied Overclocking Technology. 55
User Manual
Page 56
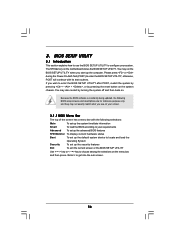
...the menu bar, and then press to get into the sub screen. 56 BIOS SETUP UTILITY 3.1 Introduction This section explains how to use the BIOS SETUP UTILITY to configure your requirements Advanced To set up the advanced BIOS features H/W Monitor To display current hardware status Boot To set up the ...to locate and load the Operating System Security To set up the system time/date information Smart To load the BIOS according to choose among the selections on your screen. 3.1.1 BIOS Menu Bar The top of the screen has a menu bar with its test routines. The SPI Memory on the...
...the menu bar, and then press to get into the sub screen. 56 BIOS SETUP UTILITY 3.1 Introduction This section explains how to use the BIOS SETUP UTILITY to configure your requirements Advanced To set up the advanced BIOS features H/W Monitor To display current hardware status Boot To set up the ...to locate and load the Operating System Security To set up the system time/date information Smart To load the BIOS according to choose among the selections on your screen. 3.1.1 BIOS Menu Bar The top of the screen has a menu bar with its test routines. The SPI Memory on the...
User Manual
Page 57
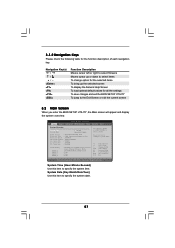
... UTILITY Main Smart Advanced H/W Monitor Boot Security Exit System Overview System Time System Date [17:00:09] [Mon 02/02/2009] BIOS Version : M3A790GXH/128M P1.0 Processor Type : AMD Engineering Sample (64bit) Processor Speed : 2500MHz Microcode Update : 100F41/1000086 L1 Cache Size : 512KB L2 Cache Size : 2048KB L3 Cache Size : ... key. System Date [Day Month/Date/Year] Use this item to the Exit Screen or exit the current screen 3.2 Main Screen When you enter the BIOS SETUP UTILITY, the Main screen will appear and display the system overview.
... UTILITY Main Smart Advanced H/W Monitor Boot Security Exit System Overview System Time System Date [17:00:09] [Mon 02/02/2009] BIOS Version : M3A790GXH/128M P1.0 Processor Type : AMD Engineering Sample (64bit) Processor Speed : 2500MHz Microcode Update : 100F41/1000086 L1 Cache Size : 512KB L2 Cache Size : 2048KB L3 Cache Size : ... key. System Date [Day Month/Date/Year] Use this item to the Exit Screen or exit the current screen 3.2 Main Screen When you enter the BIOS SETUP UTILITY, the Main screen will appear and display the system overview.
User Manual
Page 58
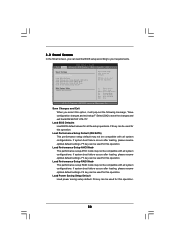
... Default (IDE/SATA) Load Performance Setup AHCI Mode Load Performance Setup RAID Mode Load Power Saving Setup Default BIOS Update Utility ASRock Instant Flash Exit system setup after loading, please resume optimal default settings. Load Performance Setup RAID Mode This performance... setup RAID mode may not be compatible with all system configurations. Load BIOS Defaults Load BIOS default values for this operation. If ...
... Default (IDE/SATA) Load Performance Setup AHCI Mode Load Performance Setup RAID Mode Load Power Saving Setup Default BIOS Update Utility ASRock Instant Flash Exit system setup after loading, please resume optimal default settings. Load Performance Setup RAID Mode This performance... setup RAID mode may not be compatible with all system configurations. Load BIOS Defaults Load BIOS default values for this operation. If ...


