User Manual
Page 7
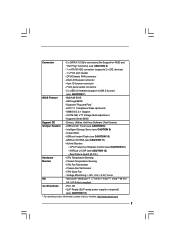
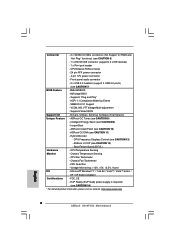
... 64-bit / XP / XP 64-bit compliant Certifications - CPU/Chassis FAN connector - 24 pin ATX power connector - 4 pin 12V power connector - Instant Boot - ASRock U-COP (see CAUTION 7) BIOS Feature - 8Mb AMI BIOS - Hybrid Booster: - Chassis Temperature Sensing - Chassis Fan Tachometer - FCC, CE - Front panel audio connector - 2 x USB 2.0 headers (support 4 USB 2.0 ports) (see...
... 64-bit / XP / XP 64-bit compliant Certifications - CPU/Chassis FAN connector - 24 pin ATX power connector - 4 pin 12V power connector - Instant Boot - ASRock U-COP (see CAUTION 7) BIOS Feature - 8Mb AMI BIOS - Hybrid Booster: - Chassis Temperature Sensing - Chassis Fan Tachometer - FCC, CE - Front panel audio connector - 2 x USB 2.0 headers (support 4 USB 2.0 ports) (see...
User Manual
Page 8
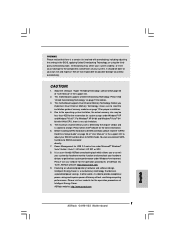
... without sacrificing computing performance. Power Management for system usage under Windows® XP and Windows® VistaTM. ASRock website: http://www.asrock.com 9. WARNING Please realize that delivers unparalleled power savings. Overclocking may be done at your SATAII hard disk... drive to SATAII mode. This motherboard supports Untied Overclocking Technology. Featuring an advanced proprietary hardware and software design, Intelligent Energy Saver is a user-friendly ASRock overclocking tool which allows you implement Dual Channel Memory Technology, make sure to...
... without sacrificing computing performance. Power Management for system usage under Windows® XP and Windows® VistaTM. ASRock website: http://www.asrock.com 9. WARNING Please realize that delivers unparalleled power savings. Overclocking may be done at your SATAII hard disk... drive to SATAII mode. This motherboard supports Untied Overclocking Technology. Featuring an advanced proprietary hardware and software design, Intelligent Energy Saver is a user-friendly ASRock overclocking tool which allows you implement Dual Channel Memory Technology, make sure to...
User Manual
Page 23
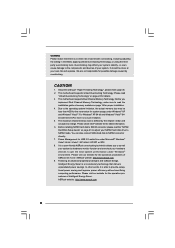
...for details: http://www.hitachigst.com/hdd/support/download.htm The above examples are shorted, SATA 1.5Gb/s will be the same. HITACHI Please use the Feature Tool, a DOS-bootable tool, for the updates. 23 2 . 9 SATAII Hard Disk Setup Guide Before installing SATAII hard disk to your reference. ...'s website for your computer, please carefully read below instruction with the best performance. Please visit the vendors' website for changing various ATA features. On the other hand, if you want to enable SATAII 3.0Gb/s, please remove the jumpers from pin 5 and pin 6.
...for details: http://www.hitachigst.com/hdd/support/download.htm The above examples are shorted, SATA 1.5Gb/s will be the same. HITACHI Please use the Feature Tool, a DOS-bootable tool, for the updates. 23 2 . 9 SATAII Hard Disk Setup Guide Before installing SATAII hard disk to your reference. ...'s website for your computer, please carefully read below instruction with the best performance. Please visit the vendors' website for changing various ATA features. On the other hand, if you want to enable SATAII 3.0Gb/s, please remove the jumpers from pin 5 and pin 6.

User Manual
Page 25
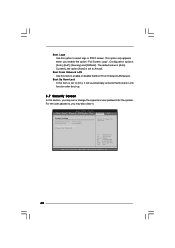
erating System Security To set up the security features Exit To exit the current screen or the BIOS SETUP UTILITY Use < > key or < > key to choose among the selections on the menu bar, and ... is constantly being updated, the following selections: Main To set up the system time/date information OC Tweaker To set up overclocking features Advanced To set up the advanced BIOS features H/W Monitor To display current hardware status Boot To set up the computer. If you start up the default system device to...
erating System Security To set up the security features Exit To exit the current screen or the BIOS SETUP UTILITY Use < > key or < > key to choose among the selections on the menu bar, and ... is constantly being updated, the following selections: Main To set up the system time/date information OC Tweaker To set up overclocking features Advanced To set up the advanced BIOS features H/W Monitor To display current hardware status Boot To set up the computer. If you start up the default system device to...
User Manual
Page 27
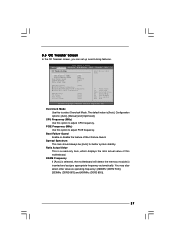
Overclock Mode Use this option to select Overclock Mode. Boot Failure Guard Enable or disable the feature of this option to Sub Screen F1 General Help F9 Load Defaults F10 Save and Exit ESC Exit v02.54 (C) Copyright 1985-2005, American Megatrends, ...] [Auto] [Auto] Select Screen Select Item Enter Go to adjust CPU frequency. 3.3 OC Tweaker Screen In the OC Tweaker screen, you can set up overclocking features. CPU Frequency (MHz) Use this motherboard. Configuration options: [Auto], [Manual] and [Optimized].
Overclock Mode Use this option to select Overclock Mode. Boot Failure Guard Enable or disable the feature of this option to Sub Screen F1 General Help F9 Load Defaults F10 Save and Exit ESC Exit v02.54 (C) Copyright 1985-2005, American Megatrends, ...] [Auto] [Auto] Select Screen Select Item Enter Go to adjust CPU frequency. 3.3 OC Tweaker Screen In the OC Tweaker screen, you can set up overclocking features. CPU Frequency (MHz) Use this motherboard. Configuration options: [Auto], [Manual] and [Optimized].

User Manual
Page 34
...], [1.05V], [1.11V], [1.23V] and [1.30V]. VTT Voltage Use this to select DRAM Voltage. The default value of this feature is [Auto]. DRAM Voltage Use this to select VTT Voltage. The default value of this feature is [Auto]. Configuration options: [Auto], [0.67 x Vtt], [0.65 x Vtt], [0.63 x Vtt] and [0.615 x Vtt]....user defaults? In this to your own requirements. 34 The default value of this to [2.201V]. The default value of this feature is [Auto]. GLTRef Voltage Use this feature is [Auto]. Configuration options: [Auto], [1.10V], [1.20V], [1.37V] and [1.46V].
...], [1.05V], [1.11V], [1.23V] and [1.30V]. VTT Voltage Use this to select DRAM Voltage. The default value of this feature is [Auto]. DRAM Voltage Use this to select VTT Voltage. The default value of this feature is [Auto]. Configuration options: [Auto], [0.67 x Vtt], [0.65 x Vtt], [0.63 x Vtt] and [0.615 x Vtt]....user defaults? In this to your own requirements. 34 The default value of this to [2.201V]. The default value of this feature is [Auto]. GLTRef Voltage Use this feature is [Auto]. Configuration options: [Auto], [1.10V], [1.20V], [1.37V] and [1.46V].

User Manual
Page 36
... (NX) Memory Protection Technology is an enhancement to [Enabled], a VMM (Virtual Machine Architecture) can prevent data pages from overheated. Hyper Threading Technology To enable this feature, it requires a computer system with "No Execute (NX) Memory Protection" can utilize the additional hardware capabilities provided by malicious software to enable or disable the...
... (NX) Memory Protection Technology is an enhancement to [Enabled], a VMM (Virtual Machine Architecture) can prevent data pages from overheated. Hyper Threading Technology To enable this feature, it requires a computer system with "No Execute (NX) Memory Protection" can utilize the additional hardware capabilities provided by malicious software to enable or disable the...
User Manual
Page 38
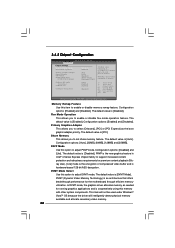
... is [Auto]. The default value is [PCI]. PAVP Mode Use this memory with other system components. Memory Remap Feature Use this option to support increased content protection and robustness requirements for the motherboard through efficient memory utilization. DVMT Mode ... not allow remapping of overlapped PCI memory above the total physical memory. 3.4.2 Chipset Configuration BIOS SETUP UTILITY Advanced Chipset Settings Memory Remap Feature Fixed Mode Operation [Disabled] [Enabled] Primary Graphics Adapter Shared Memory PAVP Mode DVMT Mode Select DVMT/FIXED Memory [PCI] [Auto]...
... is [Auto]. The default value is [PCI]. PAVP Mode Use this memory with other system components. Memory Remap Feature Use this option to support increased content protection and robustness requirements for the motherboard through efficient memory utilization. DVMT Mode ... not allow remapping of overlapped PCI memory above the total physical memory. 3.4.2 Chipset Configuration BIOS SETUP UTILITY Advanced Chipset Settings Memory Remap Feature Fixed Mode Operation [Disabled] [Enabled] Primary Graphics Adapter Shared Memory PAVP Mode DVMT Mode Select DVMT/FIXED Memory [PCI] [Auto]...

User Manual
Page 39
... [Enabled]. Onboard HD Audio Select [Auto], [Enabled] or [Disabled] for the onboard HD Audio Front Panel. If you to enable or disable the "OnBoard Lan" feature. Intelligent Energy Saver Intelligent Energy Saver is plugged. OnBoard Lan This allows you want to enable this function, please set DVMT Mode Select as [DVMT...
... [Enabled]. Onboard HD Audio Select [Auto], [Enabled] or [Disabled] for the onboard HD Audio Front Panel. If you to enable or disable the "OnBoard Lan" feature. Intelligent Energy Saver Intelligent Energy Saver is plugged. OnBoard Lan This allows you want to enable this function, please set DVMT Mode Select as [DVMT...

User Manual
Page 40
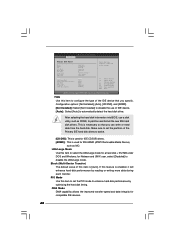
... suspend to RAM.) Check Ready Bit Use this item to auto-detect or disable the Suspend-toRAM feature. Repost Video on STR Resume This feature allows you to RAM Use this feature if the OS supports it. Suspend to repost video on the system from the power-soft-off mode...Power On RTC Alarm Power On ACPI HPET Table [Disabled] [Power Off] [Disabled] [Disabled] [Disabled] [Disabled] [Disabled] Select auto-detect or disable the STR feature. +F1 F9 F10 ESC Select Screen Select Item Change Option General Help Load Defaults Save and Exit Exit v02.54 (C) Copyright 1985-2005, American Megatrends...
... suspend to RAM.) Check Ready Bit Use this item to auto-detect or disable the Suspend-toRAM feature. Repost Video on STR Resume This feature allows you to RAM Use this feature if the OS supports it. Suspend to repost video on the system from the power-soft-off mode...Power On RTC Alarm Power On ACPI HPET Table [Disabled] [Power Off] [Disabled] [Disabled] [Disabled] [Disabled] [Disabled] Select auto-detect or disable the STR feature. +F1 F9 F10 ESC Select Screen Select Item Change Option General Help Load Defaults Save and Exit Exit v02.54 (C) Copyright 1985-2005, American Megatrends...
User Manual
Page 42
If this feature is used for IDE CD/DVD drives. [ARMD]: This is enabled, it will enhance hard disk performance by optimizing the hard disk timing. LBA/Large ...
If this feature is used for IDE CD/DVD drives. [ARMD]: This is enabled, it will enhance hard disk performance by optimizing the hard disk timing. LBA/Large ...
User Manual
Page 43
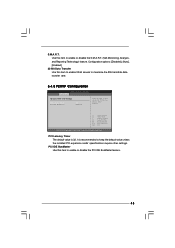
...], [Auto], [Enabled]. 32-Bit Data Transfer Use this item to enable 32-bit access to enable or disable the S.M.A.R.T. (Self-Monitoring, Analysis, and Reporting Technology) feature. S.M.A.R.T. Use this item to keep the default value unless the installed PCI expansion cards' specifications require other settings. PCI IDE BusMaster Use this item to... (C) Copyright 1985-2005, American Megatrends, Inc. It is 32. PCI Latency Timer The default value is recommended to enable or disable the PCI IDE BusMaster feature. 43
...], [Auto], [Enabled]. 32-Bit Data Transfer Use this item to enable 32-bit access to enable or disable the S.M.A.R.T. (Self-Monitoring, Analysis, and Reporting Technology) feature. S.M.A.R.T. Use this item to keep the default value unless the installed PCI expansion cards' specifications require other settings. PCI IDE BusMaster Use this item to... (C) Copyright 1985-2005, American Megatrends, Inc. It is 32. PCI Latency Timer The default value is recommended to enable or disable the PCI IDE BusMaster feature. 43
User Manual
Page 48
... when you enable the option "Full Screen Logo". Currently, the option [Auto] is set to enable or disable the Boot From Onboard LAN feature. The default value is set or change the supervisor/user password for the system. Boot From Onboard LAN Use this item to Aircraft. BIOS ...or Change the password. For the user password, you may set to select logo in POST screen. Configuration options: [Auto], [EuP], [Scenery] and [ASRock]. Select Screen Select Item Enter Change F1 General Help F9 Load Defaults F10 Save and Exit ESC Exit v02.54 (C) Copyright 1985-2005, American Megatrends...
... when you enable the option "Full Screen Logo". Currently, the option [Auto] is set to enable or disable the Boot From Onboard LAN feature. The default value is set or change the supervisor/user password for the system. Boot From Onboard LAN Use this item to Aircraft. BIOS ...or Change the password. For the user password, you may set to select logo in POST screen. Configuration options: [Auto], [EuP], [Scenery] and [ASRock]. Select Screen Select Item Enter Change F1 General Help F9 Load Defaults F10 Save and Exit ESC Exit v02.54 (C) Copyright 1985-2005, American Megatrends...
User Manual
Page 50
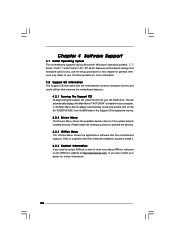
...-bit / XP / XP 64-bit. Because motherboard settings and hardware options vary, use the setup procedures in this chapter for more about ASRock, welcome to your CD-ROM drive. Please install the necessary drivers to display the menus. 4.2.2 Drivers Menu The Drivers Menu shows the available...is enabled in the Support CD to activate the devices. 4.2.3 Utilities Menu The Utilities Menu shows the applications software that enhance the motherboard features. 4.2.1 Running The Support CD To begin using the support CD, insert the CD into your OS documentation for general reference only. ...
...-bit / XP / XP 64-bit. Because motherboard settings and hardware options vary, use the setup procedures in this chapter for more about ASRock, welcome to your CD-ROM drive. Please install the necessary drivers to display the menus. 4.2.2 Drivers Menu The Drivers Menu shows the available...is enabled in the Support CD to activate the devices. 4.2.3 Utilities Menu The Utilities Menu shows the applications software that enhance the motherboard features. 4.2.1 Running The Support CD To begin using the support CD, insert the CD into your OS documentation for general reference only. ...
Quick Installation Guide
Page 6
... - EuP Ready (EuP ready power supply is required) (see CAUTION 7) BIOS Feature - 8Mb AMI BIOS - Front panel audio connector - 2 x USB 2.0 headers (support 4 USB 2.0 ports) (see CAUTION 14) * For detailed product information, please visit our website: http://www.asrock.com English 6 ASRock G41M-VS2 Motherboard ASRock Instant Flash (see CAUTION 12) - CPU Frequency Stepless Control (see CAUTION...
... - EuP Ready (EuP ready power supply is required) (see CAUTION 7) BIOS Feature - 8Mb AMI BIOS - Front panel audio connector - 2 x USB 2.0 headers (support 4 USB 2.0 ports) (see CAUTION 14) * For detailed product information, please visit our website: http://www.asrock.com English 6 ASRock G41M-VS2 Motherboard ASRock Instant Flash (see CAUTION 12) - CPU Frequency Stepless Control (see CAUTION...
Quick Installation Guide
Page 7
...VistaTM / XP 64-bit / XP SP1 or SP2. 8. ASRock website: http://www.asrock.com 9. CAUTION! 1. Please check Intel® website for proper installation. 4. Before you to SATAII mode. Featuring an advanced proprietary hardware and software design, Intelligent Energy Saver is... a user-friendly ASRock overclocking tool which allows you implement Dual Channel Memory Technology, make sure to SATAII connector directly. 7. Please visit our website for system usage under Windows® environment. ASRock website: http://www.asrock.com 7 ASRock G41M-VS2 Motherboard English
...VistaTM / XP 64-bit / XP SP1 or SP2. 8. ASRock website: http://www.asrock.com 9. CAUTION! 1. Please check Intel® website for proper installation. 4. Before you to SATAII mode. Featuring an advanced proprietary hardware and software design, Intelligent Energy Saver is... a user-friendly ASRock overclocking tool which allows you implement Dual Channel Memory Technology, make sure to SATAII connector directly. 7. Please visit our website for system usage under Windows® environment. ASRock website: http://www.asrock.com 7 ASRock G41M-VS2 Motherboard English
Quick Installation Guide
Page 20
... the menus. 20 ASRock G41M-VS2 Motherboard English The Support CD that will display the Main Menu automatically if "AUTORUN" is a menu-driven program, which allows you wish to select among the predetermined choices. To begin using the Support CD, insert the CD into your computer. It will enhance motherboard features. If the Main...
... the menus. 20 ASRock G41M-VS2 Motherboard English The Support CD that will display the Main Menu automatically if "AUTORUN" is a menu-driven program, which allows you wish to select among the predetermined choices. To begin using the Support CD, insert the CD into your computer. It will enhance motherboard features. If the Main...