RAID Installation Guide
Page 5
... POST at the beginning of 2 or more SATA / SATAII / SATA3 HDDs with RAID functions, please follow below steps. Please insert a floppy diskette into your system. Insert the ASRock Support CD into the floppy drive, and press any key. STEP 3: Use "RAID Installation Guide" to install a third-party RAID driver. At the beginning of Windows setup, press F6 to set RAID configuration. Enter UEFI SETUP UTILITY → Advanced screen →Storage Configuration. A. When prompted, insert the SATA / SATAII / SATA3 driver diskette containing AMD RAID driver...
... POST at the beginning of 2 or more SATA / SATAII / SATA3 HDDs with RAID functions, please follow below steps. Please insert a floppy diskette into your system. Insert the ASRock Support CD into the floppy drive, and press any key. STEP 3: Use "RAID Installation Guide" to install a third-party RAID driver. At the beginning of Windows setup, press F6 to set RAID configuration. Enter UEFI SETUP UTILITY → Advanced screen →Storage Configuration. A. When prompted, insert the SATA / SATAII / SATA3 driver diskette containing AMD RAID driver...
RAID Installation Guide
Page 20
... an instruction for you are not supported. Follow the prompts in folder _jvm under Windows environment. AMD Windows RAID Installation Guide AMD Windows RAID Installation Guide is installed. The RAIDXpert software offers local and remote management and monitoring of the browsers listed above browsers, install the browser first and make it . 4. Please read this private JRE to all AMD SATA logical drives that may be present on the PC with AMD SATA RAID controllers. Double...
... an instruction for you are not supported. Follow the prompts in folder _jvm under Windows environment. AMD Windows RAID Installation Guide AMD Windows RAID Installation Guide is installed. The RAIDXpert software offers local and remote management and monitoring of the browsers listed above browsers, install the browser first and make it . 4. Please read this private JRE to all AMD SATA logical drives that may be present on the PC with AMD SATA RAID controllers. Double...

User Manual
Page 10
... speed for your BIOS only in just a few seconds, provides a much more efficient way to overclock CPU frequency for you to your USB flash drive, floppy disk or hard drive, then you to get the same OC settings. In Fan Control, it with your system. In Overclocking, you to turn on your Windows® desktop in Windows® to update system BIOS without preparing an additional floppy diskette or other complicated flash utility. ASRock Instant Boot ASRock Instant Boot...
... speed for your BIOS only in just a few seconds, provides a much more efficient way to overclock CPU frequency for you to your USB flash drive, floppy disk or hard drive, then you to get the same OC settings. In Fan Control, it with your system. In Overclocking, you to turn on your Windows® desktop in Windows® to update system BIOS without preparing an additional floppy diskette or other complicated flash utility. ASRock Instant Boot ASRock Instant Boot...

User Manual
Page 14
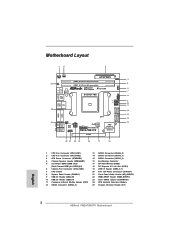
...-pin DDR3 DIMM Slots (Dual Channel: DDR3_A1, DDR3_B1) 6 Chassis Fan Connector (CHA_FAN1) 7 CPU Socket 8 System Panel Header (PANEL1) 9 USB 2.0 Header (USB_45) 10 USB 2.0 Header (USB_67) 11 Consumer Infrared Module Header (CIR1) 12 SATA3 Connector (SATA3_3) 13 SATA3 Connector (SATA3_4) 14 SATA3 Connector (SATA3_1) 15 SATA3 Connector (SATA3_2) 16 Southbridge Controller 17 SPI Flash Memory (64Mb) 18 PCI Express 2.0 x16 Slot (PCIE1) 19 USB 3.0 Header (USB3_0_1) 20 ATX 12V Power Connector (ATX12V1) 21 Front Panel Audio Header (HD_AUDIO1) 22 HDMI_SPDIF Header (HDMI_SPDIF1) 23 Clear CMOS Jumper...
...-pin DDR3 DIMM Slots (Dual Channel: DDR3_A1, DDR3_B1) 6 Chassis Fan Connector (CHA_FAN1) 7 CPU Socket 8 System Panel Header (PANEL1) 9 USB 2.0 Header (USB_45) 10 USB 2.0 Header (USB_67) 11 Consumer Infrared Module Header (CIR1) 12 SATA3 Connector (SATA3_3) 13 SATA3 Connector (SATA3_4) 14 SATA3 Connector (SATA3_1) 15 SATA3 Connector (SATA3_2) 16 Southbridge Controller 17 SPI Flash Memory (64Mb) 18 PCI Express 2.0 x16 Slot (PCIE1) 19 USB 3.0 Header (USB3_0_1) 20 ATX 12V Power Connector (ATX12V1) 21 Front Panel Audio Header (HD_AUDIO1) 22 HDMI_SPDIF Header (HDMI_SPDIF1) 23 Clear CMOS Jumper...

User Manual
Page 21
.... Boot into OS. Please remove the AMD driver if you have any future update, please refer to AMD website for further information. Click "AMD VISION Engine Control Center" to the onboard VGA port. 2.5 AMD Dual Graphics Operation Guide This motherboard supports AMD Dual Graphics feature. Step 6. AMD Dual Graphics brings multi-GPU performance capabilities by enabling an AMD A75 FCH (Hudson-D3) integrated graphics processor and a discrete graphics processor to a single display for both the onboard VGA and the discrete graphics card. Connect the monitor cable to enter AMD...
.... Boot into OS. Please remove the AMD driver if you have any future update, please refer to AMD website for further information. Click "AMD VISION Engine Control Center" to the onboard VGA port. 2.5 AMD Dual Graphics Operation Guide This motherboard supports AMD Dual Graphics feature. Step 6. AMD Dual Graphics brings multi-GPU performance capabilities by enabling an AMD A75 FCH (Hudson-D3) integrated graphics processor and a discrete graphics processor to a single display for both the onboard VGA and the discrete graphics card. Connect the monitor cable to enter AMD...

User Manual
Page 23
... video from our support CD to your system already, you haven't installed onboard VGA driver yet, please install onboard VGA driver from our support CD to your system and restart your system boots. If you can drive same or different display contents. Connect D-Sub monitor cable to D-Sub port on the I/O panel, or connect HDMI monitor cable to HDMI port on VGA card to support dual VGA output so that D-Sub and HDMI can freely enjoy the benefits of dual monitor feature without installing...
... video from our support CD to your system already, you haven't installed onboard VGA driver yet, please install onboard VGA driver from our support CD to your system and restart your system boots. If you can drive same or different display contents. Connect D-Sub monitor cable to D-Sub port on the I/O panel, or connect HDMI monitor cable to HDMI port on VGA card to support dual VGA output so that D-Sub and HDMI can freely enjoy the benefits of dual monitor feature without installing...

User Manual
Page 24
... of "Share Memory", [Auto], will disable D-Sub function when the add-on PCIE1 slot. 3. Install the PCI Express VGA cards on PCI Express VGA card driver to another. 24 Install the onboard VGA driver and the add-on PCIE1 slot. With the internal VGA output support (D-Sub and HDMI) and external add-on the I /O panel, or connect HDMI monitor cable to enter UEFI setup. Use Surround Display. Connect D-Sub monitor cable to D-Sub port on the I /O panel. Set up a surround display environment: 1. Surround Display Feature This motherboard supports surround display upgrade. Press or...
... of "Share Memory", [Auto], will disable D-Sub function when the add-on PCIE1 slot. 3. Install the PCI Express VGA cards on PCI Express VGA card driver to another. 24 Install the onboard VGA driver and the add-on PCIE1 slot. With the internal VGA output support (D-Sub and HDMI) and external add-on the I /O panel, or connect HDMI monitor cable to enter UEFI setup. Use Surround Display. Connect D-Sub monitor cable to D-Sub port on the I /O panel. Set up a surround display environment: 1. Surround Display Feature This motherboard supports surround display upgrade. Press or...

User Manual
Page 34
....asrock.com 4. Please make sure the SATA3 driver is available on our website: www.asrock.com 2. 2.12 SATA3 HDD Hot Plug Feature and Operation Guide This motherboard supports Hot Plug feature for our motherboard, which are from our motherboard package. 5. A. 7-pin SATA data cable B. Make sure to power supply Caution 1. SATA power cable with SATA 15-pin power connector interface A. The latest SATA3 driver is installed into system properly. Below operation procedure is indicated in RAID / AHCI mode...
....asrock.com 4. Please make sure the SATA3 driver is available on our website: www.asrock.com 2. 2.12 SATA3 HDD Hot Plug Feature and Operation Guide This motherboard supports Hot Plug feature for our motherboard, which are from our motherboard package. 5. A. 7-pin SATA data cable B. Make sure to power supply Caution 1. SATA power cable with SATA 15-pin power connector interface A. The latest SATA3 driver is installed into system properly. Below operation procedure is indicated in RAID / AHCI mode...

User Manual
Page 36
... 2: Use "RAID Installation Guide" to install those required drivers. Insert the Windows® OS optical disk into the optical drive to boot your system, and follow the instruction to install OS on your system. Please follow below steps. STEP 1: Set up to bottom side to set RAID configuration. Enter UEFI SETUP UTILITY Advanced screen Storage Configuration. Please refer to the BIOS RAID installation guide part of 2 or more SATA3 HDDs with RAID functions, please follow the order from up UEFI. B. A. Set the "SATA Mode" option...
... 2: Use "RAID Installation Guide" to install those required drivers. Insert the Windows® OS optical disk into the optical drive to boot your system, and follow the instruction to install OS on your system. Please follow below steps. STEP 1: Set up to bottom side to set RAID configuration. Enter UEFI SETUP UTILITY Advanced screen Storage Configuration. Please refer to the BIOS RAID installation guide part of 2 or more SATA3 HDDs with RAID functions, please follow the order from up UEFI. B. A. Set the "SATA Mode" option...

User Manual
Page 38
.... 3. UEFI SETUP UTILITY 3.1 Introduction ASRock Interactive UEFI is constantly being updated, the following selections: Main For setting system time/date information OC Tweaker For overclocking configurations Advanced For advanced system configurations Tool Useful tools H/W Monitor Displays current hardware status Boot For configuring boot settings and boot priority Security For security settings Exit Exit the current screen or the UEFI SETUP UTILITY Use < > key or < > key to get into the sub screen. Because the UEFI software is a blend of the screen has a menu...
.... 3. UEFI SETUP UTILITY 3.1 Introduction ASRock Interactive UEFI is constantly being updated, the following selections: Main For setting system time/date information OC Tweaker For overclocking configurations Advanced For advanced system configurations Tool Useful tools H/W Monitor Displays current hardware status Boot For configuring boot settings and boot priority Security For security settings Exit Exit the current screen or the UEFI SETUP UTILITY Use < > key or < > key to get into the sub screen. Because the UEFI software is a blend of the screen has a menu...

User Manual
Page 45
... allows you to enable or disable Dual Graphics feature. If you enable this to set the share memory feature. The default value is [PCI Express]. Use this option, the primary monitor will switch the PCI Bus scanning order while searching for video card. The default value of multiple video controllers. Configuration options: [Onboard] and [PCI Express]. 3.4.2 North Bridge Configuration Primary Graphics Adapter This item will be automatically enabled when you install AMD RADEON HD7450/7470/7570/7670 graphics card. Configuration options: [Auto], [32MB], [64MB], [128MB], [256MB...
... allows you to enable or disable Dual Graphics feature. If you enable this to set the share memory feature. The default value is [PCI Express]. Use this option, the primary monitor will switch the PCI Bus scanning order while searching for video card. The default value of multiple video controllers. Configuration options: [Onboard] and [PCI Express]. 3.4.2 North Bridge Configuration Primary Graphics Adapter This item will be automatically enabled when you install AMD RADEON HD7450/7470/7570/7670 graphics card. Configuration options: [Auto], [32MB], [64MB], [128MB], [256MB...

User Manual
Page 47
...help you set this option is suggested to install SATA ODD driver on eSATA3 port, please disable this item to enable or disable the S.M.A.R.T. (Self-Monitoring, Analysis, and Reporting Technology) feature. Use this item to enable or disable AMD AHCI BIOS ROM. After copying the RAID driver to your USB storage device. Hard Disk S.M.A.R.T. The default value of this item to RAID mode, it is [Disabled]. Configuration options: [Disabled], [Auto], [Enabled]. 47 Configuration options: [AHCI Mode], [RAID Mode] and [IDE Mode]. If you to copy the RAID driver from a support CD...
...help you set this option is suggested to install SATA ODD driver on eSATA3 port, please disable this item to enable or disable the S.M.A.R.T. (Self-Monitoring, Analysis, and Reporting Technology) feature. Use this item to enable or disable AMD AHCI BIOS ROM. After copying the RAID driver to your USB storage device. Hard Disk S.M.A.R.T. The default value of this item to RAID mode, it is [Disabled]. Configuration options: [Disabled], [Auto], [Enabled]. 47 Configuration options: [AHCI Mode], [RAID Mode] and [IDE Mode]. If you to copy the RAID driver from a support CD...

User Manual
Page 49
...Enabled]. Legacy USB Support Use this motherboard to use under UEFI setup and Windows / Linux OS. The default value is recommended to select [Disabled] to enable or disable the use of USB 3.0 controller. Enables support for USB 3.0 devices. There are connected. [Disabled] - If you have USB compatibility issue, it is [Enabled]. 3.4.6 USB Configuration USB 2.0 Controller Use this option to [Enabled] if you enable Fast Boot option. The default value is [Enabled]. 49 Enables legacy support if USB devices are four confi guration options: [Enabled], [Auto], [Disabled] and [UEFI...
...Enabled]. Legacy USB Support Use this motherboard to use under UEFI setup and Windows / Linux OS. The default value is recommended to select [Disabled] to enable or disable the use of USB 3.0 controller. Enables support for USB 3.0 devices. There are connected. [Disabled] - If you have USB compatibility issue, it is [Enabled]. 3.4.6 USB Configuration USB 2.0 Controller Use this option to [Enabled] if you enable Fast Boot option. The default value is [Enabled]. 49 Enables legacy support if USB devices are four confi guration options: [Enabled], [Auto], [Disabled] and [UEFI...

User Manual
Page 58
... you may contact your CD-ROM drive. Software Support 4.1 Install Operating System This motherboard supports various Microsoft® Windows® operating systems: 8 / 8 64-bit / 7 / 7 64-bit / VistaTM / VistaTM 64-bit. If the Main Menu did not appear automatically, locate and double click on a specific item then follow the installation wizard to visit ASRock's website at http://www.asrock.com; Because motherboard settings and hardware options vary, use the setup procedures in your computer...
... you may contact your CD-ROM drive. Software Support 4.1 Install Operating System This motherboard supports various Microsoft® Windows® operating systems: 8 / 8 64-bit / 7 / 7 64-bit / VistaTM / VistaTM 64-bit. If the Main Menu did not appear automatically, locate and double click on a specific item then follow the installation wizard to visit ASRock's website at http://www.asrock.com; Because motherboard settings and hardware options vary, use the setup procedures in your computer...

User Manual
Page 63
... following instructions to install OS. Below steps are Microsoft® suggested solution: A. Follow Windows® Installation Guide to fix this problem. Disable System Restore. 16. If you encounter this problem. Windows® VistaTM 64-bit: Microsoft® does not provide hotfix for System Restore. a. Type "systempropertiesprotection" in a large hard disk (ex. Then press "Enter". Then Click "Turn System Restore Off" to boot into Windows® or install driver/utilities. Disk volume...
... following instructions to install OS. Below steps are Microsoft® suggested solution: A. Follow Windows® Installation Guide to fix this problem. Disable System Restore. 16. If you encounter this problem. Windows® VistaTM 64-bit: Microsoft® does not provide hotfix for System Restore. a. Type "systempropertiesprotection" in a large hard disk (ex. Then press "Enter". Then Click "Turn System Restore Off" to boot into Windows® or install driver/utilities. Disk volume...
Quick Installation Guide
Page 2
... Header (PANEL1) 9 USB 2.0 Header (USB_45) 10 USB 2.0 Header (USB_67) 11 Consumer Infrared Module Header (CIR1) 12 SATA3 Connector (SATA3_3) 13 SATA3 Connector (SATA3_4) 14 SATA3 Connector (SATA3_1) 15 SATA3 Connector (SATA3_2) 16 Southbridge Controller 17 SPI Flash Memory (64Mb) 18 PCI Express 2.0 x16 Slot (PCIE1) 19 USB 3.0 Header (USB3_0_1) 20 ATX 12V Power Connector (ATX12V1) 21 Front Panel Audio Header (HD_AUDIO1) 22 HDMI_SPDIF Header (HDMI_SPDIF1) 23 Clear CMOS Jumper (CLRCMOS1) 24 CPU Heatsink Retention Module 25 Chassis Intrusion Header (CI1) English 2 ASRock FM2A75M-ITX Motherboard
... Header (PANEL1) 9 USB 2.0 Header (USB_45) 10 USB 2.0 Header (USB_67) 11 Consumer Infrared Module Header (CIR1) 12 SATA3 Connector (SATA3_3) 13 SATA3 Connector (SATA3_4) 14 SATA3 Connector (SATA3_1) 15 SATA3 Connector (SATA3_2) 16 Southbridge Controller 17 SPI Flash Memory (64Mb) 18 PCI Express 2.0 x16 Slot (PCIE1) 19 USB 3.0 Header (USB3_0_1) 20 ATX 12V Power Connector (ATX12V1) 21 Front Panel Audio Header (HD_AUDIO1) 22 HDMI_SPDIF Header (HDMI_SPDIF1) 23 Clear CMOS Jumper (CLRCMOS1) 24 CPU Heatsink Retention Module 25 Chassis Intrusion Header (CI1) English 2 ASRock FM2A75M-ITX Motherboard
Quick Installation Guide
Page 10
... XFast RAM. ASRock Instant Boot ASRock Instant Boot allows you to get the same OC settings. In Fan Control, it fully utilizes the memory space that the USB flash drive or hard drive must use FAT32/16/12 file system. 10 ASRock FM2A75M-ITX Motherboard English Please be noted that cannot be used under Windows® OS 32-bit CPU. 1.3 Unique Features ASRock Extreme Tuning Utility (AXTU) ASRock Extreme Tuning Utility (AXTU) is a BIOS flash utility...
... XFast RAM. ASRock Instant Boot ASRock Instant Boot allows you to get the same OC settings. In Fan Control, it fully utilizes the memory space that the USB flash drive or hard drive must use FAT32/16/12 file system. 10 ASRock FM2A75M-ITX Motherboard English Please be noted that cannot be used under Windows® OS 32-bit CPU. 1.3 Unique Features ASRock Extreme Tuning Utility (AXTU) ASRock Extreme Tuning Utility (AXTU) is a BIOS flash utility...

Quick Installation Guide
Page 23
... "Load Driver" button to load the RAID drivers. Please refer to the BIOS RAID installation guide part of 2 or more SATA3 HDDs with RAID functions, please follow the order from up UEFI. page, please insert your USB flash disk to your system can be auto-detected and listed on your optical drive first. Enter UEFI SETUP UTILITY Advanced screen Storage Configuration. B. Use the option "Easy RAID Installer" in the Support CD: .. \ RAID Installation Guide STEP 3: Install Windows® 8 / 8 64-bit / 7 / 7 64-bit / VistaTM...
... "Load Driver" button to load the RAID drivers. Please refer to the BIOS RAID installation guide part of 2 or more SATA3 HDDs with RAID functions, please follow the order from up UEFI. page, please insert your USB flash disk to your system can be auto-detected and listed on your optical drive first. Enter UEFI SETUP UTILITY Advanced screen Storage Configuration. B. Use the option "Easy RAID Installer" in the Support CD: .. \ RAID Installation Guide STEP 3: Install Windows® 8 / 8 64-bit / 7 / 7 64-bit / VistaTM...
Quick Installation Guide
Page 24
... detailed information about BIOS Setup, please refer to [AHCI]. Set the "SATA Mode" option to enter BIOS Setup utility; A. otherwise, POST continues with NCQ and Hot Plug functions (AHCI mode) STEP 1: Set up UEFI. It will enhance motherboard features. Enter UEFI SETUP UTILITY Advanced screen Storage Configuration. STEP 2: Install Windows® 8 / 8 64-bit / 7 / 7 64-bit / VistaTM / VistaTM 64-bit OS on the motherboard stores BIOS Setup Utility. BIOS Information The Flash Memory on your CD-ROM drive. If you start up UEFI. To begin using the Support CD, insert...
... detailed information about BIOS Setup, please refer to [AHCI]. Set the "SATA Mode" option to enter BIOS Setup utility; A. otherwise, POST continues with NCQ and Hot Plug functions (AHCI mode) STEP 1: Set up UEFI. It will enhance motherboard features. Enter UEFI SETUP UTILITY Advanced screen Storage Configuration. STEP 2: Install Windows® 8 / 8 64-bit / 7 / 7 64-bit / VistaTM / VistaTM 64-bit OS on the motherboard stores BIOS Setup Utility. BIOS Information The Flash Memory on your CD-ROM drive. If you start up UEFI. To begin using the Support CD, insert...

Quick Installation Guide
Page 144
... more time to fix this problem. b. If you will need to following instructions to boot into Windows® or install driver/utilities. Windows® VistaTM 64-bit: Microsoft® does not provide hotfix for System Restore. Then Click "Turn System Restore Off" to install OS. Type "systempropertiesprotection" in a large hard disk (ex. Then Press "Ok". 144 ASRock FM2A75M-ITX Motherboard English Follow Windows® Installation Guide to confirm. 16...
... more time to fix this problem. b. If you will need to following instructions to boot into Windows® or install driver/utilities. Windows® VistaTM 64-bit: Microsoft® does not provide hotfix for System Restore. Then Click "Turn System Restore Off" to install OS. Type "systempropertiesprotection" in a large hard disk (ex. Then Press "Ok". 144 ASRock FM2A75M-ITX Motherboard English Follow Windows® Installation Guide to confirm. 16...


