User Manual
Page 8
... overclock the chipset/CPU reference clock. Microsoft® Windows® VistaTM / VistaTM 64-bit driver keeps on page 11 for keeping the stability of the system or damage the CPU. 5. Please visit our website for details. 2. This motherboard supports Dual Channel Memory Technology. Although this function for proper connection. 8. If you adopt. Before installing SATAII hard disk to SATAII connector, please read "Untied Overclocking Technology" on the AM2 CPU you enable this motherboard supports 2-channel, 4-channel, 6-channel, and 8-channel modes...
... overclock the chipset/CPU reference clock. Microsoft® Windows® VistaTM / VistaTM 64-bit driver keeps on page 11 for keeping the stability of the system or damage the CPU. 5. Please visit our website for details. 2. This motherboard supports Dual Channel Memory Technology. Although this function for proper connection. 8. If you adopt. Before installing SATAII hard disk to SATAII connector, please read "Untied Overclocking Technology" on the AM2 CPU you enable this motherboard supports 2-channel, 4-channel, 6-channel, and 8-channel modes...
User Manual
Page 22
... a HDMI VGA card and a HDMI ready motherboard with a HDMI_SPDIF header, which provides an interface between any compatible digital audio/ video source, such as a set-top box, DVD player, A/V receiver and a compatible digital audio or video monitor, such as HDTV. This motherboard is an all-digital audio/video specification, which provides SPDIF audio output to HDMI VGA card, allows the system to the same pin definition. Make sure to correctly connect the HDMI_SPDIF cable to the motherboard and the HDMI VGA card...
... a HDMI VGA card and a HDMI ready motherboard with a HDMI_SPDIF header, which provides an interface between any compatible digital audio/ video source, such as a set-top box, DVD player, A/V receiver and a compatible digital audio or video monitor, such as HDTV. This motherboard is an all-digital audio/video specification, which provides SPDIF audio output to HDMI VGA card, allows the system to the same pin definition. Make sure to correctly connect the HDMI_SPDIF cable to the motherboard and the HDMI VGA card...
User Manual
Page 25
... boot device. When you see these messages, Please insert a diskette into the floppy drive. WARNING! Formatting the floppy diskette will see the message on the screen, "Do you want to install Windows® 2000, XP or XP 64-bit on your optical drive first. Therefore, the drivers you install can be auto-detected and listed on VIA® SATA ports with RAID functions, please set the "SATA Operation Mode" option to [RAID...
... boot device. When you see these messages, Please insert a diskette into the floppy drive. WARNING! Formatting the floppy diskette will see the message on the screen, "Do you want to install Windows® 2000, XP or XP 64-bit on your optical drive first. Therefore, the drivers you install can be auto-detected and listed on VIA® SATA ports with RAID functions, please set the "SATA Operation Mode" option to [RAID...
User Manual
Page 26
... below: 1. Please refer to the BIOS RAID installation guide of Windows® setup, press F6 to JMicron® SATAII connectors (red), please choose item 4. At the beginning of the document in the following path in the Support CD: .. \ RAID Installation Guide If you insert HDDs to install a third-party RAID driver. VIA VT8251/8237/8237A/6421/6410 SATA RAID Controller (Windows 2K) 3. After reading the floppy disk, the driver will be presented.
... below: 1. Please refer to the BIOS RAID installation guide of Windows® setup, press F6 to JMicron® SATAII connectors (red), please choose item 4. At the beginning of the document in the following path in the Support CD: .. \ RAID Installation Guide If you insert HDDs to install a third-party RAID driver. VIA VT8251/8237/8237A/6421/6410 SATA RAID Controller (Windows 2K) 3. After reading the floppy disk, the driver will be presented.
User Manual
Page 27
... a SATAII driver diskette. (For JMicron® SATAII ports in the Support CD: .. \ RAID Installation Guide STEP 4: Install Windows® VistaTM / VistaTM 64-bit OS on your system. Insert the Windows® VistaTM / VistaTM 64-bit optical disk into the optical drive again to set the "SATA Operation Mode" option to [RAID]. Otherwise, please skip this step. If you plan to install Windows® VistaTM / VistaTM 64-bit on VIA® SATA HDDs, when...
... a SATAII driver diskette. (For JMicron® SATAII ports in the Support CD: .. \ RAID Installation Guide STEP 4: Install Windows® VistaTM / VistaTM 64-bit OS on your system. Insert the Windows® VistaTM / VistaTM 64-bit optical disk into the optical drive again to set the "SATA Operation Mode" option to [RAID]. Otherwise, please skip this step. If you plan to install Windows® VistaTM / VistaTM 64-bit on VIA® SATA HDDs, when...
User Manual
Page 28
...) 3. Enter BIOS SETUP UTILITY Advanced screen IDE Configuration. The driver options are subject to install Windows® 2000 / XP / XP 64-bit on your system. VIA VT8251/8237/8237A/6421/6410 SATA RAID Controller (Windows NT4) 4. B. STEP 3: Install Windows® 2000 / XP / XP-64bit OS on JMicron® SATAII ports in AHCI mode only.) If you set "PCIE-SATAII Operation Mode" to [AHCI] mode, and plan to install Windows® 2000 / XP / XP 64-bit on JMicron® SATAII HDDs...
...) 3. Enter BIOS SETUP UTILITY Advanced screen IDE Configuration. The driver options are subject to install Windows® 2000 / XP / XP 64-bit on your system. VIA VT8251/8237/8237A/6421/6410 SATA RAID Controller (Windows NT4) 4. B. STEP 3: Install Windows® 2000 / XP / XP-64bit OS on JMicron® SATAII ports in AHCI mode only.) If you set "PCIE-SATAII Operation Mode" to [AHCI] mode, and plan to install Windows® 2000 / XP / XP 64-bit on JMicron® SATAII HDDs...
User Manual
Page 29
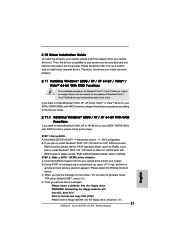
... Operation Mode" option to [IDE] or [AHCI]. If you the actual CPU host frequency in the fixed mode so that FSB can start to install Windows® VistaTM / VistaTM 64-bit on your system. 2.14 Untied Overclocking Technology This motherboard supports Untied Overclocking Technology, which will show you plan to install Windows® VistaTM / VistaTM 64-bit on VIA® SATA ports without RAID functions, please set "CPU Host Frequency" option of BIOS setup to [Auto], which means during overclocking, but PCI / PCIE...
... Operation Mode" option to [IDE] or [AHCI]. If you the actual CPU host frequency in the fixed mode so that FSB can start to install Windows® VistaTM / VistaTM 64-bit on your system. 2.14 Untied Overclocking Technology This motherboard supports Untied Overclocking Technology, which will show you plan to install Windows® VistaTM / VistaTM 64-bit on VIA® SATA ports without RAID functions, please set "CPU Host Frequency" option of BIOS setup to [Auto], which means during overclocking, but PCI / PCIE...
User Manual
Page 35
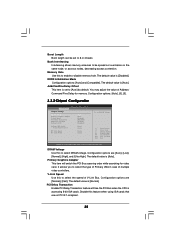
...to select DRAM voltage. Primary Graphics Adapter This item will free the PCI Bus when the CPU is [Auto]. Configuration options: [Auto], [0], [5]. 3.3.2 Chipset Configuration BIOS SETUP UTILITY Advanced Chipset Settings DRAM Voltage Primary Graphics Adapter V-Link Speed PCI Delay Transaction IDE Drive Strength OnBoard LAN [Auto] [PCI] [Normal] [Disabled] [Normal] [Enabled] OnBoard HD Audio Front Panel Control [Auto] [Auto] HT Link Speed HT Link Width [Auto] [Auto] To set DRAM Voltage. +F1 F9 F10 ESC Select Screen Select Item Change Option General Help Load Defaults Save and...
...to select DRAM voltage. Primary Graphics Adapter This item will free the PCI Bus when the CPU is [Auto]. Configuration options: [Auto], [0], [5]. 3.3.2 Chipset Configuration BIOS SETUP UTILITY Advanced Chipset Settings DRAM Voltage Primary Graphics Adapter V-Link Speed PCI Delay Transaction IDE Drive Strength OnBoard LAN [Auto] [PCI] [Normal] [Disabled] [Normal] [Enabled] OnBoard HD Audio Front Panel Control [Auto] [Auto] HT Link Speed HT Link Width [Auto] [Auto] To set DRAM Voltage. +F1 F9 F10 ESC Select Screen Select Item Change Option General Help Load Defaults Save and...
User Manual
Page 36
Configuration options: [Low], [Normal], [High] or [Ultra High]. OnBoard HD Audio Select [Auto], [Enabled] or [Disabled] for the onboard HD Audio Front Panel. The default value is [Normal]. HT Link Speed You may set the HyperTransport speed as [8 bit], [16 bit] or [Auto]. The default value is [Auto]. OnBoard LAN This allows you select [Auto], the onboard HD Audio will be disabled when PCI Sound Card is [Auto]. 36 If you to select drive strength of the onboard IDE controller. Front Panel Control Select [Auto], [Enabled] or [Disabled] for the onboard HD...
Configuration options: [Low], [Normal], [High] or [Ultra High]. OnBoard HD Audio Select [Auto], [Enabled] or [Disabled] for the onboard HD Audio Front Panel. The default value is [Normal]. HT Link Speed You may set the HyperTransport speed as [8 bit], [16 bit] or [Auto]. The default value is [Auto]. OnBoard LAN This allows you select [Auto], the onboard HD Audio will be disabled when PCI Sound Card is [Auto]. 36 If you to select drive strength of the onboard IDE controller. Front Panel Control Select [Auto], [Enabled] or [Disabled] for the onboard HD...
User Manual
Page 38
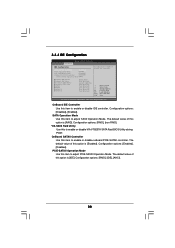
... default value of this option is [RAID]. Configuration options: [Disabled], [Enabled]. Configuration options: [RAID], [non-RAID]. PCIE-SATAII Operation Mode Use this item to enable or disable VIA VT8237A SATA Raid BIOS Utility during POST. Configuration options: [RAID], [IDE], [AHCI]. 38 Configuration options: [Enabled], [Disabled]. 3.3.4 IDE Configuration BIOS SETUP UTILITY Advanced IDE Configuration OnBoard IDE Controller [Enabled] SATA Operation Mode [RAID] VIA SATA Raid Utility [Enabled] OnBoard SATAII Controller [Enabled] PCIE-SATAII Operation Mode [IDE] Primary IDE...
... default value of this option is [RAID]. Configuration options: [Disabled], [Enabled]. Configuration options: [RAID], [non-RAID]. PCIE-SATAII Operation Mode Use this item to enable or disable VIA VT8237A SATA Raid BIOS Utility during POST. Configuration options: [RAID], [IDE], [AHCI]. 38 Configuration options: [Enabled], [Disabled]. 3.3.4 IDE Configuration BIOS SETUP UTILITY Advanced IDE Configuration OnBoard IDE Controller [Enabled] SATA Operation Mode [RAID] VIA SATA Raid Utility [Enabled] OnBoard SATAII Controller [Enabled] PCIE-SATAII Operation Mode [IDE] Primary IDE...
User Manual
Page 45
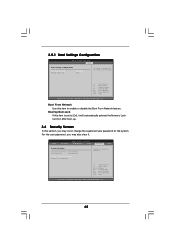
... password. Select Screen Select Item Enter Change F1 General Help F9 Load Defaults F10 Save and Exit ESC Exit v02.54 (C) Copyright 1985-2003, American Megatrends, Inc. 45 Boot From Network Use this section, you may set or change the supervisor/user password for the system. 3.5.1 Boot Settings Configuration BIOS SETUP UTILITY Boot Boot Settings Configuration Boot From Network Bootup Num-Lock [Disabled] [On] To enable or disable the boot from network feature. +F1 F9 F10 ESC Select Screen Select Item Change Option...
... password. Select Screen Select Item Enter Change F1 General Help F9 Load Defaults F10 Save and Exit ESC Exit v02.54 (C) Copyright 1985-2003, American Megatrends, Inc. 45 Boot From Network Use this section, you may set or change the supervisor/user password for the system. 3.5.1 Boot Settings Configuration BIOS SETUP UTILITY Boot Boot Settings Configuration Boot From Network Bootup Num-Lock [Disabled] [On] To enable or disable the boot from network feature. +F1 F9 F10 ESC Select Screen Select Item Change Option...

User Manual
Page 47
.... If the Main Menu did not appear automatically, locate and double click on a specific item then follow the installation wizard to your dealer for further information. 47 Because motherboard settings and hardware options vary, use the setup procedures in the Support CD to activate the devices. 4.2.3 Utilities Menu The Utilities Menu shows the applications software that enhance the motherboard features. 4.2.1 Running The Support CD To begin using the support CD, insert...
.... If the Main Menu did not appear automatically, locate and double click on a specific item then follow the installation wizard to your dealer for further information. 47 Because motherboard settings and hardware options vary, use the setup procedures in the Support CD to activate the devices. 4.2.3 Utilities Menu The Utilities Menu shows the applications software that enhance the motherboard features. 4.2.1 Running The Support CD To begin using the support CD, insert...
Quick Installation Guide
Page 7
... install the PC system. 6. This motherboard supports ASRock AM2 Boost overclocking technology. Enabling this motherboard supports 2-channel, 4-channel, 6-channel, and 8-channel modes. You may not be less than the recommended CPU bus frequencies may cause the instability of memory modules on page 25 for all CPU/DRAM configurations. CAUTION! 1. You can not guarantee the system stability for details. 2. ASRock website http://www.asrock.com 7 ASRock ALiveSATA2-GLAN Motherboard English Power Management for Microsoft® Windows® VistaTM / VistaTM 64-bit driver...
... install the PC system. 6. This motherboard supports ASRock AM2 Boost overclocking technology. Enabling this motherboard supports 2-channel, 4-channel, 6-channel, and 8-channel modes. You may not be less than the recommended CPU bus frequencies may cause the instability of memory modules on page 25 for all CPU/DRAM configurations. CAUTION! 1. You can not guarantee the system stability for details. 2. ASRock website http://www.asrock.com 7 ASRock ALiveSATA2-GLAN Motherboard English Power Management for Microsoft® Windows® VistaTM / VistaTM 64-bit driver...
Quick Installation Guide
Page 15
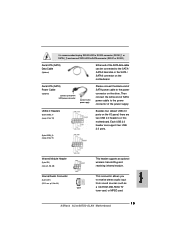
...Internal Audio Connector (4-pin CD1) (CD1: see p.2, No. 10) Besides four default USB 2.0 ports on the I/O panel, there are two USB 2.0 headers on this motherboard. Each USB 2.0 header can be connected to the SATA / SATAII hard disk or the SATA / SATAII connector on the drive. Serial ATA (SATA) Power Cable (Optional) connect to the SATA HDD power connector connect to the power supply Please connect the black end of SATA power cable to receive stereo audio input from sound sources such as a CD-ROM, DVD-ROM, TV tuner card, or MPEG card. 15 ASRock ALiveSATA2-GLAN Motherboard USB...
...Internal Audio Connector (4-pin CD1) (CD1: see p.2, No. 10) Besides four default USB 2.0 ports on the I/O panel, there are two USB 2.0 headers on this motherboard. Each USB 2.0 header can be connected to the SATA / SATAII hard disk or the SATA / SATAII connector on the drive. Serial ATA (SATA) Power Cable (Optional) connect to the SATA HDD power connector connect to the power supply Please connect the black end of SATA power cable to receive stereo audio input from sound sources such as a CD-ROM, DVD-ROM, TV tuner card, or MPEG card. 15 ASRock ALiveSATA2-GLAN Motherboard USB...

Quick Installation Guide
Page 18
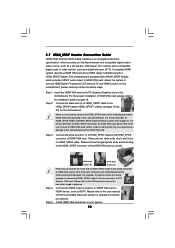
... HDMI_SPDIF Header Connection Guide HDMI (High-Definition Multi-media Interface) is equipped with a HDMI_SPDIF header. For the pin definition of HDMI_SPDIF cable to HDMI device, such as a digital television (DTV). English white end (2-pin) (B) white end (3-pin) (C) Step 4. ASRock ALiveSATA2-GLAN Motherboard A complete HDMI system requires a HDMI VGA card and a HDMI ready motherboard with a HDMI_SPDIF header, which provides an interface between any compatible digital audio/video source, such as a set-top box, DVD player, A/V receiver and a compatible digital audio or video monitor...
... HDMI_SPDIF Header Connection Guide HDMI (High-Definition Multi-media Interface) is equipped with a HDMI_SPDIF header. For the pin definition of HDMI_SPDIF cable to HDMI device, such as a digital television (DTV). English white end (2-pin) (B) white end (3-pin) (C) Step 4. ASRock ALiveSATA2-GLAN Motherboard A complete HDMI system requires a HDMI VGA card and a HDMI ready motherboard with a HDMI_SPDIF header, which provides an interface between any compatible digital audio/video source, such as a set-top box, DVD player, A/V receiver and a compatible digital audio or video monitor...
Quick Installation Guide
Page 21
... can work properly. 2.11 Installing Windows® 2000 / XP / XP 64-bit / VistaTM / VistaTM 64-bit With RAID Functions The installation procedures for boot devices selection appears. STEP 2: Make a SATA / SATAII driver diskette. C. Therefore, the drivers you will lose ALL data in the future. Insert the ASRock Support CD into the floppy drive, and press . 21 ASRock ALiveSATA2-GLAN Motherboard English Then you install can be auto-detected and listed on the support CD driver...
... can work properly. 2.11 Installing Windows® 2000 / XP / XP 64-bit / VistaTM / VistaTM 64-bit With RAID Functions The installation procedures for boot devices selection appears. STEP 2: Make a SATA / SATAII driver diskette. C. Therefore, the drivers you will lose ALL data in the future. Insert the ASRock Support CD into the floppy drive, and press . 21 ASRock ALiveSATA2-GLAN Motherboard English Then you install can be auto-detected and listed on the support CD driver...
Quick Installation Guide
Page 22
... copy SATA / SATAII drivers into the floppy diskette. After reading the floppy disk, the driver will be presented. E. Please refer to the BIOS RAID installation guide of Windows® setup, press F6 to install Windows® 2000 / XP / XP 64-bit on your system as below: 1. Before you start to install a third-party RAID driver. Select your system. JMicron JMB36X AHCI Controller (Windows 2K/XP/2003) If you insert HDDs to VIA® SATA connectors...
... copy SATA / SATAII drivers into the floppy diskette. After reading the floppy disk, the driver will be presented. E. Please refer to the BIOS RAID installation guide of Windows® setup, press F6 to install Windows® 2000 / XP / XP 64-bit on your system as below: 1. Before you start to install a third-party RAID driver. Select your system. JMicron JMB36X AHCI Controller (Windows 2K/XP/2003) If you insert HDDs to VIA® SATA connectors...
Quick Installation Guide
Page 23
... 64-bit optical disk into the optical drive again to set "PCIE-SATAII Operation Mode" to [RAID] mode, and plan to install Windows® VistaTM / VistaTM 64-bit on JMicron® SATAII HDDs, please refer to step 2 on page 21 for proper configuration. Otherwise, please skip this step. STEP 3: Use "RAID Installation Guide" to continue the installation. 23 ASRock ALiveSATA2-GLAN Motherboard English page, please insert the ASRock Support CD into the optical drive to boot...
... 64-bit optical disk into the optical drive again to set "PCIE-SATAII Operation Mode" to [RAID] mode, and plan to install Windows® VistaTM / VistaTM 64-bit on JMicron® SATAII HDDs, please refer to step 2 on page 21 for proper configuration. Otherwise, please skip this step. STEP 3: Use "RAID Installation Guide" to continue the installation. 23 ASRock ALiveSATA2-GLAN Motherboard English page, please insert the ASRock Support CD into the optical drive to boot...
Quick Installation Guide
Page 24
... [IDE] or [AHCI]. After reading the floppy disk, the driver will be presented. JMicron JMB36X AHCI Controller (Windows 2K/XP/2003) Please select item 5 to step 2 on page 21 for detailed procedures of Windows® VistaTM / VistaTM 64-bit driver and related information in AHCI mode.) 24 ASRock ALiveSATA2-GLAN Motherboard English STEP 3: Install Windows® 2000 / XP / XP 64-bit OS on your SATA / SATAII HDDs without RAID functions, please set the "SATA Operation Mode" option...
... [IDE] or [AHCI]. After reading the floppy disk, the driver will be presented. JMicron JMB36X AHCI Controller (Windows 2K/XP/2003) Please select item 5 to step 2 on page 21 for detailed procedures of Windows® VistaTM / VistaTM 64-bit driver and related information in AHCI mode.) 24 ASRock ALiveSATA2-GLAN Motherboard English STEP 3: Install Windows® 2000 / XP / XP 64-bit OS on your SATA / SATAII HDDs without RAID functions, please set the "SATA Operation Mode" option...
Quick Installation Guide
Page 25
... plan to install Windows® VistaTM / VistaTM 64-bit on JMicron® SATAII ports without RAID functions, please set the "SATA Operation Mode" option to [non-RAID]. 2.12.2 Installing Windows® VistaTM / VistaTM 64-bit Without RAID Functions If you want to install Windows® VistaTM or VistaTM 64-bit on your SATA / SATAII HDDs without RAID functions, please set the "PCIE-SATAII Operation Mode" option to [IDE] or [AHCI]. If you apply Untied Overclocking Technology. 25 ASRock ALiveSATA2-GLAN Motherboard English
... plan to install Windows® VistaTM / VistaTM 64-bit on JMicron® SATAII ports without RAID functions, please set the "SATA Operation Mode" option to [non-RAID]. 2.12.2 Installing Windows® VistaTM / VistaTM 64-bit Without RAID Functions If you want to install Windows® VistaTM or VistaTM 64-bit on your SATA / SATAII HDDs without RAID functions, please set the "PCIE-SATAII Operation Mode" option to [IDE] or [AHCI]. If you apply Untied Overclocking Technology. 25 ASRock ALiveSATA2-GLAN Motherboard English


