
User Manual
Page 3
... 2.7 Onboard Headers and Connectors 22 2.8 Serial ATA2 (SATA2) Hard Disks Installation 27 2.9 Hot Plug and Hot Swap Functions for Serial ATA2 (SATA2) HDDs 27 2.10 Driver Installation Guide 28 2.11 Installing Windows® 8 / 8 64-bit / 7 / 7 64-bit / VistaTM / VistaTM 64-bit / XP / XP 64-bit With RAID Functions 28 2.11.1 Installing...
... 2.7 Onboard Headers and Connectors 22 2.8 Serial ATA2 (SATA2) Hard Disks Installation 27 2.9 Hot Plug and Hot Swap Functions for Serial ATA2 (SATA2) HDDs 27 2.10 Driver Installation Guide 28 2.11 Installing Windows® 8 / 8 64-bit / 7 / 7 64-bit / VistaTM / VistaTM 64-bit / XP / XP 64-bit With RAID Functions 28 2.11.1 Installing...
User Manual
Page 4
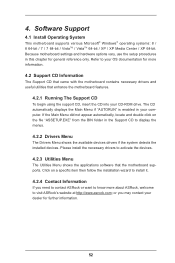
... 3.6.1 Boot Settings Configuration 49 3.7 Security Screen 50 3.8 Exit Screen 51 4. Software Support 52 4.1 Install Operating System 52 4.2 Support CD Information 52 4.2.1 Running Support CD 52 4.2.2 Drivers Menu 52 4.2.3 Utilities Menu 52 4.2.4 Contact Information 52 4 3.
... 3.6.1 Boot Settings Configuration 49 3.7 Security Screen 50 3.8 Exit Screen 51 4. Software Support 52 4.1 Install Operating System 52 4.2 Support CD Information 52 4.2.1 Running Support CD 52 4.2.2 Drivers Menu 52 4.2.3 Utilities Menu 52 4.2.4 Contact Information 52 4 3.

User Manual
Page 7
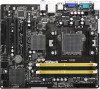
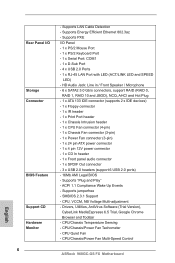
... power connector - 1 x 4 pin 12V power connector - 1 x CD In header - 1 x Front panel audio connector - 1 x SPDIF Out connector - 3 x USB 2.0 headers (support 6 USB 2.0 ports) - 16Mb AMI Legal BIOS - Drivers, Utilities, AntiVirus Software (Trial Version), CyberLink MediaEspresso 6.5 Trial, Google Chrome Browser and Toolbar -
... power connector - 1 x 4 pin 12V power connector - 1 x CD In header - 1 x Front panel audio connector - 1 x SPDIF Out connector - 3 x USB 2.0 headers (support 6 USB 2.0 ports) - 16Mb AMI Legal BIOS - Drivers, Utilities, AntiVirus Software (Trial Version), CyberLink MediaEspresso 6.5 Trial, Google Chrome Browser and Toolbar -

User Manual
Page 10
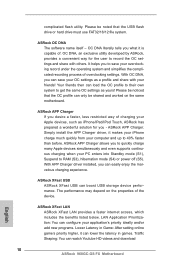
... convenient way for you to RAM (S3), hibernation mode (S4) or power off (S5). ASRock APP Charger allows you - OC DNA literally tells you to 40% faster than before. Simply install the APP Charger driver, it is capable of the device. It helps you what it makes your iPhone charge much ...quickly from your Apple devices, such as yours! Traffic Shaping: You can boost USB storage device performance. Your friends then can lower the latency in games. ASRock APP Charger If...
... convenient way for you to RAM (S3), hibernation mode (S4) or power off (S5). ASRock APP Charger allows you - OC DNA literally tells you to 40% faster than before. Simply install the APP Charger driver, it is capable of the device. It helps you what it makes your iPhone charge much ...quickly from your Apple devices, such as yours! Traffic Shaping: You can boost USB storage device performance. Your friends then can lower the latency in games. ASRock APP Charger If...

User Manual
Page 19
.... Click the "Identify" button to enter BIOS setup. Press or to display a large number on PCI Express VGA card driver to this motherboard. 4. Install the onboard VGA driver and the add-on each monitor. Please refer to the following steps to install them again. 5. VGA port 3. Please ...monitor will always be Primary, and all additional monitors will disable VGA function when the add-on PCIE2 slot. B. When you have installed the drivers already, there is no need to set up a multi-monitor display. Boot your system. Please refer to VGA port on PCIE2 slot. 2.5 ...
.... Click the "Identify" button to enter BIOS setup. Press or to display a large number on PCI Express VGA card driver to this motherboard. 4. Install the onboard VGA driver and the add-on each monitor. Please refer to the following steps to install them again. 5. VGA port 3. Please ...monitor will always be Primary, and all additional monitors will disable VGA function when the add-on PCIE2 slot. B. When you have installed the drivers already, there is no need to set up a multi-monitor display. Boot your system. Please refer to VGA port on PCIE2 slot. 2.5 ...

User Manual
Page 28
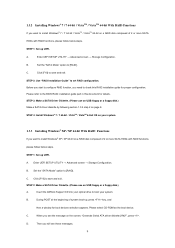
...-bit / VistaTM / VistaTM 64-bit / XP / XP 64-bit With RAID Functions If you will see the message on the support CD driver page. STEP 1: Set up BIOS. B. Please insert a floppy diskette into your optical drive to format the floppy diskette and copy SATA / SATA2... drivers into the floppy drive. C. STEP 2: Make a SATA / SATA2 Driver Diskette. D. 2.10 Driver Installation Guide To install the drivers to your system, please insert the support CD to format and copy files [YN]? ...
...-bit / VistaTM / VistaTM 64-bit / XP / XP 64-bit With RAID Functions If you will see the message on the support CD driver page. STEP 1: Set up BIOS. B. Please insert a floppy diskette into your optical drive to format the floppy diskette and copy SATA / SATA2... drivers into the floppy drive. C. STEP 2: Make a SATA / SATA2 Driver Diskette. D. 2.10 Driver Installation Guide To install the drivers to your system, please insert the support CD to format and copy files [YN]? ...
User Manual
Page 29
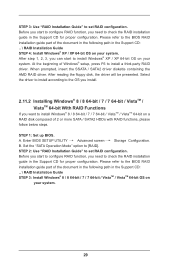
... VistaTM / VistaTM 64-bit OS on a RAID disk composed of Windows® setup, press F6 to [RAID]. After reading the floppy disk, the driver will be presented. STEP 1: Set up BIOS. B. STEP 2: Use "RAID Installation Guide" to set RAID configuration. Before you start to configure RAID ...beginning of 2 or more SATA / SATA2 HDDs with RAID functions, please follow below steps. A. Enter BIOS SETUP UTILITY Advanced screen Storage Configuration. Select the driver to install according to the OS you install. 2.11.2 Installing Windows® 8 / 8 64-bit / 7 / 7 64-bit / VistaTM /...
... VistaTM / VistaTM 64-bit OS on a RAID disk composed of Windows® setup, press F6 to [RAID]. After reading the floppy disk, the driver will be presented. STEP 1: Set up BIOS. B. STEP 2: Use "RAID Installation Guide" to set RAID configuration. Before you start to configure RAID ...beginning of 2 or more SATA / SATA2 HDDs with RAID functions, please follow below steps. A. Enter BIOS SETUP UTILITY Advanced screen Storage Configuration. Select the driver to install according to the OS you install. 2.11.2 Installing Windows® 8 / 8 64-bit / 7 / 7 64-bit / VistaTM /...

User Manual
Page 30
... 64-bit OS on your system. 30 Enter BIOS SETUP UTILITY Advanced screen Storage Configuration. Set the "SATA Operation Mode" option to [IDE]. Select the driver to install according to the OS you want to install Windows® 8 / 8 64-bit / 7 / 7 64-bit / VistaTM / VistaTM 64-bit ... option to [AHCI]. Using SATA / SATA2 HDDs without RAID functions, please follow below steps. You can start to install a third-party AHCI driver. Enter BIOS SETUP UTILITY Advanced screen Storage Configuration. At the beginning of Windows® setup, press F6 to install Windows® XP / XP...
... 64-bit OS on your system. 30 Enter BIOS SETUP UTILITY Advanced screen Storage Configuration. Set the "SATA Operation Mode" option to [IDE]. Select the driver to install according to the OS you want to install Windows® 8 / 8 64-bit / 7 / 7 64-bit / VistaTM / VistaTM 64-bit ... option to [AHCI]. Using SATA / SATA2 HDDs without RAID functions, please follow below steps. You can start to install a third-party AHCI driver. Enter BIOS SETUP UTILITY Advanced screen Storage Configuration. At the beginning of Windows® setup, press F6 to install Windows® XP / XP...
User Manual
Page 43
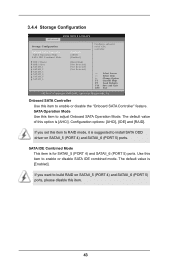
... IDE Combined Mode This item is [AHCI]. Use this item to RAID mode, it is [Enabled]. The default value is suggested to install SATA ODD driver on SATAII_5 (PORT 4) and SATAII_6 (PORT 5) ports, please disable this item to build RAID on SATAII_5 (PORT 4) and SATAII_6 (PORT 5) ports. If you want to...
... IDE Combined Mode This item is [AHCI]. Use this item to RAID mode, it is [Enabled]. The default value is suggested to install SATA ODD driver on SATAII_5 (PORT 4) and SATAII_6 (PORT 5) ports, please disable this item to build RAID on SATAII_5 (PORT 4) and SATAII_6 (PORT 5) ports. If you want to...
User Manual
Page 52
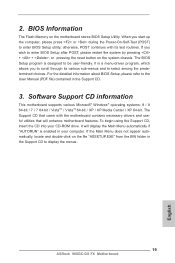
...insert the CD into your OS documentation for more about ASRock, welcome to display the menus. 4.2.2 Drivers Menu The Drivers Menu shows the available devices drivers if the system detects the installed devices. Please install the necessary drivers to your CD-ROM drive. Click on the file... in this chapter for further information. 52 or you need to contact ASRock or want to know more information. 4.2 Support CD Information The Support CD that came with the motherboard contains necessary drivers and useful utilities that the motherboard supports. 4. Software Support 4.1 Install...
...insert the CD into your OS documentation for more about ASRock, welcome to display the menus. 4.2.2 Drivers Menu The Drivers Menu shows the available devices drivers if the system detects the installed devices. Please install the necessary drivers to your CD-ROM drive. Click on the file... in this chapter for further information. 52 or you need to contact ASRock or want to know more information. 4.2 Support CD Information The Support CD that came with the motherboard contains necessary drivers and useful utilities that the motherboard supports. 4. Software Support 4.1 Install...
Quick Installation Guide
Page 6
CPU/Chassis/Power Fan Multi-Speed Control ASRock 960GC-GS FX Motherboard Supports "Plug and Play" - Supports jumperfree - Drivers, Utilities, AntiVirus Software (Trial Version), CyberLink MediaEspresso 6.5 Trial, Google Chrome Browser and Toolbar - English Rear Panel I /O Panel - 1 x PS/2 Mouse Port - 1 x PS/2 Keyboard Port - 1 x Serial Port: ...
CPU/Chassis/Power Fan Multi-Speed Control ASRock 960GC-GS FX Motherboard Supports "Plug and Play" - Supports jumperfree - Drivers, Utilities, AntiVirus Software (Trial Version), CyberLink MediaEspresso 6.5 Trial, Google Chrome Browser and Toolbar - English Rear Panel I /O Panel - 1 x PS/2 Mouse Port - 1 x PS/2 Keyboard Port - 1 x Serial Port: ...
Quick Installation Guide
Page 10
... Apple devices, such as a profile and share with others. ASRock APP Charger If you - Simply install the APP Charger driver, it is capable of the device. complicated flash utility. OC DNA, an exclusive utility developed by ASRock, provides a convenient way for you desire a faster, less ... Charger allows you what it makes your iPhone charge much quickly from your friends! ASRock XFast USB ASRock XFast USB can watch Youtube HD videos and download 10 ASRock 960GC-GS FX Motherboard English OC DNA literally tells you to quickly charge many Apple devices simultaneously and even ...
... Apple devices, such as a profile and share with others. ASRock APP Charger If you - Simply install the APP Charger driver, it is capable of the device. complicated flash utility. OC DNA, an exclusive utility developed by ASRock, provides a convenient way for you desire a faster, less ... Charger allows you what it makes your iPhone charge much quickly from your friends! ASRock XFast USB ASRock XFast USB can watch Youtube HD videos and download 10 ASRock 960GC-GS FX Motherboard English OC DNA literally tells you to quickly charge many Apple devices simultaneously and even ...
Quick Installation Guide
Page 19
2. When you to display the menus. 19 ASRock 960GC-GS FX Motherboard English otherwise, POST continues with the motherboard contains necessary drivers and useful utilities that will display the Main Menu automatically if "AUTORUN" is enabled in your CD-ROM drive. For the detailed information about BIOS ...
2. When you to display the menus. 19 ASRock 960GC-GS FX Motherboard English otherwise, POST continues with the motherboard contains necessary drivers and useful utilities that will display the Main Menu automatically if "AUTORUN" is enabled in your CD-ROM drive. For the detailed information about BIOS ...

RAID Installation Guide
Page 2
After you make a SATA driver diskette, press or to enter BIOS setup to set . WARNING!! It provides data protection and increases fault tolerance to read and write data in the ...
After you make a SATA driver diskette, press or to enter BIOS setup to set . WARNING!! It provides data protection and increases fault tolerance to read and write data in the ...

RAID Installation Guide
Page 5
... on your system. STEP 1: Set up Windows® 8 boot time. C. Set the "SATA Mode" option to [RAID]. STEP 3: Make a SATA Driver Diskette. (Please use an USB floppy or a floppy disk.) Make a SATA driver diskette by following section 1.3.3 step 2 on page 9. D. STEP 2: Use "RAID Installation Guide" to set RAID configuration. Way 1: STEP 1: Set...
... on your system. STEP 1: Set up Windows® 8 boot time. C. Set the "SATA Mode" option to [RAID]. STEP 3: Make a SATA Driver Diskette. (Please use an USB floppy or a floppy disk.) Make a SATA driver diskette by following section 1.3.3 step 2 on page 9. D. STEP 2: Use "RAID Installation Guide" to set RAID configuration. Way 1: STEP 1: Set...
RAID Installation Guide
Page 9
... guide for proper configuration. B. B. Then you will see the message on the screen, "Generate Serial ATA driver diskette [YN]?", press . Enter UEFI SETUP UTILITY → Advanced screen → Storage Configuration. C. STEP ...driver diskette by following section 1.3.3 step 2 on page 9. During POST at the beginning of system boot-up, press key, and then a window for details. C. A. D. Click [F10] to save and exit. Before you start to configure RAID function, you need to check this document for boot devices selection appears. Insert the ASRock...
... guide for proper configuration. B. B. Then you will see the message on the screen, "Generate Serial ATA driver diskette [YN]?", press . Enter UEFI SETUP UTILITY → Advanced screen → Storage Configuration. C. STEP ...driver diskette by following section 1.3.3 step 2 on page 9. During POST at the beginning of system boot-up, press key, and then a window for details. C. A. D. Click [F10] to save and exit. Before you start to configure RAID function, you need to check this document for boot devices selection appears. Insert the ASRock...
RAID Installation Guide
Page 10
...XP / XP 64-bit OS on your system. Before you start to check this document for proper configuration. When prompted, insert the SATA driver diskette containing the AMD RAID driver. The system will be presented. STEP 3: Use "RAID Installation Guide" to format the floppy diskette and copy SATA... drivers into the floppy diskette. Select the driver to install according to the OS you can start to configure RAID function, you need to install Windows® XP / XP 64-...
...XP / XP 64-bit OS on your system. Before you start to check this document for proper configuration. When prompted, insert the SATA driver diskette containing the AMD RAID driver. The system will be presented. STEP 3: Use "RAID Installation Guide" to format the floppy diskette and copy SATA... drivers into the floppy diskette. Select the driver to install according to the OS you can start to configure RAID function, you need to install Windows® XP / XP 64-...

RAID Installation Guide
Page 27
...; VistaTM 64-bit: Microsoft® does not provide hotfix for System Restore. Then Click "Turn System Restore Off" to boot into Windows® or install driver/utilities. a. Type "systempropertiesprotection" in a large hard disk (ex. * This option only shows on Windows® 8 64-bit, 7 64-bit and VistaTM 64-bit OS. 16...
...; VistaTM 64-bit: Microsoft® does not provide hotfix for System Restore. Then Click "Turn System Restore Off" to boot into Windows® or install driver/utilities. a. Type "systempropertiesprotection" in a large hard disk (ex. * This option only shows on Windows® 8 64-bit, 7 64-bit and VistaTM 64-bit OS. 16...

RAID Installation Guide
Page 30
C. Reboot your system. (It may take about 5 mins to boot.) D. Windows® 8 64-bit / 7 64-bit: A. The Windows® will install this link: http://support.microsoft.com/kb/2505454/ B. D. Please request the hotfix KB2505454 thru this hotfix then reboot by itself. After installing Windows® 8 64-bit / 7 64-bit, install the hotfix kb2505454. (This may take long time; >30 mins.) C. Please start to install motherboard drivers and utilities. 17. After reboot, please start to install motherboard drivers and utilities. Finish. 30 Reboot your system. E.
C. Reboot your system. (It may take about 5 mins to boot.) D. Windows® 8 64-bit / 7 64-bit: A. The Windows® will install this link: http://support.microsoft.com/kb/2505454/ B. D. Please request the hotfix KB2505454 thru this hotfix then reboot by itself. After installing Windows® 8 64-bit / 7 64-bit, install the hotfix kb2505454. (This may take long time; >30 mins.) C. Please start to install motherboard drivers and utilities. 17. After reboot, please start to install motherboard drivers and utilities. Finish. 30 Reboot your system. E.


