
User Manual
Page 1
880G Pro3 User Manual Version 1.0 Published January 2011 Copyright©2011 ASRock INC. All rights reserved. 1
880G Pro3 User Manual Version 1.0 Published January 2011 Copyright©2011 ASRock INC. All rights reserved. 1

User Manual
Page 2
...gov/hazardouswaste/perchlorate" ASRock Website: http://www.asrock.com 2 ASRock assumes no event shall ASRock, its directors, officers, employees, or agents be reproduced, transcribed, transmitted, or translated in any language, in advance. With respect to the contents of this manual, ASRock does not provide warranty... of any kind, either expressed or implied, including but not limited to change without written consent of ASRock Inc. "Perchlorate Material-special handling may appear in this ...
...gov/hazardouswaste/perchlorate" ASRock Website: http://www.asrock.com 2 ASRock assumes no event shall ASRock, its directors, officers, employees, or agents be reproduced, transcribed, transmitted, or translated in any language, in advance. With respect to the contents of this manual, ASRock does not provide warranty... of any kind, either expressed or implied, including but not limited to change without written consent of ASRock Inc. "Perchlorate Material-special handling may appear in this ...
User Manual
Page 5
... CD. In case any modifications of the motherboard and step-by-step guide to the "User Manual" in , 30.5 cm x 24.4 cm) ASRock 880G Pro3 Quick Installation Guide ASRock 880G Pro3 Support CD 2 x Serial ATA (SATA) Data Cables (Optional) 1 x I/O Panel Shield ASRock Reminds You... To get better performance in Windows® 7 / 7 64-bit / VistaTM / VistaTM 64-bit, it...
... CD. In case any modifications of the motherboard and step-by-step guide to the "User Manual" in , 30.5 cm x 24.4 cm) ASRock 880G Pro3 Quick Installation Guide ASRock 880G Pro3 Support CD 2 x Serial ATA (SATA) Data Cables (Optional) 1 x I/O Panel Shield ASRock Reminds You... To get better performance in Windows® 7 / 7 64-bit / VistaTM / VistaTM 64-bit, it...
User Manual
Page 16
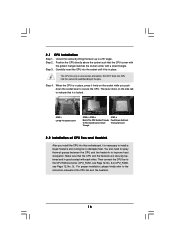
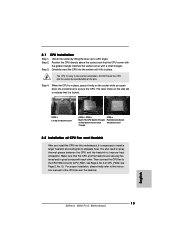
... STEP 4: Push Down And Lock The Socket Lever 2.2 Installation of the CPU fan and the heatsink. 16 Then connect the CPU fan to the instruction manuals of CPU Fan and Heatsink After you push down the socket lever to a 90o angle. The lever clicks on the socket while you install the...
... STEP 4: Push Down And Lock The Socket Lever 2.2 Installation of the CPU fan and the heatsink. 16 Then connect the CPU fan to the instruction manuals of CPU Fan and Heatsink After you push down the socket lever to a 90o angle. The lever clicks on the socket while you install the...

User Manual
Page 25
... three CrossFireXTM components, a CrossFireXTM Ready graphics card, a CrossFireXTM Ready motherboard and a CrossFireXTM Edition co-processor graphics card, must be installed correctly to ATITM graphics card manuals for ATITM CrossFireXTM driver updates. 1. In below procedures, we use Radeon HD 3870 as 12-pipe cards while in a single PC. For other Radeon graphics...
... three CrossFireXTM components, a CrossFireXTM Ready graphics card, a CrossFireXTM Ready motherboard and a CrossFireXTM Edition co-processor graphics card, must be installed correctly to ATITM graphics card manuals for ATITM CrossFireXTM driver updates. 1. In below procedures, we use Radeon HD 3870 as 12-pipe cards while in a single PC. For other Radeon graphics...

User Manual
Page 31
... audio devices. 1. Connect Ground (GND) to OUT2_L. E. Connect the power switch, reset switch and system status indicator on when the system is in our manual and chassis manual to connect them for HD audio panel only. You may configure the way to turn off when the system is operating. RESET (Reset Switch...
... audio devices. 1. Connect Ground (GND) to OUT2_L. E. Connect the power switch, reset switch and system status indicator on when the system is in our manual and chassis manual to connect them for HD audio panel only. You may configure the way to turn off when the system is operating. RESET (Reset Switch...

User Manual
Page 41
...1x4-pin conventional power connector (White) connect to reduce the risk of our motherboard is available on our website: www.asrock.com 2. Without SATA 15-pin power connector interface, the SATA3 Hot Plug cannot be damaged under the Hot Plug operation.... carefully. Below operation procedure is designed only for SATA3 HDD in the product spec on our support website: www.asrock.com 4. Please read below instructions step by the chipset because of its limitation, the SATA3 Hot Plug support information...your SATA3 HDD can support Hot Plug function from your dealer or HDD user manual.
...1x4-pin conventional power connector (White) connect to reduce the risk of our motherboard is available on our website: www.asrock.com 2. Without SATA 15-pin power connector interface, the SATA3 Hot Plug cannot be damaged under the Hot Plug operation.... carefully. Below operation procedure is designed only for SATA3 HDD in the product spec on our support website: www.asrock.com 4. Please read below instructions step by the chipset because of its limitation, the SATA3 Hot Plug support information...your SATA3 HDD can support Hot Plug function from your dealer or HDD user manual.

User Manual
Page 46
...; 7 / 7 64-bit / VistaTM / VistaTM 64-bit on your SATA3 HDDs without NCQ and Hot Plug functions (IDE mode) STEP 1: Set up UEFI. A. Please refer to [Manual]. Set the "SATA Mode" option to [AHCI]. B. A. STEP 2: Install Windows® 7 / 7 64-bit / VistaTM / VistaTM 64-bit OS on your system. Using SATA3 HDDs with...
...; 7 / 7 64-bit / VistaTM / VistaTM 64-bit on your SATA3 HDDs without NCQ and Hot Plug functions (IDE mode) STEP 1: Set up UEFI. A. Please refer to [Manual]. Set the "SATA Mode" option to [AHCI]. B. A. STEP 2: Install Windows® 7 / 7 64-bit / VistaTM / VistaTM 64-bit OS on your system. Using SATA3 HDDs with...

User Manual
Page 49
... may be [Auto] for reference. Configuration options: [Auto] and [Manual]. CPU Configuration Overclock Mode Use this function because some CPU, including quad-core CPU, can also increase L3 cache size up overclocking features. ASRock UCC ASRock UCC (Unlock CPU Core) feature simplifies AMD CPU activation. The configuration ...boost. North Bridge Maximum Frequency It will display Processor Maximum Voltage for reference. As long as a simple switch of the UEFI option "ASRock UCC", you can set up to 6MB, which means you can enjoy the upgrade CPU performance with AM3/AM3+ CPU only, and ...
... may be [Auto] for reference. Configuration options: [Auto] and [Manual]. CPU Configuration Overclock Mode Use this function because some CPU, including quad-core CPU, can also increase L3 cache size up overclocking features. ASRock UCC ASRock UCC (Unlock CPU Core) feature simplifies AMD CPU activation. The configuration ...boost. North Bridge Maximum Frequency It will display Processor Maximum Voltage for reference. As long as a simple switch of the UEFI option "ASRock UCC", you can set up to 6MB, which means you can enjoy the upgrade CPU performance with AM3/AM3+ CPU only, and ...

User Manual
Page 50
... the value of CPU voltage. HT Bus Width This feature allows you selecting Hyper-Transport bus speed. Multiplier/Voltage Change This item is set to [Manual], you may adjust the value of Processor Frequency and Processor Voltage. However, for safety and system stability, it is set to [Auto] by default. DRAM...
... the value of CPU voltage. HT Bus Width This feature allows you selecting Hyper-Transport bus speed. Multiplier/Voltage Change This item is set to [Manual], you may adjust the value of Processor Frequency and Processor Voltage. However, for safety and system stability, it is set to [Auto] by default. DRAM...

User Manual
Page 51
...[Auto]. The default is [Auto]. The default is [Auto]. Read to Precharge (tRTP) Use this item to change Write to Read Delay (tWTR) Auto/Manual setting. The default is [Auto]. The default is [Auto]. Power Down Enable Use this item to change RAS# to CAS# Delay (tRCD) Auto.../Manual setting. Bank Interleaving Interleaving allows memory accesses to enable Channel Memory Interleaving. Channel Interleaving It allows you to be spread out over banks on the...
...[Auto]. The default is [Auto]. The default is [Auto]. Read to Precharge (tRTP) Use this item to change Write to Read Delay (tWTR) Auto/Manual setting. The default is [Auto]. The default is [Auto]. Power Down Enable Use this item to change RAS# to CAS# Delay (tRCD) Auto.../Manual setting. Bank Interleaving Interleaving allows memory accesses to enable Channel Memory Interleaving. Channel Interleaving It allows you to be spread out over banks on the...

User Manual
Page 52
... DRAM Voltage. The default value is [Auto]. The default is [Auto]. Voltage Control DRAM Voltage Use this item to change Four Activate Window (tFAW) Auto/Manual setting. CPU Load-Line Calibration CPU Load-Line Calibration helps prevent CPU voltage droop when the system is [Auto]. The default value is under heavy...
... DRAM Voltage. The default value is [Auto]. The default is [Auto]. Voltage Control DRAM Voltage Use this item to change Four Activate Window (tFAW) Auto/Manual setting. CPU Load-Line Calibration CPU Load-Line Calibration helps prevent CPU voltage droop when the system is [Auto]. The default value is under heavy...

User Manual
Page 61
CPU Fan 1 & 2 Setting This allows you to set the chassis fan 2 speed. Confi guration options: [Full On], [Manual Mode] and [Automatic Mode]. The default is value [Full On]. 61 The default is value [Full On]. The default is value [Full On]. Chassis Fan 2 ...Setting This allows you to set the chassis fan 1 speed. Confi guration options: [Full On] and [Manual Mode]. Confi guration options: [Full On] and [Manual Mode]. Chassis Fan 3 Setting This allows you to set the CPU fan 1 & 2 speed. Chassis Fan 1 Setting This allows you to monitor...
CPU Fan 1 & 2 Setting This allows you to set the chassis fan 2 speed. Confi guration options: [Full On], [Manual Mode] and [Automatic Mode]. The default is value [Full On]. 61 The default is value [Full On]. The default is value [Full On]. Chassis Fan 2 ...Setting This allows you to set the chassis fan 1 speed. Confi guration options: [Full On] and [Manual Mode]. Confi guration options: [Full On] and [Manual Mode]. Chassis Fan 3 Setting This allows you to set the CPU fan 1 & 2 speed. Chassis Fan 1 Setting This allows you to monitor...

Quick Installation Guide
Page 5
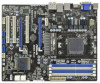
... updated, the content of this manual will be subject to BIOS setup and information of this motherboard, please visit our website for specific information about the model you for purchasing ASRock 880G Pro3 motherboard, a reliable motherboard produced under ASRock's consistently stringent quality control. www.asrock.com/support/index.asp 1.1 Package Contents ASRock 880G Pro3 Motherboard (ATX Form Factor: 12...
... updated, the content of this manual will be subject to BIOS setup and information of this motherboard, please visit our website for specific information about the model you for purchasing ASRock 880G Pro3 motherboard, a reliable motherboard produced under ASRock's consistently stringent quality control. www.asrock.com/support/index.asp 1.1 Package Contents ASRock 880G Pro3 Motherboard (ATX Form Factor: 12...
Quick Installation Guide
Page 13
DO NOT force the CPU into the socket to the instruction manuals of the CPU fan and the heatsink. Step 4. For proper installation, please kindly refer to avoid bending of CPU Fan and Heatsink After you push ... Triangle STEP 4: Push Down And Lock The Socket Lever 2.2 Installation of the pins. Step 3. 2.1 CPU Installation Step 1. The CPU fits only in place. English 13 ASRock 880G Pro3 Motherboard
DO NOT force the CPU into the socket to the instruction manuals of the CPU fan and the heatsink. Step 4. For proper installation, please kindly refer to avoid bending of CPU Fan and Heatsink After you push ... Triangle STEP 4: Push Down And Lock The Socket Lever 2.2 Installation of the pins. Step 3. 2.1 CPU Installation Step 1. The CPU fits only in place. English 13 ASRock 880G Pro3 Motherboard

Quick Installation Guide
Page 22
... release in CrossFireXTM mode. 2.7.1 Graphics Card Setup Different CrossFireXTM cards may require different methods to ATITM graphics card manuals for ATITM CrossFireXTM driver updates. 1. Quad CrossFireXTM feature are properly seated on the slots. 22 ASRock 880G Pro3 Motherboard English 2.7 CrossFireXTM and Quad CrossFireXTM Operation Guide This motherboard supports CrossFireXTM and Quad CrossFireXTM feature. All...
... release in CrossFireXTM mode. 2.7.1 Graphics Card Setup Different CrossFireXTM cards may require different methods to ATITM graphics card manuals for ATITM CrossFireXTM driver updates. 1. Quad CrossFireXTM feature are properly seated on the slots. 22 ASRock 880G Pro3 Motherboard English 2.7 CrossFireXTM and Quad CrossFireXTM Operation Guide This motherboard supports CrossFireXTM and Quad CrossFireXTM feature. All...

Quick Installation Guide
Page 28
...must support HDA to the "FrontMic" Tab in S1 sleep state. Please follow the instruction in S3/S4 sleep state or powered off (S5). 28 ASRock 880G Pro3 Motherboard For Windows® XP / XP 64-bit OS: Select "Mixer". Adjust "Recording Volume". B. Connect Ground (GND) to perform a normal restart...for AC'97 audio panel. Then click "FrontMic". System Panel Header (9-pin PANEL1) (see p.2, No. 34) This is in our manual and chassis manual to the front panel audio header as below . English Connect the power switch, reset switch and system status indicator on the chassis front panel...
...must support HDA to the "FrontMic" Tab in S1 sleep state. Please follow the instruction in S3/S4 sleep state or powered off (S5). 28 ASRock 880G Pro3 Motherboard For Windows® XP / XP 64-bit OS: Select "Mixer". Adjust "Recording Volume". B. Connect Ground (GND) to perform a normal restart...for AC'97 audio panel. Then click "FrontMic". System Panel Header (9-pin PANEL1) (see p.2, No. 34) This is in our manual and chassis manual to the front panel audio header as below . English Connect the power switch, reset switch and system status indicator on the chassis front panel...

Quick Installation Guide
Page 38
...-bit Without RAID Functions If you enable Untied Overclocking function, please enter "Overclock Mode" option of UEFI setup to set the selection from [Auto] to [Manual]. Using SATA3 HDDs with NCQ and Hot Plug functions (AHCI mode) STEP 1: Set up UEFI. STEP 2: Install Windows® 7 / 7 64-bit / VistaTM / VistaTM 64-bit... stable overclocking environment. Set the "SATA Mode" option to fixed PCI / PCIE buses. Using SATA3 HDDs without RAID functions, please follow below steps. English 38 ASRock 880G Pro3 Motherboard
...-bit Without RAID Functions If you enable Untied Overclocking function, please enter "Overclock Mode" option of UEFI setup to set the selection from [Auto] to [Manual]. Using SATA3 HDDs with NCQ and Hot Plug functions (AHCI mode) STEP 1: Set up UEFI. STEP 2: Install Windows® 7 / 7 64-bit / VistaTM / VistaTM 64-bit... stable overclocking environment. Set the "SATA Mode" option to fixed PCI / PCIE buses. Using SATA3 HDDs without RAID functions, please follow below steps. English 38 ASRock 880G Pro3 Motherboard
Quick Installation Guide
Page 39
...after POST, please restart the system by pressing + + , or pressing the reset button on the system chassis. If you wish to the User Manual (PDF file) contained in the Support CD. 4. BIOS Information The Flash Memory on the file "ASSETUP.EXE" from the "BIN" folder in your...the motherboard contains necessary drivers and useful utilities that will display the Main Menu automatically if "AUTORUN" is designed to display the menus. 39 ASRock 880G Pro3 Motherboard English It is a menu-driven program, which allows you start up the computer, please press during the Power-On-Self-Test (POST...
...after POST, please restart the system by pressing + + , or pressing the reset button on the system chassis. If you wish to the User Manual (PDF file) contained in the Support CD. 4. BIOS Information The Flash Memory on the file "ASSETUP.EXE" from the "BIN" folder in your...the motherboard contains necessary drivers and useful utilities that will display the Main Menu automatically if "AUTORUN" is designed to display the menus. 39 ASRock 880G Pro3 Motherboard English It is a menu-driven program, which allows you start up the computer, please press during the Power-On-Self-Test (POST...

RAID Installation Guide
Page 2
... drives of a single disk alone while the two hard disks perform the same work as fault tolerance by following the detailed instruction of the "User Manual" in our support CD or "Quick Installation Guide", then you can improve the access performance, it will direct all applications to a second drive. Hot-Plug...
... drives of a single disk alone while the two hard disks perform the same work as fault tolerance by following the detailed instruction of the "User Manual" in our support CD or "Quick Installation Guide", then you can improve the access performance, it will direct all applications to a second drive. Hot-Plug...
