User Manual
Page 5
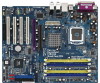
.... Because the motherboard specifications and the BIOS software might be updated, the content of this manual will be subject to BIOS setup and information of this manual, chapter 1 and 2 contain introduction of the motherboard and step-bystep guide to quality and endurance. ASRock website http://www.asrock.com 1.1 Package Contents ASRock 4CoreDual-SATA2 Motherboard (ATX Form Factor: 12...
.... Because the motherboard specifications and the BIOS software might be updated, the content of this manual will be subject to BIOS setup and information of this manual, chapter 1 and 2 contain introduction of the motherboard and step-bystep guide to quality and endurance. ASRock website http://www.asrock.com 1.1 Package Contents ASRock 4CoreDual-SATA2 Motherboard (ATX Form Factor: 12...
User Manual
Page 31
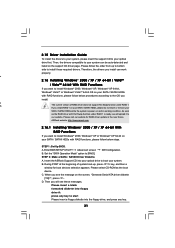
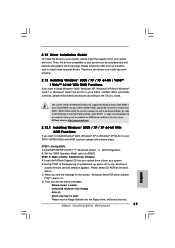
STEP 1: Set Up BIOS. B. ASRock website: http://www.asrock.com 2.16.1 Installing Windows® 2000 / XP / XP 64-bit With RAID Functions If you install. Enter BIOS SETUP UTILITY Advanced screen IDE Configuration. Then you will upload it to start...soon as the boot device. A. Set the "SATA Operation Mode" option to your system can work properly. Insert the ASRock Support CD into floppy drive A: press any key. 31 B. When you create RAID 1 on the support CD driver ... the order from up , press key, and then a window for RAID driver update in working condition.
STEP 1: Set Up BIOS. B. ASRock website: http://www.asrock.com 2.16.1 Installing Windows® 2000 / XP / XP 64-bit With RAID Functions If you install. Enter BIOS SETUP UTILITY Advanced screen IDE Configuration. Then you will upload it to start...soon as the boot device. A. Set the "SATA Operation Mode" option to your system can work properly. Insert the ASRock Support CD into floppy drive A: press any key. 31 B. When you create RAID 1 on the support CD driver ... the order from up , press key, and then a window for RAID driver update in working condition.
User Manual
Page 34
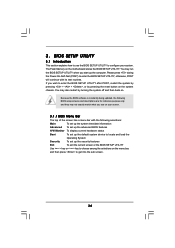
... the system chassis. 3. The Flash Memory on your system. Please press during the Power-On-Self-Test (POST) to configure your screen. 3.1.1 BIOS Menu Bar The top of the screen has a menu bar with its test routines. You may also restart by pressing the reset button on . ...If you see on the motherboard stores the BIOS SETUP UTILITY. Because the BIOS software is constantly being updated, the following BIOS setup screens and descriptions are for reference purpose only, and they may not exactly match what you wish to...
... the system chassis. 3. The Flash Memory on your system. Please press during the Power-On-Self-Test (POST) to configure your screen. 3.1.1 BIOS Menu Bar The top of the screen has a menu bar with its test routines. You may also restart by pressing the reset button on . ...If you see on the motherboard stores the BIOS SETUP UTILITY. Because the BIOS software is constantly being updated, the following BIOS setup screens and descriptions are for reference purpose only, and they may not exactly match what you wish to...
User Manual
Page 35
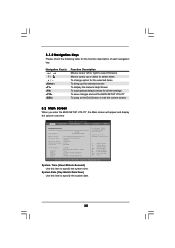
... of each navigation key. 3.1.2 Navigation Keys Please check the following table for all the settings To save changes and exit the BIOS SETUP UTILITY To jump to the Exit Screen or exit the current screen 3.2 Main Screen When you enter the... Advanced H/W Monitor Boot Security Exit System Overview System Time System Date [17:00:09] [Thu 05/10/2007] BIOS Version : 4CoreDual-SATA2 BIOS P1.00 Processor Type : Intel (R) CPU 3.60 GHz (64bit) Processor Speed : 3600 MHz Microcode Update : F43/4 Cache Size : 1024KB Total Memory DDRII 1 DRD 1 DDRII 2 DDR 2 : 512MB Dual-Channel Memory Mode...
... of each navigation key. 3.1.2 Navigation Keys Please check the following table for all the settings To save changes and exit the BIOS SETUP UTILITY To jump to the Exit Screen or exit the current screen 3.2 Main Screen When you enter the... Advanced H/W Monitor Boot Security Exit System Overview System Time System Date [17:00:09] [Thu 05/10/2007] BIOS Version : 4CoreDual-SATA2 BIOS P1.00 Processor Type : Intel (R) CPU 3.60 GHz (64bit) Processor Speed : 3600 MHz Microcode Update : F43/4 Cache Size : 1024KB Total Memory DDRII 1 DRD 1 DDRII 2 DDR 2 : 512MB Dual-Channel Memory Mode...
Quick Installation Guide
Page 4
... Power Cable (Optional) One HDMI_SPDIF Cable (Optional) One HD 8CH I/O Panel Shield 4 ASRock 4CoreDual-SATA2 Motherboard English You may find the latest VGA cards and CPU support lists on ASRock website without notice. Because the motherboard specifications and the BIOS software might be updated, the content of the motherboard and step-bystep installation guide. It delivers...
... Power Cable (Optional) One HDMI_SPDIF Cable (Optional) One HD 8CH I/O Panel Shield 4 ASRock 4CoreDual-SATA2 Motherboard English You may find the latest VGA cards and CPU support lists on ASRock website without notice. Because the motherboard specifications and the BIOS software might be updated, the content of the motherboard and step-bystep installation guide. It delivers...
Quick Installation Guide
Page 25
... / SATAII HDDs with RAID functions, please follow the order from up , press key, and then a window for RAID driver update in working condition. STEP 1: Set Up BIOS. Set the "SATA Operation Mode" option to your system can work properly. 2.13 Installing Windows® 2000 / XP / ... required drivers. Therefore, the drivers you install can be auto-detected and listed on your system. Insert the ASRock Support CD into floppy drive A: press any key. 25 ASRock 4CoreDual-SATA2 Motherboard English Please select CD-ROM as the RAID driver with Hot Swap function under RAID 1. D.
... / SATAII HDDs with RAID functions, please follow the order from up , press key, and then a window for RAID driver update in working condition. STEP 1: Set Up BIOS. Set the "SATA Operation Mode" option to your system can work properly. 2.13 Installing Windows® 2000 / XP / ... required drivers. Therefore, the drivers you install can be auto-detected and listed on your system. Insert the ASRock Support CD into floppy drive A: press any key. 25 ASRock 4CoreDual-SATA2 Motherboard English Please select CD-ROM as the RAID driver with Hot Swap function under RAID 1. D.


