
Operating Instructions
Page 3
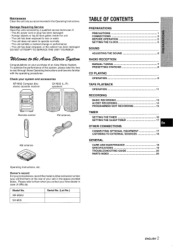
...the unit - The AC power cord or plug has been damaged - The unit does not seem to rain or water - Check your Aiwa dealer in performance - The unit has been exposed to operate normally - The unit has been dropped, or the cabinet has been damaged .... To optimize the performance of an Aiwa Stereo System. I 2 ENGLISH Owner's record Forycwrconvenience, record the model number and serial number (you will find them when you contact your system and accessories XR-M35 Compact disc stereo cassette receiver SX-M35 (L, R) speakers Remote control FM antenna AM antenna TABLE OF...
...the unit - The AC power cord or plug has been damaged - The unit does not seem to rain or water - Check your Aiwa dealer in performance - The unit has been exposed to operate normally - The unit has been dropped, or the cabinet has been damaged .... To optimize the performance of an Aiwa Stereo System. I 2 ENGLISH Owner's record Forycwrconvenience, record the model number and serial number (you will find them when you contact your system and accessories XR-M35 Compact disc stereo cassette receiver SX-M35 (L, R) speakers Remote control FM antenna AM antenna TABLE OF...
Operating Instructions
Page 5
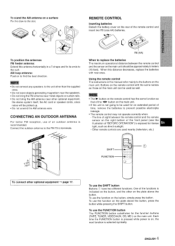
...functions is indicated on the button, and the other on the plate above the button, press the button while pressing the SHIFT button. O-ther remote controls ar~ used nearby (television, etc.) SHIFT FUNCTION I TCJuse the SHIFT button Buttons (~ have two different functions. L) / R6 (AA)... will be atwroximatelv 5 meters (16 feet). m - TCIuse the FUNCTION button The FUNCTION button substitutes for an extended period of the remote control and insert two R6 (size AA) batteries. To prxition the antennas FM feeder antenna: Extend this antenna horizontally in this distance ...
...functions is indicated on the button, and the other on the plate above the button, press the button while pressing the SHIFT button. O-ther remote controls ar~ used nearby (television, etc.) SHIFT FUNCTION I TCJuse the SHIFT button Buttons (~ have two different functions. L) / R6 (AA)... will be atwroximatelv 5 meters (16 feet). m - TCIuse the FUNCTION button The FUNCTION button substitutes for an extended period of the remote control and insert two R6 (size AA) batteries. To prxition the antennas FM feeder antenna: Extend this antenna horizontally in this distance ...
Operating Instructions
Page 6
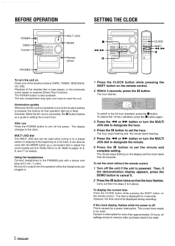
...Connect headphones to the PHONES jack with the MODE button as a guide to adjust the sound quality and turn the unit on the remote control. 2 Within 4 seconds, press the 11 button. If power is received (Direct Play Function). The disc compartment may open and...To switch to set the hour. changes to the clock. 4 Press the 11 button to the 24-hour standard, press the s button. Function PHONES Remote sensor ""m II 1"""""""'"~ Ej - However, the time cannot be displayed during recording. Refer to pages 6, 8, 9, and 11 for more than approximately 12...
...Connect headphones to the PHONES jack with the MODE button as a guide to adjust the sound quality and turn the unit on the remote control. 2 Within 4 seconds, press the 11 button. If power is received (Direct Play Function). The disc compartment may open and...To switch to set the hour. changes to the clock. 4 Press the 11 button to the 24-hour standard, press the s button. Function PHONES Remote sensor ""m II 1"""""""'"~ Ej - However, the time cannot be displayed during recording. Refer to pages 6, 8, 9, and 11 for more than approximately 12...
Operating Instructions
Page 7
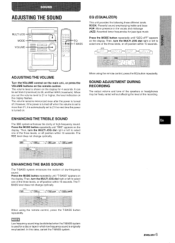
... O (minimum) to 21 the next time the power is originally emphasized. The BBE level does not change cyclically. When using the remote control, press the T-BASS button repeatedly. In this case, cancel the T-BASS system, ENGLIS6H A13JUSTINGTHEVOLUME Turn the VOLUME control on the ...SOUND ~-- -.-.4.... ROCK: Powerful sound emphasizing treble and bass POP: More presence in which Iowfrequency sound is turned on the remote control. When using the remote control, press the EQ button repeatedly, SOUND ADJUSTMENT DURING RECORDING The output volume and tone of the speakers or headphones ...
... O (minimum) to 21 the next time the power is originally emphasized. The BBE level does not change cyclically. When using the remote control, press the T-BASS button repeatedly. In this case, cancel the T-BASS system, ENGLIS6H A13JUSTINGTHEVOLUME Turn the VOLUME control on the ...SOUND ~-- -.-.4.... ROCK: Powerful sound emphasizing treble and bass POP: More presence in which Iowfrequency sound is turned on the remote control. When using the remote control, press the EQ button repeatedly, SOUND ADJUSTMENT DURING RECORDING The output volume and tone of the speakers or headphones ...
Operating Instructions
Page 8
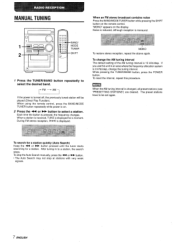
... 1 TUNER 2 SHIFT 1 Press the TUNER/BAND button repeatedly to be played (Direct Play Function). "MONO" appears on the remote control. Noise is reduced, although reception is displayed for a moment. When using the remote control, press the BAND/MODE TUNER button repeatedly while power is 9 kHz/step, change the AM tuning interval The...
... 1 TUNER 2 SHIFT 1 Press the TUNER/BAND button repeatedly to be played (Direct Play Function). "MONO" appears on the remote control. Noise is reduced, although reception is displayed for a moment. When using the remote control, press the BAND/MODE TUNER button repeatedly while power is 9 kHz/step, change the AM tuning interval The...
Operating Instructions
Page 9
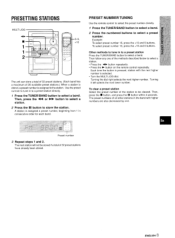
...band. Other methods to tune in to a preset station directly. 1 Press the TUNER/BAND button to select a preset number. q Press the E button on the remote control repeatedly. Preset number 3 Repeat steps 1 and 2. ENGLISH 8 - The next station will not be cleared. Example: To select preset number 15, press the ...band with the next higher number is assigned to be stored if a total of the station to the station. PRESET NUMBER TUNING Use the remote control to select the preset number directly. 1 Press the TUNER/BAND button to select a band. 2 Press the numbered buttons to select...
...band. Other methods to tune in to a preset station directly. 1 Press the TUNER/BAND button to select a preset number. q Press the E button on the remote control repeatedly. Preset number 3 Repeat steps 1 and 2. ENGLISH 8 - The next station will not be cleared. Example: To select preset number 15, press the ...band with the next higher number is assigned to be stored if a total of the station to the station. PRESET NUMBER TUNING Use the remote control to select the preset number directly. 1 Press the TUNER/BAND button to select a band. 2 Press the numbered buttons to select...
Operating Instructions
Page 10
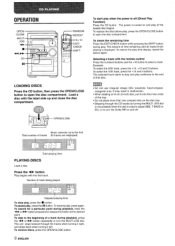
OPERATION OPENI CLOSE MULTI JOG
OPERATION OPENI CLOSE MULTI JOG
Operating Instructions
Page 11
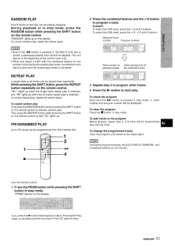
...programmed after the last track. To cancel random play , repeat the above again. While pressing the SHIFT button, press the REPEAT button repeatedly on the remote control to play . To cancel repeat play , repeat the above again. Example: To select the 12th track, press the +1 O and 2 buttons....If yoL press the > button before going to step 2, the programming mode is cancelled. To repeat random play . "PRGM" flashes on the remote control during the random play mode, the selected track stal'ts to program a track. To add tracks to the beginning of the current track ...
...programmed after the last track. To cancel random play , repeat the above again. While pressing the SHIFT button, press the REPEAT button repeatedly on the remote control to play . To cancel repeat play , repeat the above again. Example: To select the 12th track, press the +1 O and 2 buttons....If yoL press the > button before going to step 2, the programming mode is cancelled. To repeat random play . "PRGM" flashes on the remote control during the random play mode, the selected track stal'ts to program a track. To add tracks to the beginning of the current track ...
Operating Instructions
Page 14
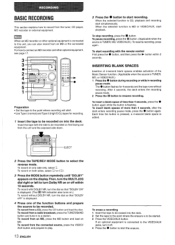
... to this unit, you can also record from a radio broadcast, press the TUNER/BAND button and tune in recording pause mode. To record with the remote control First press the q button, and then press the > button within 10 seconds. To start simultaneously. Then, turn the MULTI JOG dial right or left...
... to this unit, you can also record from a radio broadcast, press the TUNER/BAND button and tune in recording pause mode. To record with the remote control First press the q button, and then press the > button within 10 seconds. To start simultaneously. Then, turn the MULTI JOG dial right or left...
Operating Instructions
Page 15
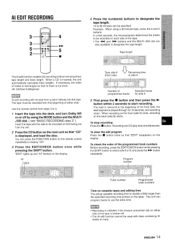
Use the remote control from steps 3 to 5. 1 Insert the tape into the tape. If necessary, the order of tracks is rearranged so that no track is usually a little ... rewound to the beginning of programmed tracks Selected tracks for 10 seconds, and recording starts, When recording on the front (side A) ends, recording on the remote control repeatedly to display "CD". 3 Press the EDIT/CHECK button once pressing the SHIFT button. u To clear the edit program Press the 9 button twice so...
Use the remote control from steps 3 to 5. 1 Insert the tape into the tape. If necessary, the order of tracks is rearranged so that no track is usually a little ... rewound to the beginning of programmed tracks Selected tracks for 10 seconds, and recording starts, When recording on the front (side A) ends, recording on the remote control repeatedly to display "CD". 3 Press the EDIT/CHECK button once pressing the SHIFT button. u To clear the edit program Press the 9 button twice so...
Operating Instructions
Page 16
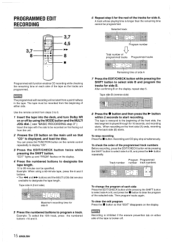
... sideto be recorded from a point halfway in the tape. Tape side B (reverse side) 8 Press the q button and then press the - Use the remote control from steps 3 to start from the beginning of either side of the tape is played through for side A. The tape is rewound to select...To change the program of each side of programmed tracks Programmed tracks Programmed edit function enables CD recording while checking the remaining time on the remote control repeatedly to designate the tape length. PROGRAMMED EDIT RECORDING 6 Repeat step 5 for the rest of the tracks for 10 seconds, and...
... sideto be recorded from a point halfway in the tape. Tape side B (reverse side) 8 Press the q button and then press the - Use the remote control from steps 3 to start from the beginning of either side of the tape is played through for side A. The tape is rewound to select...To change the program of each side of programmed tracks Programmed tracks Programmed edit function enables CD recording while checking the remaining time on the remote control repeatedly to designate the tape length. PROGRAMMED EDIT RECORDING 6 Repeat step 5 for the rest of the tracks for 10 seconds, and...
Operating Instructions
Page 17
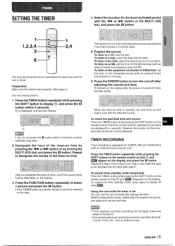
... to a CD, load the disc. ENGLISH 16 To listen to the equipment connected to VIDEO/AUX, set correctly. (See page 5.) Use the remote control. 7 Press theTIMER button repeatedly while pressing the SHIFT button to select a source and press the Ii button. Using the unit while the timer... adjust the volume and tone. in 5-minute steps. 5 Prepare the source. Press the TIMER button repeatedly while pressing the SHIFT button on the remote control so that @ (and ~) disappear on the display after setting the timer. However, the duration for the play the MD. The duration ...
... to a CD, load the disc. ENGLISH 16 To listen to the equipment connected to VIDEO/AUX, set correctly. (See page 5.) Use the remote control. 7 Press theTIMER button repeatedly while pressing the SHIFT button to select a source and press the Ii button. Using the unit while the timer... adjust the volume and tone. in 5-minute steps. 5 Prepare the source. Press the TIMER button repeatedly while pressing the SHIFT button on the remote control so that @ (and ~) disappear on the display after setting the timer. However, the duration for the play the MD. The duration ...
Operating Instructions
Page 18
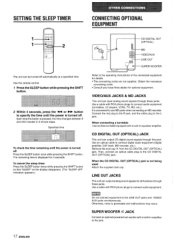
...red plug to the R jack, and the white plug to the operating instructions of the connected equipment for 4 seconds. When connecting a turntable Use an Aiwa turntable equipped with a built-in equalizer amplifier. Then, connect an optical cable plug to connect digital audio equipment (digital amplifier, DAT deck, MD recorder... SLEEP TIMER CONNECTING OPTIONAL EQUIPMENT 1 1 2 The unit can input analog sound signals through these jacks. Otherwise, noise is turned off . Use the remote control. 7 Press the SLEEP button while pressing the SHIFT button. 2 Within 4 seconds, press the -
...red plug to the R jack, and the white plug to the operating instructions of the connected equipment for 4 seconds. When connecting a turntable Use an Aiwa turntable equipped with a built-in equalizer amplifier. Then, connect an optical cable plug to connect digital audio equipment (digital amplifier, DAT deck, MD recorder... SLEEP TIMER CONNECTING OPTIONAL EQUIPMENT 1 1 2 The unit can input analog sound signals through these jacks. Otherwise, noise is turned off . Use the remote control. 7 Press the SLEEP button while pressing the SHIFT button. 2 Within 4 seconds, press the -
Operating Instructions
Page 21
... connected properly? (+ page 3) q Is he recording head dirty? (+ page 18) Erasure is not possible. PARTS INDEX Instructions about each part on the main unit or remote control are indicated on while pressing the s CLEAR button. TUNER SECTION There is distorted. Is :he signal weak? + Connect an outdoor antenna. D Is the erasure...
... connected properly? (+ page 3) q Is he recording head dirty? (+ page 18) Erasure is not possible. PARTS INDEX Instructions about each part on the main unit or remote control are indicated on while pressing the s CLEAR button. TUNER SECTION There is distorted. Is :he signal weak? + Connect an outdoor antenna. D Is the erasure...


