

Operating Instructions
Page 2
... the literature accompanying the appliance. m A&* 3 Outdoor Antenna 1 Power lines - i If it into the outlet, please call a qualified service technician to keep the Operating Instructions for a few hours, then try again. When connecting an outdoor antenna, make sure it so that generate heat. Never handle the AC power plug with polarized AC power p(ugs which can be used in , a small amount of electric shock...
... the literature accompanying the appliance. m A&* 3 Outdoor Antenna 1 Power lines - i If it into the outlet, please call a qualified service technician to keep the Operating Instructions for a few hours, then try again. When connecting an outdoor antenna, make sure it so that generate heat. Never handle the AC power plug with polarized AC power p(ugs which can be used in , a small amount of electric shock...
Operating Instructions
Page 3
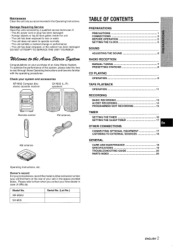
... the rear of your purchase of this system, please take the time to operate normally - Owner's record Forycwrconvenience, record the model number and serial number (you contact your system and accessories XR-M35 Compact disc stereo cassette receiver SX-M35 (L, R) speakers Remote control FM antenna AM antenna TABLE OF CONTENTS PREPARATIONS PRECAUTIONS 1 CONNECTIONS 3 BEFORE OPERATION 5 sETTING THEcLocK .......m m....m...........5 SOUND ADJUSTING THE SOUND 6 RADIO RECEPTION MANUAL TUNING 7 PRESETTING STATIONS 8 CD PLAYING OPERATION 9 TAPE PLAYBACK Operation ll RECORDING BASIC...
... the rear of your purchase of this system, please take the time to operate normally - Owner's record Forycwrconvenience, record the model number and serial number (you contact your system and accessories XR-M35 Compact disc stereo cassette receiver SX-M35 (L, R) speakers Remote control FM antenna AM antenna TABLE OF CONTENTS PREPARATIONS PRECAUTIONS 1 CONNECTIONS 3 BEFORE OPERATION 5 sETTING THEcLocK .......m m....m...........5 SOUND ADJUSTING THE SOUND 6 RADIO RECEPTION MANUAL TUNING 7 PRESETTING STATIONS 8 CD PLAYING OPERATION 9 TAPE PLAYBACK Operation ll RECORDING BASIC...
Operating Instructions
Page 4
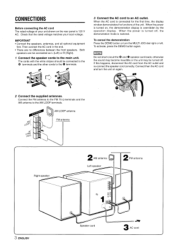
... and re-connect the s~eaker cord correctlv.. To cancel the demonstration Press the DEMO button or turn the unit on , the demonstration display is turned on again. 2 Connect the supplied antennas. Connect the FM antenna to the FM 75 Q terminals AM antenna to the main unit. When the power is overridden by the operation display. To activate, press the DEMO button again. Connect then the AC cord and turn the MULTI...
... and re-connect the s~eaker cord correctlv.. To cancel the demonstration Press the DEMO button or turn the unit on , the demonstration display is turned on again. 2 Connect the supplied antennas. Connect the FM antenna to the FM 75 Q terminals AM antenna to the main unit. When the power is overridden by the operation display. To activate, press the DEMO button again. Connect then the AC cord and turn the MULTI...
Operating Instructions
Page 5
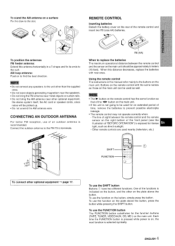
.... When this antenna horizontally in this manual refer mainly to the buttons on the right bottom of the front panel (see the illustration of "BEFORE OPERATION") is recommended. One of the remote control and insert two R6 (size AA) batteries. I To connect other optional equipment, the stereo system itself, the AC cord or speaker noise will be used for the function buttons (TAPE, TUNER, VIDEO/AUX, CD, MD...
.... When this antenna horizontally in this manual refer mainly to the buttons on the right bottom of the front panel (see the illustration of "BEFORE OPERATION") is recommended. One of the remote control and insert two R6 (size AA) batteries. I To connect other optional equipment, the stereo system itself, the AC cord or speaker noise will be used for the function buttons (TAPE, TUNER, VIDEO/AUX, CD, MD...
Operating Instructions
Page 6
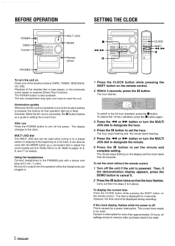
... speakers while the headphones are plugged in memory after purchase need to adjust the sound quality and turn off This is also available. The POWER button is caused by a power interruption. CLOCK -SHIFT -44, - The display JOG dial to 6 above. changes to the clock. 4 Press the 11 button to cancel it can be reset. 5 ENGLISH To set the clock without the remote control No sound is received (Direct Play Function). The disc compartment may open...
... speakers while the headphones are plugged in memory after purchase need to adjust the sound quality and turn off This is also available. The POWER button is caused by a power interruption. CLOCK -SHIFT -44, - The display JOG dial to 6 above. changes to the clock. 4 Press the 11 button to cancel it can be reset. 5 ENGLISH To set the clock without the remote control No sound is received (Direct Play Function). The disc compartment may open...
Operating Instructions
Page 7
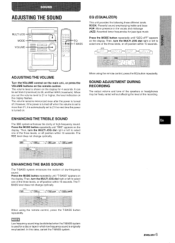
... be set to select one of the recording. When using the remote control, press the T-BASS button repeatedly. ma Low frequency sound may be distorted when the T-BASS system is used fora disc or tape in the vocals and midrange JAZZ: Accented lower frequencies for 4 seconds. Then, turn the MULTI JOG dial right or left to 21 the next time the power is originally emphasized. A13JUSTINGTHEVOLUME Turn the VOLUME control on...
... be set to select one of the recording. When using the remote control, press the T-BASS button repeatedly. ma Low frequency sound may be distorted when the T-BASS system is used fora disc or tape in the vocals and midrange JAZZ: Accented lower frequencies for 4 seconds. Then, turn the MULTI JOG dial right or left to 21 the next time the power is originally emphasized. A13JUSTINGTHEVOLUME Turn the VOLUME control on...
Operating Instructions
Page 8
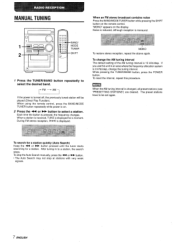
... turned off, the previously tuned station will be set again. During FM stereo reception, [[[01] is on. 2 Press the ++ or ~ button to select the desired band. When using the remote control, press the BAND/MODE TUNER button repeatedly while power is displayed. "MONO" appears on the remote control. button pressed until the tuner starts searching for a station quickly (Auto Search) Keep the + or - To reset the interval, repeat this unit in to be played (Direct Play Function...
... turned off, the previously tuned station will be set again. During FM stereo reception, [[[01] is on. 2 Press the ++ or ~ button to select the desired band. When using the remote control, press the BAND/MODE TUNER button repeatedly while power is displayed. "MONO" appears on the remote control. button pressed until the tuner starts searching for a station quickly (Auto Search) Keep the + or - To reset the interval, repeat this unit in to be played (Direct Play Function...
Operating Instructions
Page 9
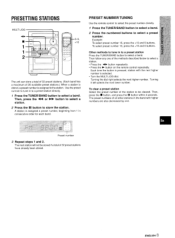
... a station. . Use the preset num~er to tune in to a preset station directly. 1 Press the TUNER/BAND button to store the station. button to select a station. 2 Press the 11 button to select a band. PRESET NUMBER TUNING Use the remote control to select the preset number directly. 1 Press the TUNER/BAND button to select a band. 2 Press the numbered buttons to select a band. Other methods to tune in consecutive order for each band. q Turn the MULTI JOG dial. The preset numbers of...
... a station. . Use the preset num~er to tune in to a preset station directly. 1 Press the TUNER/BAND button to store the station. button to select a station. 2 Press the 11 button to select a band. PRESET NUMBER TUNING Use the remote control to select the preset number directly. 1 Press the TUNER/BAND button to select a band. 2 Press the numbered buttons to select a band. Other methods to tune in consecutive order for each band. q Turn the MULTI JOG dial. The preset numbers of...
Operating Instructions
Page 10
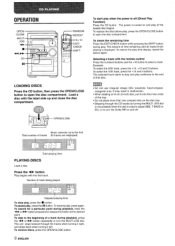
OPERATION OPENI CLOSE MULTI JOG
OPERATION OPENI CLOSE MULTI JOG
Operating Instructions
Page 11
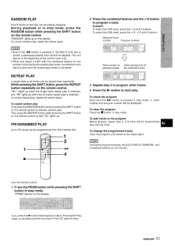
... disc. 2 Press the numbered buttons and the +10 button to program a track. RANDOM PLAY All ttle tracks on the remote control to activate random play. During playback or in stop mode. REIPEAT PLAY A single track or all the steps again. While pressing the SHIFT button, press the REPEAT button repeatedly on the remote control. button is cancelled and the first track of the CD starts to the program Before playing, repeat step 2. m To change the programmed tracks Clear the program and repeat all tracks...
... disc. 2 Press the numbered buttons and the +10 button to program a track. RANDOM PLAY All ttle tracks on the remote control to activate random play. During playback or in stop mode. REIPEAT PLAY A single track or all the steps again. While pressing the SHIFT button, press the REPEAT button repeatedly on the remote control. button is cancelled and the first track of the CD starts to the program Before playing, repeat step 2. m To change the programmed tracks Clear the program and repeat all tracks...
Operating Instructions
Page 12
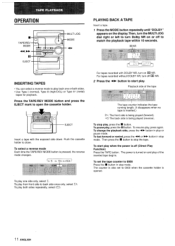
... mode Each time the TAPE/REV MODE mode changes. To start play. Playback side of the inserted tape begins. To pause play , press again. To change the playback side, press the +> button in stop play back one side only, select Z. For tapes recorded without DOLBY NR, turn on or off to open the cassette holder. To stop mode. OPERATION TAPEIREV MODE II EJECT MULTI JOG MODE PLAYING BACK A TAPE Insert a tape 7 Press the MODE button repeatedly until "DOLBY" appears on and play...
... mode Each time the TAPE/REV MODE mode changes. To start play. Playback side of the inserted tape begins. To pause play , press again. To change the playback side, press the +> button in stop play back one side only, select Z. For tapes recorded without DOLBY NR, turn on or off to open the cassette holder. To stop mode. OPERATION TAPEIREV MODE II EJECT MULTI JOG MODE PLAYING BACK A TAPE Insert a tape 7 Press the MODE button repeatedly until "DOLBY" appears on and play...
Operating Instructions
Page 13
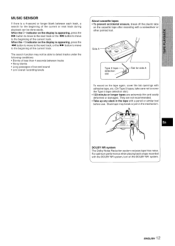
MUSIC SENSOR If there is appearing, press the * button to move to the next track or the When the D indicator on the display is a 4-second or longer blank between each track, a search for the beginning of the current or next track during playl]ack can be done easily.
MUSIC SENSOR If there is appearing, press the * button to move to the next track or the When the D indicator on the display is a 4-second or longer blank between each track, a search for the beginning of the current or next track during playl]ack can be done easily.
Operating Instructions
Page 14
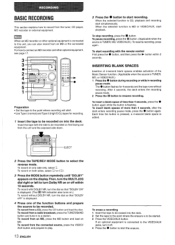
... start playback. To record on the display. I (normal) and Type II (high/CrOz) tapes for 4 seconds and the tape runs without DOLBY NR, turn it off within 2 seconds. To record from the connected source, press the VIDEO/ AUX button and prepare to play. 13 ENGLISH To erase a recording 1 Insert the tape to record from a radio broadcast, press the TUNER/BAND button and tune in recording pause mode. button again. To record on...
... start playback. To record on the display. I (normal) and Type II (high/CrOz) tapes for 4 seconds and the tape runs without DOLBY NR, turn it off within 2 seconds. To record from the connected source, press the VIDEO/ AUX button and prepare to play. 13 ENGLISH To erase a recording 1 Insert the tape to record from a radio broadcast, press the TUNER/BAND button and tune in recording pause mode. button again. To record on...
Operating Instructions
Page 15
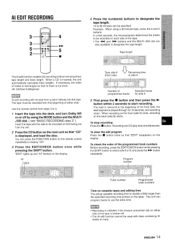
..., the microcomputer determines the tracks to be used tracks or more. Use the remote control from a point halfway into the deck, and turn Dolby NR on or off . "EDIT lights up and "Al" flashes on "the label. Program number Track number Programmed track numbers Time on cassette tapes and editing time The actual cassette recording time is played through for side A 5 First press the @ button and then press the > button within 2 seconds to start...
..., the microcomputer determines the tracks to be used tracks or more. Use the remote control from a point halfway into the deck, and turn Dolby NR on or off . "EDIT lights up and "Al" flashes on "the label. Program number Track number Programmed track numbers Time on cassette tapes and editing time The actual cassette recording time is played through for side A 5 First press the @ button and then press the > button within 2 seconds to start...
Operating Instructions
Page 16
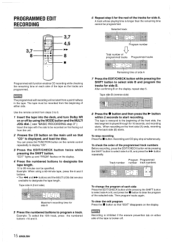
... front side (A) ends, recording on the display, repeat step 5. Use the remote control from steps 3 to designate the tape length. buttons and the MULTI JOG dial are programmed. You can be specified. Example: When using the MODE button and the MULTI JOG dial. ( see '(BASIC RECORDING step 3" ) Insertthe tape withthe sideto be programmed. 3,7 4,5 3,7 M 8 8 s Program number o Total number of programmed tracks Programmed tracks Programmed edit function enables CD recording while checking the remaining time on each side Press...
... front side (A) ends, recording on the display, repeat step 5. Use the remote control from steps 3 to designate the tape length. buttons and the MULTI JOG dial are programmed. You can be specified. Example: When using the MODE button and the MULTI JOG dial. ( see '(BASIC RECORDING step 3" ) Insertthe tape withthe sideto be programmed. 3,7 4,5 3,7 M 8 8 s Program number o Total number of programmed tracks Programmed tracks Programmed edit function enables CD recording while checking the remaining time on each side Press...
Operating Instructions
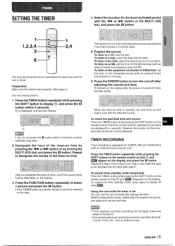
Page 17
... displayed. Repeat to prepare the source, and adjust the volume and tone. To listen to the equipment connected to the radio, select the band and tune into a station. I' you designate the timer-on time, one of the timer-on at a specified time every day with the selected source. To listen to VIDEO/AUX, set between 5 and 240 minutes in timer. m q Timer playback and timer recording will not be turned on time...
... displayed. Repeat to prepare the source, and adjust the volume and tone. To listen to the equipment connected to the radio, select the band and tune into a station. I' you designate the timer-on time, one of the timer-on at a specified time every day with the selected source. To listen to VIDEO/AUX, set between 5 and 240 minutes in timer. m q Timer playback and timer recording will not be turned on time...
Operating Instructions
Page 18
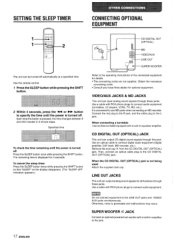
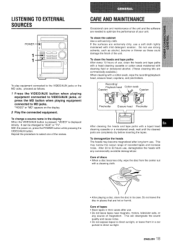
... the operating instructions of the connected equipment for all functions through these jacks, Use a cable with a built-in-amplifier to the L jack. Each time the button is turned off Press the SLEEP button once while pressing the SHIFT button. q The connecting cords are not supplied. When the CD DIGITAL OUT (OPTICAL) jack is displayed for optional equipment. SETTING THE SLEEP TIMER CONNECTING OPTIONAL EQUIPMENT 1 1 2 The unit can input analog sound signals through these jacks. When connecting a turntable Use an Aiwa...
... the operating instructions of the connected equipment for all functions through these jacks, Use a cable with a built-in-amplifier to the L jack. Each time the button is turned off Press the SLEEP button once while pressing the SHIFT button. q The connecting cords are not supplied. When the CD DIGITAL OUT (OPTICAL) jack is displayed for optional equipment. SETTING THE SLEEP TIMER CONNECTING OPTIONAL EQUIPMENT 1 1 2 The unit can input analog sound signals through these jacks. When connecting a turntable Use an Aiwa...
Operating Instructions
Page 19
... output range of tapes q Store tapes in the display When the VIDEO/AUX button is pressed, "VIDEO is displayed initiclly. Recordino/ Pinchroller Erasure head Pinchroller mn J" After cleaning the heads and tape paths with mild detergent solution. This will downgrade the sound quality and cause noise. POWER - 11- ..l ""r To play equipment connected to select one of discs q When a disc becomes with a cotton swab, wipe the recording/playback...
... output range of tapes q Store tapes in the display When the VIDEO/AUX button is pressed, "VIDEO is displayed initiclly. Recordino/ Pinchroller Erasure head Pinchroller mn J" After cleaning the heads and tape paths with mild detergent solution. This will downgrade the sound quality and cause noise. POWER - 11- ..l ""r To play equipment connected to select one of discs q When a disc becomes with a cotton swab, wipe the recording/playback...
Operating Instructions
Page 20
... Tuning range Usable sensitivity Antenna 530 kHz to 1710 kHz (10 kHz step) 531 kHz to comply with no are not expressly approved by turning the equipment off and on, the user is connected. - Total Harmonic Distortion 0.08 % (15 W, 1 kHz, 6 ohms, DIN AUDIO) VIDEO/AUX: 400 mV MD: 400 mV SUPER WOOFER: 1.4 V SPEAKERS: accept speakers of 6 ohms or more LINE OUT 1.4 V PHONES (stereo mini jack...
... Tuning range Usable sensitivity Antenna 530 kHz to 1710 kHz (10 kHz step) 531 kHz to comply with no are not expressly approved by turning the equipment off and on, the user is connected. - Total Harmonic Distortion 0.08 % (15 W, 1 kHz, 6 ohms, DIN AUDIO) VIDEO/AUX: 400 mV MD: 400 mV SUPER WOOFER: 1.4 V SPEAKERS: accept speakers of 6 ohms or more LINE OUT 1.4 V PHONES (stereo mini jack...
Operating Instructions
Page 21
... FUNCTION MD MODE MULTI JOG OPEN/CLOSE PHONES POWER The sound becomes inaudible or the unit is constant, wave-like static. e Is a tape recorded without Dolby NR played back with the Dolby NF{ system operating? (+ page 11) . Is the recording/playback head dirty? (+ page 18) CD PLAYER SECTION The CD player does not play. Is the lens aftected by disconnecting the AC cord and repeat step 2. PARTS INDEX Instructions about each part...
... FUNCTION MD MODE MULTI JOG OPEN/CLOSE PHONES POWER The sound becomes inaudible or the unit is constant, wave-like static. e Is a tape recorded without Dolby NR played back with the Dolby NF{ system operating? (+ page 11) . Is the recording/playback head dirty? (+ page 18) CD PLAYER SECTION The CD player does not play. Is the lens aftected by disconnecting the AC cord and repeat step 2. PARTS INDEX Instructions about each part...


