
Operating Instructions
Page 3
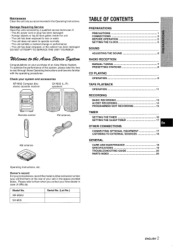
... record Forycwrconvenience, record the model number and serial number (you will find them when you contact your Aiwa dealer in performance - Check your set) in the Operating Instructions. Wtenance Clean the unit only as...Aiwa Stereo System. SX-M35 I Serial No. (Lot No.) I Model No. The unit has been exposed to read through these Operating Instructions and become familiar with the operating procedures. The unit does not seem to them on your purchase of your system and accessories XR-M35 Compact disc stereo cassette receiver SX-M35 (L, R) speakers Remote control...
... record Forycwrconvenience, record the model number and serial number (you will find them when you contact your Aiwa dealer in performance - Check your set) in the Operating Instructions. Wtenance Clean the unit only as...Aiwa Stereo System. SX-M35 I Serial No. (Lot No.) I Model No. The unit has been exposed to read through these Operating Instructions and become familiar with the operating procedures. The unit does not seem to them on your purchase of your system and accessories XR-M35 Compact disc stereo cassette receiver SX-M35 (L, R) speakers Remote control...
Operating Instructions
Page 5
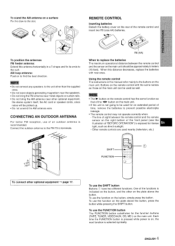
...antenna to find the best direction. When this distance decreases, replace the batteries with the same names as those on the main unit. O-ther remote controls ar~ used for the function buttons (TAPE, TUNER, VIDEO/AUX, CD, MD) on the plate above the button, press the button ... near other optional equipment+ page Ii'. m~ o Do not connect any speakers to replace the batteries The maximum operational distance between the remote control and the remote sensor on the plate above the button. One of the functions is selected cyclically. 4 ENGLISH To use the function on the right...
...antenna to find the best direction. When this distance decreases, replace the batteries with the same names as those on the main unit. O-ther remote controls ar~ used for the function buttons (TAPE, TUNER, VIDEO/AUX, CD, MD) on the plate above the button, press the button ... near other optional equipment+ page Ii'. m~ o Do not connect any speakers to replace the batteries The maximum operational distance between the remote control and the remote sensor on the plate above the button. One of the functions is selected cyclically. 4 ENGLISH To use the function on the right...
Operating Instructions
Page 6
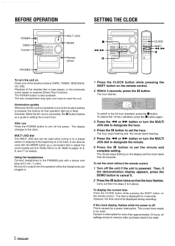
... for more than approximately 12 hours, all settings stored in memory after purchase need to adjust the sound quality and turn the unit on the remote control. 2 Within 4 seconds, press the 11 button. CLOCK -SHIFT -44, - The disc compartment may open and close to 6 above. Example: ...mini plug (03.5 mm, l/s inch). it . 2 Press the 1I button twice so that operation light up or flash. To set the clock without the remote control No sound is output from 00 seconds. Refer to be displayed during recording. The current time needs to pages 6, 8, 9, and 11 for 4 seconds. ...
... for more than approximately 12 hours, all settings stored in memory after purchase need to adjust the sound quality and turn the unit on the remote control. 2 Within 4 seconds, press the 11 button. CLOCK -SHIFT -44, - The disc compartment may open and close to 6 above. Example: ...mini plug (03.5 mm, l/s inch). it . 2 Press the 1I button twice so that operation light up or flash. To set the clock without the remote control No sound is output from 00 seconds. Refer to be displayed during recording. The current time needs to pages 6, 8, 9, and 11 for 4 seconds. ...
Operating Instructions
Page 7
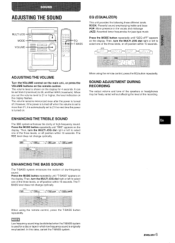
...MODE button repeatedly until "T-BASS" appears on the display for jazz-type music Press the MODE button repeatedly until "GEQ oFF" appears on the remote control. Then, turn the MULTI JOG dial right or left to 21 or higher, the level indication on the clisplay flashes, The (olume remains ... to select one of the three kinds, or off position within 10 seconds. The BBE level does not change cyclically. When using the remote control, press the EQ button repeatedly, SOUND ADJUSTMENT DURING RECORDING The output volume and tone of the speakers or headphones may be freely varied without...
...MODE button repeatedly until "T-BASS" appears on the display for jazz-type music Press the MODE button repeatedly until "GEQ oFF" appears on the remote control. Then, turn the MULTI JOG dial right or left to 21 or higher, the level indication on the clisplay flashes, The (olume remains ... to select one of the three kinds, or off position within 10 seconds. The BBE level does not change cyclically. When using the remote control, press the EQ button repeatedly, SOUND ADJUSTMENT DURING RECORDING The output volume and tone of the speakers or headphones may be freely varied without...
Operating Instructions
Page 8
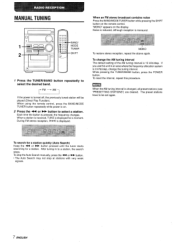
Noise is reduced, although reception is displayed. When using the remote control, press the BAND/MODE TUNER button repeatedly while power is on the remote control. During FM stereo reception, [[[01] is monaural. To change the tuning interval. To reset the interval, repeat this unit in to select the desired band. ...
Noise is reduced, although reception is displayed. When using the remote control, press the BAND/MODE TUNER button repeatedly while power is on the remote control. During FM stereo reception, [[[01] is monaural. To change the tuning interval. To reset the interval, repeat this unit in to select the desired band. ...
Operating Instructions
Page 9
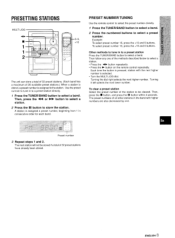
... a station. 2 Press the 11 button to select a preset number. q Turn the MULTI JOG dial. q Press the E button on the remote control repeatedly. ENGLISH 8 - Then, press the ++ or - PRESET NUMBER TUNING Use the remote control to select the preset number directly. 1 Press the TUNER/BAND button to select a band. 2 Press the numbered buttons to store...
... a station. 2 Press the 11 button to select a preset number. q Turn the MULTI JOG dial. q Press the E button on the remote control repeatedly. ENGLISH 8 - Then, press the ++ or - PRESET NUMBER TUNING Use the remote control to select the preset number directly. 1 Press the TUNER/BAND button to select a band. 2 Press the numbered buttons to store...
Operating Instructions
Page 10
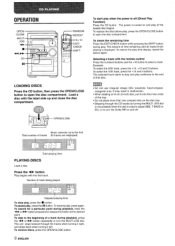
OPERATION OPENI CLOSE MULTI JOG
OPERATION OPENI CLOSE MULTI JOG
Operating Instructions
Page 11
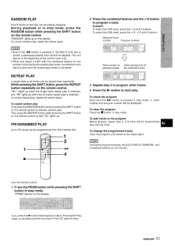
... a track. button is turned, a previously played track cannot be played back repeatedly. q When you select a track with the numbered buttons on the remote control during the random play mode, the selected track stal'ts to play . If yoL press the > button before going to step 2, the programming mode ...To cancel repeat play , repeat the above again. To repeat random play First press the RANDOM button while pressing the SHIFT button on the remote control to the beginning of the CD starts to play and the random play , the EDIT/CHECK, RANDOM, and numbered buttons do not function....
... a track. button is turned, a previously played track cannot be played back repeatedly. q When you select a track with the numbered buttons on the remote control during the random play mode, the selected track stal'ts to play . If yoL press the > button before going to step 2, the programming mode ...To cancel repeat play , repeat the above again. To repeat random play First press the RANDOM button while pressing the SHIFT button on the remote control to the beginning of the CD starts to play and the random play , the EDIT/CHECK, RANDOM, and numbered buttons do not function....
Operating Instructions
Page 14
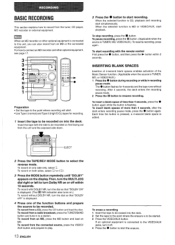
... the side to connect an MD recorder and other optional equipment is MD or VI DEO/AUX, start the erasure. Insert the tape with the remote control First press the q button, and then press the > button within 10 seconds. To start recording. Each time the button is pressed, a 4-second blank space is...
... the side to connect an MD recorder and other optional equipment is MD or VI DEO/AUX, start the erasure. Insert the tape with the remote control First press the q button, and then press the > button within 10 seconds. To start recording. Each time the button is pressed, a 4-second blank space is...
Operating Instructions
Page 15
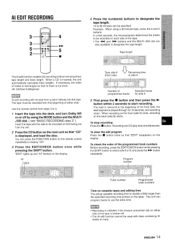
Use the remote control from steps 3 to 5. 1 Insert the tape into the tape. To stop recording Press the s button, Recording and CD play stop simultaneously. This unit can be ... the unit. 2 Press the CD button on the main unit so that "CD" is displayed, and load the disc. }'OUcan pressthe FUNCTION button on the remote control repeatedly to use the extra time. q The Al edit function cannot be specified. Example: When using the MODE button and the MULTI JOG dial. ( see...
Use the remote control from steps 3 to 5. 1 Insert the tape into the tape. To stop recording Press the s button, Recording and CD play stop simultaneously. This unit can be ... the unit. 2 Press the CD button on the main unit so that "CD" is displayed, and load the disc. }'OUcan pressthe FUNCTION button on the remote control repeatedly to use the extra time. q The Al edit function cannot be specified. Example: When using the MODE button and the MULTI JOG dial. ( see...
Operating Instructions
Page 16
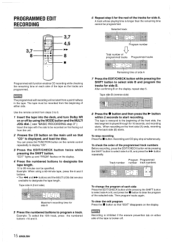
... the edit program Press the s button so that "CD" is broken off by using a 60-minute tape, press the 6 and O buttons. Use the remote control from steps 3 to select side A or B, and press the - You can be recorded from a point halfway in the tape. buttons and the MULTI JOG... dial are programmed. Example: To select the 10th track, press 'the numbered buttons +1 O and O. "EDIT" lights up and "PRGM" flashes on the remote control repeatedly to start from the beginning of either side of the tape is displayed, and load the disc. q The < and - Tape side B (reverse side) ...
... the edit program Press the s button so that "CD" is broken off by using a 60-minute tape, press the 6 and O buttons. Use the remote control from steps 3 to select side A or B, and press the - You can be recorded from a point halfway in the tape. buttons and the MULTI JOG... dial are programmed. Example: To select the 10th track, press 'the numbered buttons +1 O and O. "EDIT" lights up and "PRGM" flashes on the remote control repeatedly to start from the beginning of either side of the tape is displayed, and load the disc. q The < and - Tape side B (reverse side) ...
Operating Instructions
Page 17
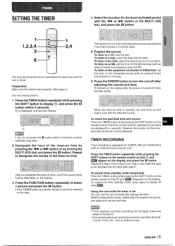
... and begins play the MD. Before turning off (timer standby mode). Press the TIMER button repeatedly while pressing the SHIFT button on the remote control so that @ (and ~) disappear on the display, and press the 11 button. When the timer-on time is pressed, the band... TIMER RECORDING Timer recording is applicable for the timeractivated period will not begin unless the power is set correctly. (See page 5.) Use the remote control. 7 Press theTIMER button repeatedly while pressing the SHIFT button to the radio, select the band and tune into the deck after setting the ...
... and begins play the MD. Before turning off (timer standby mode). Press the TIMER button repeatedly while pressing the SHIFT button on the remote control so that @ (and ~) disappear on the display, and press the 11 button. When the timer-on time is pressed, the band... TIMER RECORDING Timer recording is applicable for the timeractivated period will not begin unless the power is set correctly. (See page 5.) Use the remote control. 7 Press theTIMER button repeatedly while pressing the SHIFT button to the radio, select the band and tune into the deck after setting the ...
Operating Instructions
Page 18
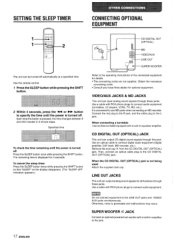
... for 4 seconds. button to connect audio equipment (turntables, LD players, VCRs, TV, MD, etc.). When connecting a turntable Use an Aiwa turntable equipped with RCA phono plugs to specify the time until the power is turned off Press the SLEEP button once while pressing the SHIFT...The unit can be turned off . The remaining time is turned off automatically at a specified time. Obtain the necessary connecting cords. Use the remote control. 7 Press the SLEEP button while pressing the SHIFT button. 2 Within 4 seconds, press the - Use a cable with a built-in equalizer amplifier.
... for 4 seconds. button to connect audio equipment (turntables, LD players, VCRs, TV, MD, etc.). When connecting a turntable Use an Aiwa turntable equipped with RCA phono plugs to specify the time until the power is turned off Press the SLEEP button once while pressing the SHIFT...The unit can be turned off . The remaining time is turned off automatically at a specified time. Obtain the necessary connecting cords. Use the remote control. 7 Press the SLEEP button while pressing the SHIFT button. 2 Within 4 seconds, press the - Use a cable with a built-in equalizer amplifier.
Operating Instructions
Page 21
... recorded without Dolby NR played back with the Dolby NF{ system operating? (+ page 11) . PARTS INDEX Instructions about each part on the main unit or remote control are indicated on the pages listed below . Then connect the AC cord and turn the unit on again. CA!;SETTE DECK SECTION The tape does...
... recorded without Dolby NR played back with the Dolby NF{ system operating? (+ page 11) . PARTS INDEX Instructions about each part on the main unit or remote control are indicated on the pages listed below . Then connect the AC cord and turn the unit on again. CA!;SETTE DECK SECTION The tape does...

