
Operating Instructions
Page 3
NO USER-SERVICEABLE PARTS INSIDE. The exclamation point within an equilateral triangle is used for a few hours, then try again. Owner's record For your convenience, record the model number and serial number (you contact your unit) in the literature accompanying the appliance. It also should be completely inserted to keep the Operating Instructions for future reference. When placed or mounted on the rear of current...
NO USER-SERVICEABLE PARTS INSIDE. The exclamation point within an equilateral triangle is used for a few hours, then try again. Owner's record For your convenience, record the model number and serial number (you contact your unit) in the literature accompanying the appliance. It also should be completely inserted to keep the Operating Instructions for future reference. When placed or mounted on the rear of current...
Operating Instructions
Page 4
... 6 CONNECTING A DVD PLAYER 8 REMOTE CONTROL 9 BEFORE OPERATION 9 SOUND AUDIO ADJUSTMENTS 11 GRAPHIC EQUALIZER 12 DSP SURROUND 13 RADIO RECEPTION MANUAL TUNING 14 PRESETTING STATIONS 15 TAPE PLAYBACK BASIC OPERATIONS 16 CD PLAYING BASIC OPERATIONS 17 PROGRAMMED PLAY 19 RECORDING BASIC RECORDING 20 AI EDIT RECORDING 21 En PROGRAMMED EDIT RECORDING 22 DOLBY SURROUND ADJUSTING SPEAKER LEVEL 23 PLAY WITH DOLBY PRO LOGIC 24 LISTENING TO DOLBY DIGITAL SURROUND SOUND ...... 25 KARAOKE MICROPHONE MIXING 26 CD KARAOKE PROGRAM 28 CLOCK AND TIMER SETTING THE CLOCK 29 SETTING...
... 6 CONNECTING A DVD PLAYER 8 REMOTE CONTROL 9 BEFORE OPERATION 9 SOUND AUDIO ADJUSTMENTS 11 GRAPHIC EQUALIZER 12 DSP SURROUND 13 RADIO RECEPTION MANUAL TUNING 14 PRESETTING STATIONS 15 TAPE PLAYBACK BASIC OPERATIONS 16 CD PLAYING BASIC OPERATIONS 17 PROGRAMMED PLAY 19 RECORDING BASIC RECORDING 20 AI EDIT RECORDING 21 En PROGRAMMED EDIT RECORDING 22 DOLBY SURROUND ADJUSTING SPEAKER LEVEL 23 PLAY WITH DOLBY PRO LOGIC 24 LISTENING TO DOLBY DIGITAL SURROUND SOUND ...... 25 KARAOKE MICROPHONE MIXING 26 CD KARAOKE PROGRAM 28 CLOCK AND TIMER SETTING THE CLOCK 29 SETTING...
Operating Instructions
Page 5
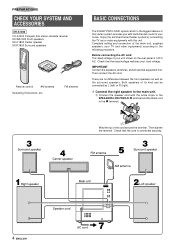
... TV set or video equipments with multichannel sound in your local voltage. Check that the rated voltage matches your home. Check that the cord is connected securely. 4 ENGLISH IMPORTANT Connect the speakers, antennas, and all optional equipment first. PREPARATIONS CHECK YOUR SYSTEM AND ACCESSORIES XH-A1000 CX-A1000 Compact disc stereo cassette receiver SX-WA1000 Front speakers SX-C1800 Center speaker SX-R1800 Surround speakers Remote control AM antenna Operating Instructions, etc. FM antenna BASIC CONNECTIONS...
... TV set or video equipments with multichannel sound in your local voltage. Check that the rated voltage matches your home. Check that the cord is connected securely. 4 ENGLISH IMPORTANT Connect the speakers, antennas, and all optional equipment first. PREPARATIONS CHECK YOUR SYSTEM AND ACCESSORIES XH-A1000 CX-A1000 Compact disc stereo cassette receiver SX-WA1000 Front speakers SX-C1800 Center speaker SX-R1800 Surround speakers Remote control AM antenna Operating Instructions, etc. FM antenna BASIC CONNECTIONS...

Operating Instructions
Page 6
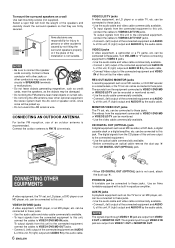
... player, DVD player, TV, etc.) can be connected to this antenna to find out the best location in the same manner as step 1. 3 Connect the surround speakers to SURROUND SPEAKERS L terminal. Align them horizontally, about 1 meter above ear height. To stand the AM antenna on a surface Fix the claw to the slot. 2 Connect the left to the main unit. To deactivate the DEMO, set the clock...
... player, DVD player, TV, etc.) can be connected to this antenna to find out the best location in the same manner as step 1. 3 Connect the surround speakers to SURROUND SPEAKERS L terminal. Align them horizontally, about 1 meter above ear height. To stand the AM antenna on a surface Fix the claw to the slot. 2 Connect the left to the main unit. To deactivate the DEMO, set the clock...
Operating Instructions
Page 7
...) output and AUDIO R by not fitting the surround speakers properly or if the place of this unit, R (right) output and AUDIO R by the audio cable. CD DIGITAL OUT (OPTICAL) jack A digital equipment such as an MD recorder, a CD-R/RW recorder or a cassette deck, or the TV set or an MD player, etc. can be connected to VIDEO 3 jacks. • Use the audio cable and video cable commercially available. • Connect L (left ) output of the connected equipment and AUDIO L of...
...) output and AUDIO R by not fitting the surround speakers properly or if the place of this unit, R (right) output and AUDIO R by the audio cable. CD DIGITAL OUT (OPTICAL) jack A digital equipment such as an MD recorder, a CD-R/RW recorder or a cassette deck, or the TV set or an MD player, etc. can be connected to VIDEO 3 jacks. • Use the audio cable and video cable commercially available. • Connect L (left ) output of the connected equipment and AUDIO L of...

Operating Instructions
Page 9
... DOLBY DIGITAL SURROUND sound cannot be recorded. The signals through MONITOR/VIDEO OUT jack is not displayed. 2 Play the connected equipment. To remove these limitations, connect LINE OUT jacks of the DVD player to AUX IN jacks of the sources depending on the equipment connected to PHONO jacks) When the sound level of the external source is pressed AUX 5.1chIN∗ PHONO Select one of this unit using cables with RCA phono plugs...
... DOLBY DIGITAL SURROUND sound cannot be recorded. The signals through MONITOR/VIDEO OUT jack is not displayed. 2 Play the connected equipment. To remove these limitations, connect LINE OUT jacks of the DVD player to AUX IN jacks of the sources depending on the equipment connected to PHONO jacks) When the sound level of the external source is pressed AUX 5.1chIN∗ PHONO Select one of this unit using cables with RCA phono plugs...
Operating Instructions
Page 10
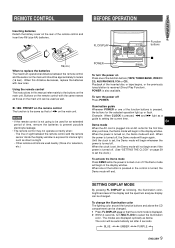
... inserted disc or tape begins, or the previously tuned station is set after 4 seconds. When the clock is received (Direct Play Function). The Demo mode will end. c/d PRESET on the remote control The function is the same as those of a television, etc.) POWER To turn the power off Press POWER. Buttons on the remote control with new ones. To change the illumination color The lighting color around the function buttons and above the CD compartment can be used...
... inserted disc or tape begins, or the previously tuned station is set after 4 seconds. When the clock is received (Direct Play Function). The Demo mode will end. c/d PRESET on the remote control The function is the same as those of a television, etc.) POWER To turn the power off Press POWER. Buttons on the remote control with new ones. To change the illumination color The lighting color around the function buttons and above the CD compartment can be used...

Operating Instructions
Page 11
... mode is displayed. 2 Within 4 seconds, turn off, press CLOCK so that the time is displayed for 4 seconds. DIMMER 3: The illumination of powerful, satisfying bass performance with true stereo separation. NORMAL REVERSE PEAK 2 Turn MULTI JOG within 4 seconds to change the power-economizing mode. 3 Within 4 seconds, press ENTER to set to the conditions of the display is set to reproduce mud-tohigh-range frequencies, this system incorporates a second L/R 2-channel...
... mode is displayed. 2 Within 4 seconds, turn off, press CLOCK so that the time is displayed for 4 seconds. DIMMER 3: The illumination of powerful, satisfying bass performance with true stereo separation. NORMAL REVERSE PEAK 2 Turn MULTI JOG within 4 seconds to change the power-economizing mode. 3 Within 4 seconds, press ENTER to set to the conditions of the display is set to reproduce mud-tohigh-range frequencies, this system incorporates a second L/R 2-channel...
Operating Instructions
Page 12
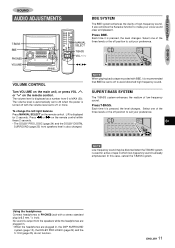
... the DOLBY DIGITAL SURROUND (page 25) front speakers level is also changed. NOTE When playing back a tape recorded with the volume level set to 20 when the power is already emphasized. SUPER T-BASS SYSTEM The T-BASS system enhances the realism of high-frequency sound. The volume level is displayed as a number from the speakers while the headphones are plugged in. • When the headphones are plugged in which low-frequency sound is turned off...
... the DOLBY DIGITAL SURROUND (page 25) front speakers level is also changed. NOTE When playing back a tape recorded with the volume level set to 20 when the power is already emphasized. SUPER T-BASS SYSTEM The T-BASS system enhances the realism of high-frequency sound. The volume level is displayed as a number from the speakers while the headphones are plugged in. • When the headphones are plugged in which low-frequency sound is turned off...
Operating Instructions
Page 14
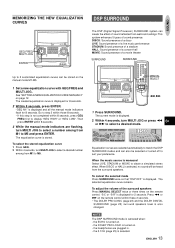
... is turned on . - DISCO: Sound presence of a disco LIVE: Sound presence of a live music performance STADIUM: Sound presence of a stadium HALL: Sound presence of a concert hall MOVIE: Sound presence of the surround speakers Press MANUAL SELECT twice or three times on the manual mode M1-M5. 1 Set a new equalization curve with GEQ FREQ and MULTI JOG. "GEQ M1" is displayed for 8 seconds. "S-L" or "S-R" is displayed and all the manual mode...
... is turned on . - DISCO: Sound presence of a disco LIVE: Sound presence of a live music performance STADIUM: Sound presence of a stadium HALL: Sound presence of a concert hall MOVIE: Sound presence of the surround speakers Press MANUAL SELECT twice or three times on the manual mode M1-M5. 1 Set a new equalization curve with GEQ FREQ and MULTI JOG. "GEQ M1" is displayed for 8 seconds. "S-L" or "S-R" is displayed and all the manual mode...
Operating Instructions
Page 15
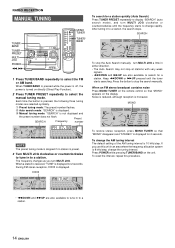
... MONO TUNER on directly (Direct Play Function). 2 Press TUNER PRESET repeatedly to change rapidly. During FM stereo reception, 1 is displayed. 1 To restore stereo reception, press MONO TUNER so that "MONO" appears on the unit. Press the button to stop at stations with very weak signals. • fDOWN and gUP are also available to tune in to tune in either direction. • The Auto Search may not stop the search manually. If you turn...
... MONO TUNER on directly (Direct Play Function). 2 Press TUNER PRESET repeatedly to change rapidly. During FM stereo reception, 1 is displayed. 1 To restore stereo reception, press MONO TUNER so that "MONO" appears on the unit. Press the button to stop at stations with very weak signals. • fDOWN and gUP are also available to tune in to tune in either direction. • The Auto Search may not stop the search manually. If you turn...

Operating Instructions
Page 17
... to stop mode. MUSIC SENSOR If there is pressed, the reverse mode changes. ]P [ [ 1 Press DOLBY NR to match the playback tape. For tapes recorded without DOLBY NR, turn off to turn on . Playback side indicator The tape counter indicates the tape running length. To play , press a. The power is also turned on hNR. When the x indicator of the current track. To start play when the power is off (Direct Play Function) When a tape is...
... to stop mode. MUSIC SENSOR If there is pressed, the reverse mode changes. ]P [ [ 1 Press DOLBY NR to match the playback tape. For tapes recorded without DOLBY NR, turn off to turn on . Playback side indicator The tape counter indicates the tape running length. To play , press a. The power is also turned on hNR. When the x indicator of the current track. To start play when the power is off (Direct Play Function) When a tape is...
Operating Instructions
Page 18
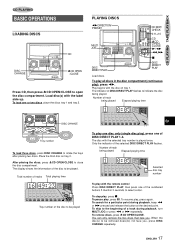
... the trays after placing two discs. To load one of a track during playback, keep f or g pressed and release the button at the desired point. Play begins with the label side up. The disc with the remote control Press DISC DIRECT PLAY, then press one of the disc to be removed does(do) not face you . To stop play ), press d. CD PLAYING TAPE PLAYBACK CD PLAYING BASIC OPERATIONS LOADING DISCS DISC CHANGE CD zCD OPEN /CLOSE Press CD, then...
... the trays after placing two discs. To load one of a track during playback, keep f or g pressed and release the button at the desired point. Play begins with the label side up. The disc with the remote control Press DISC DIRECT PLAY, then press one of the disc to be removed does(do) not face you . To stop play ), press d. CD PLAYING TAPE PLAYBACK CD PLAYING BASIC OPERATIONS LOADING DISCS DISC CHANGE CD zCD OPEN /CLOSE Press CD, then...
Operating Instructions
Page 20
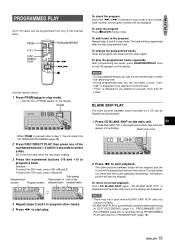
PRGM 0-9,+10 DISC DIRECT PLAY RANDOM/REPEAT c/d f,g s Use the remote control. 1 Press PRGM twice in stop mode. To select the 10th track, press +10 and 0. Selected track number Program number Total playing Total number of time of PRGM appear on a CD can not select a track. BLANK SKIP PLAY The silent portions between tracks will be skipped, and the sound will appear in the display. Blank skip mark 2 Press d to normal playback Press CD BLANK SKIP again...
PRGM 0-9,+10 DISC DIRECT PLAY RANDOM/REPEAT c/d f,g s Use the remote control. 1 Press PRGM twice in stop mode. To select the 10th track, press +10 and 0. Selected track number Program number Total playing Total number of time of PRGM appear on a CD can not select a track. BLANK SKIP PLAY The silent portions between tracks will be skipped, and the sound will appear in the display. Blank skip mark 2 Press d to normal playback Press CD BLANK SKIP again...
Operating Instructions
Page 21
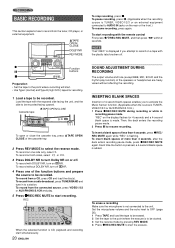
... SOUND ADJUSTMENT DURING RECORDING The output volume and tone (except BBE, MIC, ECHO and the rhythm play . 5 Press wREC/REC MUTE to start recording with the plastic tabs brocken off . RECORDING BASIC RECORDING This section explains how to record from a CD, press CD and load the disc(s). To pause recording, press a. (Applicable when the recording source is TUNER, VIDEO1/2/3 or an external equipment connected to AUDIO IN jacks on the display...
... SOUND ADJUSTMENT DURING RECORDING The output volume and tone (except BBE, MIC, ECHO and the rhythm play . 5 Press wREC/REC MUTE to start recording with the plastic tabs brocken off . RECORDING BASIC RECORDING This section explains how to record from a CD, press CD and load the disc(s). To pause recording, press a. (Applicable when the recording source is TUNER, VIDEO1/2/3 or an external equipment connected to AUDIO IN jacks on the display...
Operating Instructions
Page 24
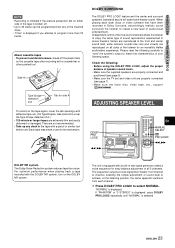
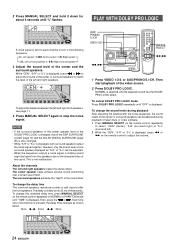
... tracks. Independent control of the five sound channels allows the listener to create a new level of audio/visual entertainment. For optimum performance when playing back a tape recorded with a built-in the tape with adhesive tape, etc. (On Type II tapes, take care not to cover the Type II tape detection slot.) • 120-minute or longer tapes are properly connected (see page 7). • Make sure the laser disc...
... tracks. Independent control of the five sound channels allows the listener to create a new level of audio/visual entertainment. For optimum performance when playing back a tape recorded with a built-in the tape with adhesive tape, etc. (On Type II tapes, take care not to cover the Type II tape detection slot.) • 120-minute or longer tapes are properly connected (see page 7). • Make sure the laser disc...
Operating Instructions
Page 25
... stop the noise signal. To change this standard delay time, press MANUAL SELECT on the remote control to each channel in turn in NORMAL or PHANTOM mode until "L" flashes. To cancel DOLBY PRO LOGIC mode Press DOLBY PRO LOGIC repeatedly until "OFF" is displayed, press f or g on the remote control repeatedly in the following sequence. PLAY WITH DOLBY PRO LOGIC A noise signal is sent to adjust the volume...
... stop the noise signal. To change this standard delay time, press MANUAL SELECT on the remote control to each channel in turn in NORMAL or PHANTOM mode until "L" flashes. To cancel DOLBY PRO LOGIC mode Press DOLBY PRO LOGIC repeatedly until "OFF" is displayed, press f or g on the remote control repeatedly in the following sequence. PLAY WITH DOLBY PRO LOGIC A noise signal is sent to adjust the volume...
Operating Instructions
Page 26
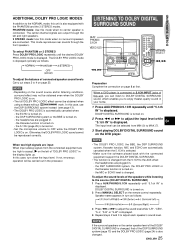
... DVD player. the headphones are plugged in the processor. The center channel signals are input When input analog signals from MIN (0) to the NORMAL mode, this unit, you to OFF while the DOLBY PRO LOGIC is also changed . LISTENING TO DOLBY DIGITAL SURROUND SOUND AUX/ PHONO/ 5.1CH VIDEO 1/2/3 MANUAL SELECT f,g f,g To adjust the balance of connected speaker sound levels Carry out steps 2 to accept, l on . DOLBY DIGITAL SURROUND is turned...
... DVD player. the headphones are plugged in the processor. The center channel signals are input When input analog signals from MIN (0) to the NORMAL mode, this unit, you to OFF while the DOLBY PRO LOGIC is also changed . LISTENING TO DOLBY DIGITAL SURROUND SOUND AUX/ PHONO/ 5.1CH VIDEO 1/2/3 MANUAL SELECT f,g f,g To adjust the balance of connected speaker sound levels Carry out steps 2 to accept, l on . DOLBY DIGITAL SURROUND is turned...

Operating Instructions
Page 33
...: 310mV 5.1CH INPUT (adjustable) FRONT: 300 mV SURROUND: 300 mV CENTER: 600 mV SUB WOOFER: 300 mV MIC 1, MIC 2: 1.4 mV (20 kohms) Outputs CD DIGITAL OUT (OPTICAL) SPEAKERS: LOW + SUB WOOFER 6 ohms HIGH 8 ohms SURROUND SPEAKERS: accept speakers of 8 -16 ohms CENTER SPEAKER: accepts speakers of 8 ohms or more PHONES (stereo jack): accepts headphones of 32 ohms or more Cassette deck section Track format 4 tracks, 2 channels stereo Frequency response CrO2 tape: 50 Hz...
...: 310mV 5.1CH INPUT (adjustable) FRONT: 300 mV SURROUND: 300 mV CENTER: 600 mV SUB WOOFER: 300 mV MIC 1, MIC 2: 1.4 mV (20 kohms) Outputs CD DIGITAL OUT (OPTICAL) SPEAKERS: LOW + SUB WOOFER 6 ohms HIGH 8 ohms SURROUND SPEAKERS: accept speakers of 8 -16 ohms CENTER SPEAKER: accepts speakers of 8 ohms or more PHONES (stereo jack): accepts headphones of 32 ohms or more Cassette deck section Track format 4 tracks, 2 channels stereo Frequency response CrO2 tape: 50 Hz...
Operating Instructions
Page 34
... the cassette decks, reset the unit as follows. 1 Press POWER to turn the power back on the tape broken off in which can radiate radio frequency energy and, if not installed and used in accordance with the instructions, may be turned off ? (b page 23) • Is the recording head dirty? (b page 31) Erasure is off the power. 2 Press POWER to turn off . • Is the power economizing mode set...
... the cassette decks, reset the unit as follows. 1 Press POWER to turn the power back on the tape broken off in which can radiate radio frequency energy and, if not installed and used in accordance with the instructions, may be turned off ? (b page 23) • Is the recording head dirty? (b page 31) Erasure is off the power. 2 Press POWER to turn off . • Is the power economizing mode set...


