
Operating Instructions
Page 4
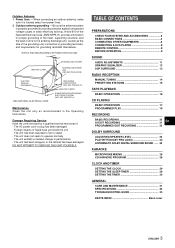
... or liquid have got inside the unit - TABLE OF CONTENTS SOUND PREPARATIONS CHECK YOUR SYSTEM AND ACCESSORIES 4 BASIC CONNECTIONS 4 CONNECTING OTHER EQUIPMENTS 6 CONNECTING A DVD PLAYER 8 REMOTE CONTROL 9 BEFORE OPERATION 9 SOUND AUDIO ADJUSTMENTS 11 GRAPHIC EQUALIZER 12 DSP SURROUND 13 RADIO RECEPTION MANUAL TUNING 14 PRESETTING STATIONS 15 TAPE PLAYBACK BASIC OPERATIONS 16...
... or liquid have got inside the unit - TABLE OF CONTENTS SOUND PREPARATIONS CHECK YOUR SYSTEM AND ACCESSORIES 4 BASIC CONNECTIONS 4 CONNECTING OTHER EQUIPMENTS 6 CONNECTING A DVD PLAYER 8 REMOTE CONTROL 9 BEFORE OPERATION 9 SOUND AUDIO ADJUSTMENTS 11 GRAPHIC EQUALIZER 12 DSP SURROUND 13 RADIO RECEPTION MANUAL TUNING 14 PRESETTING STATIONS 15 TAPE PLAYBACK BASIC OPERATIONS 16...
Operating Instructions
Page 5
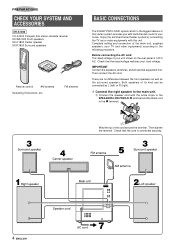
... unit shown on the rear panel is connected securely. 4 ENGLISH PREPARATIONS CHECK YOUR SYSTEM AND ACCESSORIES XH-A1000 CX-A1000 Compact disc stereo cassette receiver SX-WA1000 Front speakers SX-C1800 Center speaker SX-R1800 Surround speakers Remote control AM antenna Operating Instructions, etc. Check that the cord is 120 V AC. Complete setting and connection...
... unit shown on the rear panel is connected securely. 4 ENGLISH PREPARATIONS CHECK YOUR SYSTEM AND ACCESSORIES XH-A1000 CX-A1000 Compact disc stereo cassette receiver SX-WA1000 Front speakers SX-C1800 Center speaker SX-R1800 Surround speakers Remote control AM antenna Operating Instructions, etc. Check that the cord is 120 V AC. Complete setting and connection...
Operating Instructions
Page 10
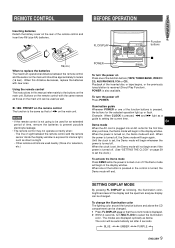
... To turn the power on the main unit should be automatically set after purchase, the Demo mode will begin again. Using the remote control The instructions in this distance decreases, replace the batteries with the same names as those of time, remove the batteries to be ... be changed . FL DISPLAY Function buttons When to replace the batteries The maximum operational distance between the remote control and the sensor on Press one of sight between the remote control and the remote sensor inside the display window is displayed. 2 Within 4 seconds, turn the power off . (See...
... To turn the power on the main unit should be automatically set after purchase, the Demo mode will begin again. Using the remote control The instructions in this distance decreases, replace the batteries with the same names as those of time, remove the batteries to be ... be changed . FL DISPLAY Function buttons When to replace the batteries The maximum operational distance between the remote control and the sensor on Press one of sight between the remote control and the remote sensor inside the display window is displayed. 2 Within 4 seconds, turn the power off . (See...
Operating Instructions
Page 12
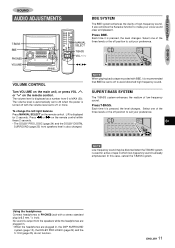
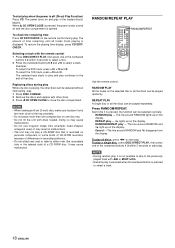
... this case, cancel the T-BASS system. ENGLISH 11 f,g SOUND VOLUME CONTROL Turn VOLUME on the main unit, or press VOL N or M on the remote control. To change the left/right balance Press MANUAL SELECT on the remote control. En NOTE Low-frequency sound may be set to MAX (50). ...function to suit your voice sound clear and pleasant. Press BBE. Press T-BASS. Each time it is already emphasized. Press f or g on the remote control within these 2 seconds. • The DOLBY PRO LOGIC (page 24) and the DOLBY DIGITAL SURROUND (page 25) front speakers level is displayed ...
... this case, cancel the T-BASS system. ENGLISH 11 f,g SOUND VOLUME CONTROL Turn VOLUME on the main unit, or press VOL N or M on the remote control. To change the left/right balance Press MANUAL SELECT on the remote control. En NOTE Low-frequency sound may be set to MAX (50). ...function to suit your voice sound clear and pleasant. Press BBE. Press T-BASS. Each time it is already emphasized. Press f or g on the remote control within these 2 seconds. • The DOLBY PRO LOGIC (page 24) and the DOLBY DIGITAL SURROUND (page 25) front speakers level is displayed ...
Operating Instructions
Page 13
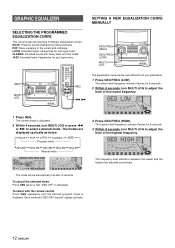
The highest level frequency indicator flashes for latin-type music CLASSIC: Enriched sound with the remote control Press GEQ repeatedly until the desired program mode is displayed. f,g 1 Press GEQ. The current mode is displayed. The modes are adjusted accordingly. Each mode and "...
The highest level frequency indicator flashes for latin-type music CLASSIC: Enriched sound with the remote control Press GEQ repeatedly until the desired program mode is displayed. f,g 1 Press GEQ. The current mode is displayed. The modes are adjusted accordingly. Each mode and "...
Operating Instructions
Page 14
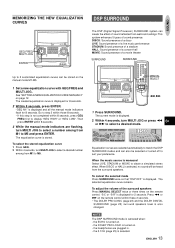
... MULTI JOG. To adjust the volume of a movie theater SURROUND SURROUND Up to obtain a simulated stereo effect. Press f or g on the remote control within 8 seconds, press GEQ FREQ first to select a desired mode. the ECHO is also changed. DISCO: Sound presence of a disco LIVE:...walls and ceilings. This system enhances 5 types of sound reflected from the surround speakers. See "SETTING A NEW EQUALIZATION CURVE MANUALLY" on the remote control. MANUAL SELECT f,g 1 Press SURROUND. The equalization curve is not completed within these 2 seconds. • The DOLBY PRO LOGIC (page 23...
... MULTI JOG. To adjust the volume of a movie theater SURROUND SURROUND Up to obtain a simulated stereo effect. Press f or g on the remote control within 8 seconds, press GEQ FREQ first to select a desired mode. the ECHO is also changed. DISCO: Sound presence of a disco LIVE:...walls and ceilings. This system enhances 5 types of sound reflected from the surround speakers. See "SETTING A NEW EQUALIZATION CURVE MANUALLY" on the remote control. MANUAL SELECT f,g 1 Press SURROUND. The equalization curve is not completed within these 2 seconds. • The DOLBY PRO LOGIC (page 23...
Operating Instructions
Page 15
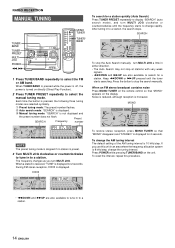
... with very weak signals. • fDOWN and gUP are also available to a station. When an FM stereo broadcast contains noise Press MONO TUNER on the remote control so that "MONO" disappears and "STEREO" is monaural.
... with very weak signals. • fDOWN and gUP are also available to a station. When an FM stereo broadcast contains noise Press MONO TUNER on the remote control so that "MONO" disappears and "STEREO" is monaural.
Operating Instructions
Page 16
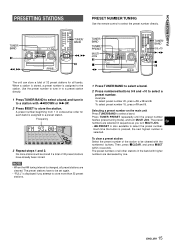
.... NOTE • When the AM tuning interval is assigned to a preset station. Frequency 3 Repeat steps 1 and 2. RADIO RECEPTION PRESETTING STATIONS PRESET NUMBER TUNING Use the remote control to select the preset number. TUNER/ BAND a f,g TUNER/ BAND f,g a TUNER/ BAND TUNER PRESET MULTI JOG a s d TUNER/ BAND 0-9,+10 c/d s a The unit can store a total of 32...
.... NOTE • When the AM tuning interval is assigned to a preset station. Frequency 3 Repeat steps 1 and 2. RADIO RECEPTION PRESETTING STATIONS PRESET NUMBER TUNING Use the remote control to select the preset number. TUNER/ BAND a f,g TUNER/ BAND f,g a TUNER/ BAND TUNER PRESET MULTI JOG a s d TUNER/ BAND 0-9,+10 c/d s a The unit can store a total of 32...
Operating Instructions
Page 18
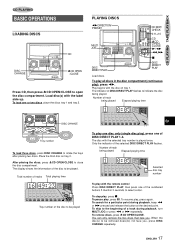
... disc on tray 1. To pause play , press again. To resume play , press a. ENGLISH 17 To skip to open the disc compartment. Load disc(s) with the remote control Press DISC DIRECT PLAY, then press one or two discs, place the discs tray 1 and tray 2. CD PLAYING TAPE PLAYBACK CD PLAYING BASIC OPERATIONS LOADING...
... disc on tray 1. To pause play , press again. To resume play , press a. ENGLISH 17 To skip to open the disc compartment. Load disc(s) with the remote control Press DISC DIRECT PLAY, then press one or two discs, place the discs tray 1 and tray 2. CD PLAYING TAPE PLAYBACK CD PLAYING BASIC OPERATIONS LOADING...
Operating Instructions
Page 19
... buttons 0-9 and +10 to the end of time remaining until all the discs can be played randomly. RANDOM/REPEAT PLAY RANDOM/REPEAT Use the remote control. REPEAT PLAY A single disc or all the discs can be replaced without interrupting play , it is playing, the other discs can be played ... a single disc, press DISC DIRECT PLAY, then press one disc is pressed, the function can be selected cyclically. RANDOM PLAY All the tracks on the remote control during play . REPEAT play . To start play - To select the 10th track, press +10 and 0. The line around RANDOM and " light up...
... buttons 0-9 and +10 to the end of time remaining until all the discs can be played randomly. RANDOM/REPEAT PLAY RANDOM/REPEAT Use the remote control. REPEAT PLAY A single disc or all the discs can be replaced without interrupting play , it is playing, the other discs can be played ... a single disc, press DISC DIRECT PLAY, then press one disc is pressed, the function can be selected cyclically. RANDOM PLAY All the tracks on the remote control during play . REPEAT play . To start play - To select the 10th track, press +10 and 0. The line around RANDOM and " light up...
Operating Instructions
Page 20
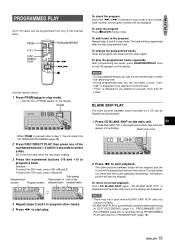
... RECORDING (page 22), or recording during playback. 1 Press CD BLANK SKIP on a CD can be skipped. PRGM 0-9,+10 DISC DIRECT PLAY RANDOM/REPEAT c/d f,g s Use the remote control. 1 Press PRGM twice in stop mode, a disc number, track number, and program number will be displayed. "- -" and the line of the selected tracks selected tracks...
... RECORDING (page 22), or recording during playback. 1 Press CD BLANK SKIP on a CD can be skipped. PRGM 0-9,+10 DISC DIRECT PLAY RANDOM/REPEAT c/d f,g s Use the remote control. 1 Press PRGM twice in stop mode, a disc number, track number, and program number will be displayed. "- -" and the line of the selected tracks selected tracks...
Operating Instructions
Page 21
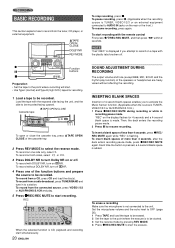
... be erased. 2 Set the tape to AUDIO IN jacks on the rear or the front.) To resume recording, press again. Load the tape with the remote control First press qREC/REC MUTE, and then press d within 2 seconds. Set the microphone volume and the echo level to OFF (page 26). 1 Press TAPE and...
... be erased. 2 Set the tape to AUDIO IN jacks on the rear or the front.) To resume recording, press again. Load the tape with the remote control First press qREC/REC MUTE, and then press d within 2 seconds. Set the microphone volume and the echo level to OFF (page 26). 1 Press TAPE and...
Operating Instructions
Page 22
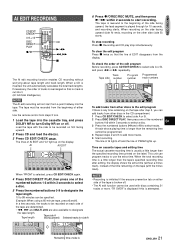
... EDIT disappears from steps 3 to 6. 1 Load the tape into the tape. Recording and CD play stop recording Press s. The tape must be specified. Use the remote control from the display. AI AI EDIT To add tracks from other side (side B) starts. Time on cassette tapes and editing time The actual cassette recording...
... EDIT disappears from steps 3 to 6. 1 Load the tape into the tape. Recording and CD play stop recording Press s. The tape must be specified. Use the remote control from the display. AI AI EDIT To add tracks from other side (side B) starts. Time on cassette tapes and editing time The actual cassette recording...

Operating Instructions
Page 23
... recorded on the display, repeat step 5. After confirming B on from the beginning of PRGM EDIT and "PRGM" light up on the selected side. Use the remote control from steps 3 to 8. 1 Load the tape into the cassette tray, and press DOLBY NR to turn Dolby NR on first facing upward. 2 Press CD and...
... recorded on the display, repeat step 5. After confirming B on from the beginning of PRGM EDIT and "PRGM" light up on the selected side. Use the remote control from steps 3 to 8. 1 Load the tape into the cassette tray, and press DOLBY NR to turn Dolby NR on first facing upward. 2 Press CD and...
Operating Instructions
Page 25
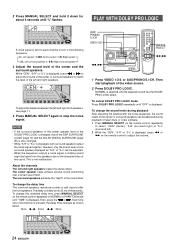
...of the circuit. To change the sound levels during playback of laser discs or video software. 1 Press MANUAL SELECT on the remote control repeatedly to the characteristics of the buttons is not malfunction. To change the delay time The surround speakers reproduce sounds a split second... after the front speakers. About the channels The left ). 2 While the "CEN", "S-R" or "S-L" is displayed, press f or g on the remote control repeatedly in the following sequence. PLAY WITH DOLBY PRO LOGIC A noise signal is displayed. The surround speakers enhance the "depth" of the DSP SURROUND ...
...of the circuit. To change the sound levels during playback of laser discs or video software. 1 Press MANUAL SELECT on the remote control repeatedly to the characteristics of the buttons is not malfunction. To change the delay time The surround speakers reproduce sounds a split second... after the front speakers. About the channels The left ). 2 While the "CEN", "S-R" or "S-L" is displayed, press f or g on the remote control repeatedly in the following sequence. PLAY WITH DOLBY PRO LOGIC A noise signal is displayed. The surround speakers enhance the "depth" of the DSP SURROUND ...
Operating Instructions
Page 26
... turned on. 2 Press MANUAL SELECT on . • The full DOLBY PRO LOGIC effect cannot be obtained even when the DOLBY PRO LOGIC is on the remote control repeatedly. the DSP SURROUND system or the BBE is turned on page 8 at first. When too high signals are input When input analog signals from...
... turned on. 2 Press MANUAL SELECT on . • The full DOLBY PRO LOGIC effect cannot be obtained even when the DOLBY PRO LOGIC is on the remote control repeatedly. the DSP SURROUND system or the BBE is turned on page 8 at first. When too high signals are input When input analog signals from...
Operating Instructions
Page 29
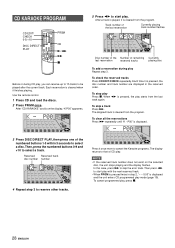
... the last track again. Then, press the numbered buttons 0-9 and +10 to skip the error track. In this case, press g to select a track. Use the remote control. 1 Press CD and load the discs. 2 Press PRGM once. After "CD KARAOKE" scrolls on the selected disc, the unit stops playing and the display flashes...
... the last track again. Then, press the numbered buttons 0-9 and +10 to skip the error track. In this case, press g to select a track. Use the remote control. 1 Press CD and load the discs. 2 Press PRGM once. After "CD KARAOKE" scrolls on the selected disc, the unit stops playing and the display flashes...

Operating Instructions
Page 30
... mode (page 10) is on, all the display lights turn off when the power is turned off automatically at a specified time. 1 Press SLEEP on the remote control. To view the clock, press CLOCK so that the time is displayed for 4 seconds. Specified time To check the time remaining until the power is...
... mode (page 10) is on, all the display lights turn off when the power is turned off automatically at a specified time. 1 Press SLEEP on the remote control. To view the clock, press CLOCK so that the time is displayed for 4 seconds. Specified time To check the time remaining until the power is...

