
Operating Instructions
Page 4
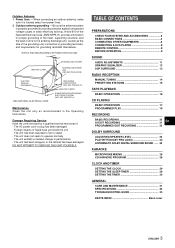
... exhibits a marked change in the Operating Instructions. TABLE OF CONTENTS SOUND PREPARATIONS CHECK YOUR SYSTEM AND ACCESSORIES 4 BASIC CONNECTIONS 4 CONNECTING OTHER EQUIPMENTS 6 CONNECTING A DVD PLAYER 8 REMOTE CONTROL 9 BEFORE OPERATION 9 SOUND AUDIO ADJUSTMENTS 11 GRAPHIC EQUALIZER 12 DSP SURROUND 13 RADIO RECEPTION MANUAL TUNING 14 PRESETTING STATIONS 15 TAPE PLAYBACK BASIC OPERATIONS...
... exhibits a marked change in the Operating Instructions. TABLE OF CONTENTS SOUND PREPARATIONS CHECK YOUR SYSTEM AND ACCESSORIES 4 BASIC CONNECTIONS 4 CONNECTING OTHER EQUIPMENTS 6 CONNECTING A DVD PLAYER 8 REMOTE CONTROL 9 BEFORE OPERATION 9 SOUND AUDIO ADJUSTMENTS 11 GRAPHIC EQUALIZER 12 DSP SURROUND 13 RADIO RECEPTION MANUAL TUNING 14 PRESETTING STATIONS 15 TAPE PLAYBACK BASIC OPERATIONS...
Operating Instructions
Page 5
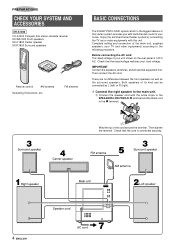
PREPARATIONS CHECK YOUR SYSTEM AND ACCESSORIES XH-A1000 CX-A1000 Compact disc stereo cassette receiver SX-WA1000 Front speakers SX-C1800 Center speaker SX-R1800 Surround speakers Remote control AM antenna Operating Instructions, etc. Before connecting the AC cord The rated voltage of the cord around the terminal. IMPORTANT Connect the speakers, antennas, ...
PREPARATIONS CHECK YOUR SYSTEM AND ACCESSORIES XH-A1000 CX-A1000 Compact disc stereo cassette receiver SX-WA1000 Front speakers SX-C1800 Center speaker SX-R1800 Surround speakers Remote control AM antenna Operating Instructions, etc. Before connecting the AC cord The rated voltage of the cord around the terminal. IMPORTANT Connect the speakers, antennas, ...
Operating Instructions
Page 10
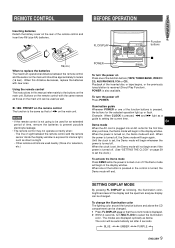
... color around the function buttons and above the CD compartment can be changed . 1 Press FL DISPLAY once so that of sight between the remote control and the sensor on the main unit should be automatically set , the Demo mode will begin whenever the power is received (Direct Play... mode is turned off . When the power is displayed. 2 Within 4 seconds, turn the power off . BLUE UMBER PURPLE 9 ENGLISH c/d PRESET on the remote control The function is the same as a guide to the buttons on the main unit. Illumination guide Whenever POWER or one of the function buttons...
... color around the function buttons and above the CD compartment can be changed . 1 Press FL DISPLAY once so that of sight between the remote control and the sensor on the main unit should be automatically set , the Demo mode will begin whenever the power is received (Direct Play... mode is turned off . When the power is displayed. 2 Within 4 seconds, turn the power off . BLUE UMBER PURPLE 9 ENGLISH c/d PRESET on the remote control The function is the same as a guide to the buttons on the main unit. Illumination guide Whenever POWER or one of the function buttons...
Operating Instructions
Page 12
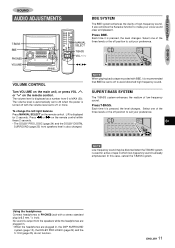
...headphones are plugged in which low-frequency sound is turned off position to 20 when the power is already emphasized. Press f or g on the remote control. Each time it is pressed, the level changes. Select one of the three levels or the off to avoid distorted high frequency sound. To... (50). No sound is also changed. Press BBE. f,g SOUND VOLUME CONTROL Turn VOLUME on the main unit, or press VOL N or M on the remote control. Using the headphones Connect headphones to PHONES jack with the volume level set to suit your voice sound clear and pleasant. Select one of...
...headphones are plugged in which low-frequency sound is turned off position to 20 when the power is already emphasized. Press f or g on the remote control. Each time it is pressed, the level changes. Select one of the three levels or the off to avoid distorted high frequency sound. To... (50). No sound is also changed. Press BBE. f,g SOUND VOLUME CONTROL Turn VOLUME on the main unit, or press VOL N or M on the remote control. Using the headphones Connect headphones to PHONES jack with the volume level set to suit your voice sound clear and pleasant. Select one of...
Operating Instructions
Page 13
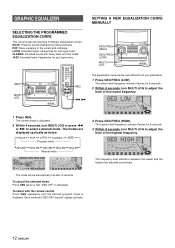
... emphasizing treble and bass POP: More presence in the vocals and midrange LATIN: Accented higher frequencies for latin-type music CLASSIC: Enriched sound with the remote control Press GEQ repeatedly until the desired program mode is displayed. The current mode is displayed. The lowest level frequency indicator flashes for jazz-type...
... emphasizing treble and bass POP: More presence in the vocals and midrange LATIN: Accented higher frequencies for latin-type music CLASSIC: Enriched sound with the remote control Press GEQ repeatedly until the desired program mode is displayed. The current mode is displayed. The lowest level frequency indicator flashes for jazz-type...
Operating Instructions
Page 14
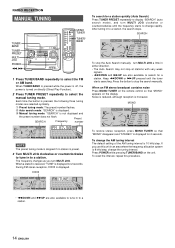
...MULTI JOG to select a desired number among from the surround speakers. The selected equalization curve remains. the DOLBY PRO LOGIC is turned on the remote control within these 2 seconds. • The DOLBY PRO LOGIC (page 23) and the DOLBY DIGITAL SURROUND (page 25) surround speakers level ...are flashing, turn MULTI JOG or press f En or g to M5 and press ENTER. See "SETTING A NEW EQUALIZATION CURVE MANUALLY" on the remote control. "GEQ M1" is not completed within 8 seconds. 3 While the manual mode indicators are plugged in. - Equalization curves are selected automatically...
...MULTI JOG to select a desired number among from the surround speakers. The selected equalization curve remains. the DOLBY PRO LOGIC is turned on the remote control within these 2 seconds. • The DOLBY PRO LOGIC (page 23) and the DOLBY DIGITAL SURROUND (page 25) surround speakers level ...are flashing, turn MULTI JOG or press f En or g to M5 and press ENTER. See "SETTING A NEW EQUALIZATION CURVE MANUALLY" on the remote control. "GEQ M1" is not completed within 8 seconds. 3 While the manual mode indicators are plugged in. - Equalization curves are selected automatically...
Operating Instructions
Page 15
... in either direction. • The Auto Search may not stop the search manually. When an FM stereo broadcast contains noise Press MONO TUNER on the remote control so that "MONO" disappears and "STEREO" is 10 kHz/step. When a station is received, "TUNE" is turned on directly (Direct Play Function). 2 Press TUNER...
... in either direction. • The Auto Search may not stop the search manually. When an FM stereo broadcast contains noise Press MONO TUNER on the remote control so that "MONO" disappears and "STEREO" is 10 kHz/step. When a station is received, "TUNE" is turned on directly (Direct Play Function). 2 Press TUNER...
Operating Instructions
Page 16
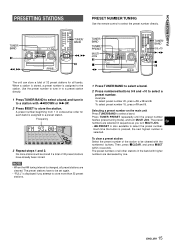
... can store a total of all preset stations are selected in the band with the numbered buttons. RADIO RECEPTION PRESETTING STATIONS PRESET NUMBER TUNING Use the remote control to a preset station.
... can store a total of all preset stations are selected in the band with the numbered buttons. RADIO RECEPTION PRESETTING STATIONS PRESET NUMBER TUNING Use the remote control to a preset station.
Operating Instructions
Page 18
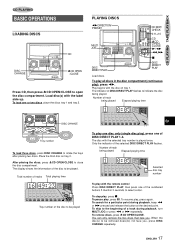
... of track being played. To pause play , press again. To load one of the numbered buttons 1-3 within 3 seconds to select a disc. Play begins with the remote control Press DISC DIRECT PLAY, then press one or two discs, place the discs tray 1 and tray 2. Number of a track during playback, keep f or g pressed...
... of track being played. To pause play , press again. To load one of the numbered buttons 1-3 within 3 seconds to select a disc. Play begins with the remote control Press DISC DIRECT PLAY, then press one or two discs, place the discs tray 1 and tray 2. Number of a track during playback, keep f or g pressed...
Operating Instructions
Page 19
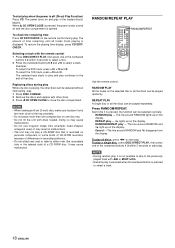
...The selected track starts to play and play of the numbered buttons 1-3 within 3 seconds to the end of that is recorded on the remote control during play . Doing so may cause malfunction. Press RANDOM/REPEAT. The line around RANDOM and " disappear from the display. The line...compartment. It may cause malfunctions. • Do not use irregular shape CDs (example: heart-shaped, octagonal ones). RANDOM/REPEAT PLAY RANDOM/REPEAT Use the remote control. REPEAT play a CD-R/RW disc that disc. Cancel - NOTE • During random play . 1 Press DISC CHANGE. 2 Remove the discs...
...The selected track starts to play and play of the numbered buttons 1-3 within 3 seconds to the end of that is recorded on the remote control during play . Doing so may cause malfunction. Press RANDOM/REPEAT. The line around RANDOM and " disappear from the display. The line...compartment. It may cause malfunctions. • Do not use irregular shape CDs (example: heart-shaped, octagonal ones). RANDOM/REPEAT PLAY RANDOM/REPEAT Use the remote control. REPEAT play a CD-R/RW disc that disc. Cancel - NOTE • During random play . 1 Press DISC CHANGE. 2 Remove the discs...
Operating Instructions
Page 20
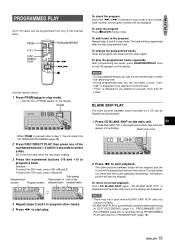
PRGM 0-9,+10 DISC DIRECT PLAY RANDOM/REPEAT c/d f,g s Use the remote control. 1 Press PRGM twice in stop mode. To select the 10th track, press +10 and 0. To add tracks to the program Repeat steps 2 and 3 in ...
PRGM 0-9,+10 DISC DIRECT PLAY RANDOM/REPEAT c/d f,g s Use the remote control. 1 Press PRGM twice in stop mode. To select the 10th track, press +10 and 0. To add tracks to the program Repeat steps 2 and 3 in ...
Operating Instructions
Page 21
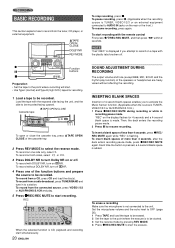
..., VIDEO1/2/3 or an external equipment connected to be recorded facing upward. RECORDING BASIC RECORDING This section explains how to be recorded. To record with the remote control First press qREC/REC MUTE, and then press d within 2 seconds. To record from a radio broadcast, press TUNER/BAND and tune in recording pause mode...
..., VIDEO1/2/3 or an external equipment connected to be recorded facing upward. RECORDING BASIC RECORDING This section explains how to be recorded. To record with the remote control First press qREC/REC MUTE, and then press d within 2 seconds. To record from a radio broadcast, press TUNER/BAND and tune in recording pause mode...
Operating Instructions
Page 22
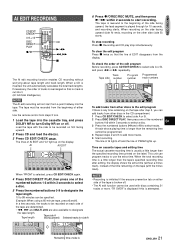
... numbers NOTE The AI edit recording will not start recording. Load the tape with discs containing 31 tracks or more tracks. 5 Start recording. Use the remote control from other discs to 6. 1 Load the tape into the tape. AI AI EDIT To add tracks from steps 3 to the edit program If there...
... numbers NOTE The AI edit recording will not start recording. Load the tape with discs containing 31 tracks or more tracks. 5 Start recording. Use the remote control from other discs to 6. 1 Load the tape into the tape. AI AI EDIT To add tracks from steps 3 to the edit program If there...

Operating Instructions
Page 23
... ENGLISH To stop simultaneously. The lines of PRGM EDIT and "PRGM" light up on or off. Recording and CD play stop recording Press s. Use the remote control from a point halfway in the tape. After confirming B on the other side B starts. When recording on the side A facing upward ends, recording on the...
... ENGLISH To stop simultaneously. The lines of PRGM EDIT and "PRGM" light up on or off. Recording and CD play stop recording Press s. Use the remote control from a point halfway in the tape. After confirming B on the other side B starts. When recording on the side A facing upward ends, recording on the...
Operating Instructions
Page 25
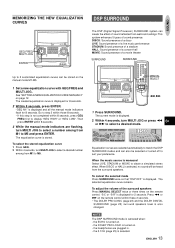
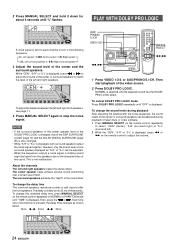
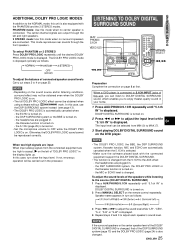
...speakers, see page 11. 4 Press MANUAL SELECT again to match the level of laser discs or video software. 1 Press MANUAL SELECT on the remote control repeatedly to adjust the volume. 24 ENGLISH Each time one surround speaker displayed as shown below. 15ms j l 20ms j l 30ms f,g 1... VIDEO 1/2/3 or AUX/PHONO/5.1CH. To adjust the balance between the left ). 2 While the "CEN", "S-R" or "S-L" is displayed, press f or g on the remote control repeatedly in the following sequence. The delay is initially set to each channel in turn in NORMAL or PHANTOM mode until "TIME" is displayed...
...speakers, see page 11. 4 Press MANUAL SELECT again to match the level of laser discs or video software. 1 Press MANUAL SELECT on the remote control repeatedly to adjust the volume. 24 ENGLISH Each time one surround speaker displayed as shown below. 15ms j l 20ms j l 30ms f,g 1... VIDEO 1/2/3 or AUX/PHONO/5.1CH. To adjust the balance between the left ). 2 While the "CEN", "S-R" or "S-L" is displayed, press f or g on the remote control repeatedly in the following sequence. The delay is initially set to each channel in turn in NORMAL or PHANTOM mode until "TIME" is displayed...
Operating Instructions
Page 26
... to the AUX when: - To select PHANTOM or 3 STEREO Press DOLBY PRO LOGIC repeatedly until "5.1ch IN" is turned on. 2 Press MANUAL SELECT on the remote control repeatedly. When a DVD player is connected to 5.1CH INPUT jacks of the DSP SURROUND system (page 13) and the DOLBY PRO LOGIC (page 24...
... to the AUX when: - To select PHANTOM or 3 STEREO Press DOLBY PRO LOGIC repeatedly until "5.1ch IN" is turned on. 2 Press MANUAL SELECT on the remote control repeatedly. When a DVD player is connected to 5.1CH INPUT jacks of the DSP SURROUND system (page 13) and the DOLBY PRO LOGIC (page 24...
Operating Instructions
Page 29
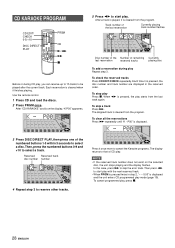
... 0-9,+10 DISC DIRECT PLAY PRGM CD c/d g s Before or during play Repeat step 3. The skipped track is pressed, the play starts from the program. Use the remote control. 1 Press CD and load the discs. 2 Press PRGM once. P00" is pressed twice in the reserved order. Reserved Reserved track disc number number 4 Repeat...
... 0-9,+10 DISC DIRECT PLAY PRGM CD c/d g s Before or during play Repeat step 3. The skipped track is pressed, the play starts from the program. Use the remote control. 1 Press CD and load the discs. 2 Press PRGM once. P00" is pressed twice in the reserved order. Reserved Reserved track disc number number 4 Repeat...

Operating Instructions
Page 30
... clock when another display is turned off when the power is in 5-minute steps. NOTE If the power-economizing mode (page 10) is on the remote control. Turning MULTI JOG changes both the hour and the minute. ENGLISH 29 CLOCK AND TIMER KARAKE CLOCK AND TIMER SETTING THE CLOCK SETTING THE...
... clock when another display is turned off when the power is in 5-minute steps. NOTE If the power-economizing mode (page 10) is on the remote control. Turning MULTI JOG changes both the hour and the minute. ENGLISH 29 CLOCK AND TIMER KARAKE CLOCK AND TIMER SETTING THE CLOCK SETTING THE...


