Operating Instructions
Page 4
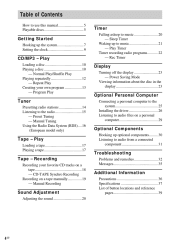
...Tuning Using the Radio Data System (RDS)...16 (European model only) Optional Components Hooking up the system...7 Setting the clock...9 CD/MP3 - Manual Recording Additional Information Precautions ...36 Specifications ...37 List of Contents How to use this manual...5 Playable discs...5 Timer...to audio from a connected component ...31 Tape - Rec Timer Getting Started Hooking up optional components...30 Listening to music ...20 - CD-TAPE Synchro Recording Recording on a personal computer...29 Tuner Presetting radio stations ...14 Listening to music...21 - Play Timer Timer recording...
...Tuning Using the Radio Data System (RDS)...16 (European model only) Optional Components Hooking up the system...7 Setting the clock...9 CD/MP3 - Manual Recording Additional Information Precautions ...36 Specifications ...37 List of Contents How to use this manual...5 Playable discs...5 Timer...to audio from a connected component ...31 Tape - Rec Timer Getting Started Hooking up optional components...30 Listening to music ...20 - CD-TAPE Synchro Recording Recording on a personal computer...29 Tuner Presetting radio stations ...14 Listening to music...21 - Play Timer Timer recording...

Operating Instructions
Page 5
...1) Playable discs You can play • An 8 cm disc • An 8 cm disc converted to a standard disc using an adaptor • CD-ROMs • CD-Rs/CD-RWs other than eight characters. MP3 format that conforms to ISO96601) Level 1/Level 2, Joliet, Romeo or Multi Session2) • A disc that has the... format, make sure of the contents of data using the Track-At-Once method. List of playable discs Format of discs Disc logo Audio CDs CD-R/CD-RW (audio data/MP3 files) ISO 9660 Format The most common international standard for the logical format of a session. 2) continued 5GB There...
...1) Playable discs You can play • An 8 cm disc • An 8 cm disc converted to a standard disc using an adaptor • CD-ROMs • CD-Rs/CD-RWs other than eight characters. MP3 format that conforms to ISO96601) Level 1/Level 2, Joliet, Romeo or Multi Session2) • A disc that has the... format, make sure of the contents of data using the Track-At-Once method. List of playable discs Format of discs Disc logo Audio CDs CD-R/CD-RW (audio data/MP3 files) ISO 9660 Format The most common international standard for the logical format of a session. 2) continued 5GB There...

Operating Instructions
Page 6
... it is recognized as an MP3 disc, and playback continues until an MP3 session is designed to playback discs that conform to the Compact Disc (CD) standard. Cautions when playing a disc that is recorded in Multi Session • If the disc begins with... the disc begins with complicated tree structure. - a disc recorded with an MP3 session, it has not been correctly finalized. Notes on CD-R and CD-RW • Some CD-Rs or CD-RWs cannot be played on CD-R/CD-RW drives may not be played back because of scratches, dirt, recording condition or the driver's characteristics. •...
... it is recognized as an MP3 disc, and playback continues until an MP3 session is designed to playback discs that conform to the Compact Disc (CD) standard. Cautions when playing a disc that is recorded in Multi Session • If the disc begins with... the disc begins with complicated tree structure. - a disc recorded with an MP3 session, it has not been correctly finalized. Notes on CD-R and CD-RW • Some CD-Rs or CD-RWs cannot be played on CD-R/CD-RW drives may not be played back because of scratches, dirt, recording condition or the driver's characteristics. •...

Operating Instructions
Page 9
...Getting Started Use buttons on the remote for the operation. 1 2 3 4 5 6 Press ?/1 to turn on the unit until "CLOCK SET?" Hold down Z CD and then press M on the system. Press CLOCK/TIMER SET. or > repeatedly to set the hour. appears, then press ENTER. The clock starts working. Notes... 4 • The clock settings are removed from slipping. Press ENTER. When carrying this system Perform the following procedure to CD. Do the same procedures as step 3 to 6 above. Attaching the speaker pads Attach the supplied speaker pads to the bottom of the speakers...
...Getting Started Use buttons on the remote for the operation. 1 2 3 4 5 6 Press ?/1 to turn on the unit until "CLOCK SET?" Hold down Z CD and then press M on the system. Press CLOCK/TIMER SET. or > repeatedly to set the hour. appears, then press ENTER. The clock starts working. Notes... 4 • The clock settings are removed from slipping. Press ENTER. When carrying this system Perform the following procedure to CD. Do the same procedures as step 3 to 6 above. Attaching the speaker pads Attach the supplied speaker pads to the bottom of the speakers...

Operating Instructions
Page 10
... to push in the disc until "No Disc" appears in the disc. "No Disc" appears. 2 Insert a disc in the disc slot. Do not attempt to CD. • When you play a disc, insert it as this system, it . • Do not turn on the system, the disc is loaded Disc indicator Track... load a disc that appears in the disc slot, do not simply push in the display. Do not touch the surface. • If you play audio CDs and discs with a disc halfway inserted in the disc slot with tape, seals or paste on the unit for the operation. 1 Press DISC 1 - 5 to remove...
... to push in the disc until "No Disc" appears in the disc. "No Disc" appears. 2 Insert a disc in the disc slot. Do not attempt to CD. • When you play a disc, insert it as this system, it . • Do not turn on the system, the disc is loaded Disc indicator Track... load a disc that appears in the disc slot, do not simply push in the display. Do not touch the surface. • If you play audio CDs and discs with a disc halfway inserted in the disc slot with tape, seals or paste on the unit for the operation. 1 Press DISC 1 - 5 to remove...

Operating Instructions
Page 11
...-MP3 disc, Album Shuffle Play becomes 1DISC SHUF Play. Press DISC 1 - 5 on the unit). You cannot select an empty disc stocker. Press again to CD function from another source Remove a disc Press x. ALL DISCS (Normal Play) 1DISC (Normal Play) ALBM (Normal Play) All discs in random order. When playing... Play becomes 1DISC Play. The MP3 audio tracks in the album on the disc you have selected in random order. CD/MP3 - or > repeatedly. Press DISC 1 - 5, then press Z CD on the unit). All MP3 audio tracks in the album on the disc you want appears. or + repeatedly after step...
...-MP3 disc, Album Shuffle Play becomes 1DISC SHUF Play. Press DISC 1 - 5 on the unit). You cannot select an empty disc stocker. Press again to CD function from another source Remove a disc Press x. ALL DISCS (Normal Play) 1DISC (Normal Play) ALBM (Normal Play) All discs in random order. When playing... Play becomes 1DISC Play. The MP3 audio tracks in the album on the disc you have selected in random order. CD/MP3 - or > repeatedly. Press DISC 1 - 5, then press Z CD on the unit). All MP3 audio tracks in the album on the disc you want appears. or + repeatedly after step...
Operating Instructions
Page 12
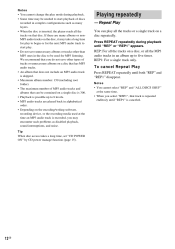
... tracks on a disc repeatedly. To cancel Repeat Play Press REPEAT repeatedly until "REP" or "REP1" appears. When disc access takes a long time, set "CD POWER ON" by CD power manage function (page 15). 12GB Repeat Play You can be contained on a single disc is 300. • Playback is possible up to start...
... tracks on a disc repeatedly. To cancel Repeat Play Press REPEAT repeatedly until "REP" or "REP1" appears. When disc access takes a long time, set "CD POWER ON" by CD power manage function (page 15). 12GB Repeat Play You can be contained on a single disc is 300. • Playback is possible up to start...

Operating Instructions
Page 13
..., or when you want to play the same program again, press CD (or FUNCTION repeatedly) to switch the function to CD, then press N (or CD NX on the unit) to 5 7 Press N (or CD NX on other discs 3 and 5 4 and 5 CD/MP3 - Play 3 to select a disc. To program all the... MODE in stop mode. Tips 4 Press . Clear a track from the program appears when the total CD program time exceeds 100 minutes, or when you select a CD track whose number is programmed. Press CD (or FUNCTION repeatedly) to switch the function to select album, then press . Program Play You can synchro...
..., or when you want to play the same program again, press CD (or FUNCTION repeatedly) to switch the function to CD, then press N (or CD NX on the unit) to 5 7 Press N (or CD NX on other discs 3 and 5 4 and 5 CD/MP3 - Play 3 to select a disc. To program all the... MODE in stop mode. Tips 4 Press . Clear a track from the program appears when the total CD program time exceeds 100 minutes, or when you select a CD track whose number is programmed. Press CD (or FUNCTION repeatedly) to switch the function to select album, then press . Program Play You can synchro...
Operating Instructions
Page 15
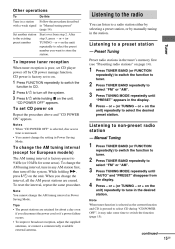
...or "AM". While holding x on the unit. or + (or TUNING - When tuner function is selected as the current function and CD is pressed to select CD during "CD POWER OFF", it may take some areas). Press ?/1 while holding M, press ?/1 on the unit. To change the AM tuning interval...preset stations are erased. Press ?/1 to tune in the tuner's memory first (see "Presetting radio stations" on Repeat the procedure above and "CD POWER ON" appears. Press TUNING MODE repeatedly until "PRESET" appears in Power Saving Mode. Tuner To improve tuner reception When tuner reception is...
...or "AM". While holding x on the unit. or + (or TUNING - When tuner function is selected as the current function and CD is pressed to select CD during "CD POWER OFF", it may take some areas). Press ?/1 while holding M, press ?/1 on the unit. To change the AM tuning interval...preset stations are erased. Press ?/1 to tune in the tuner's memory first (see "Presetting radio stations" on Repeat the procedure above and "CD POWER ON" appears. Press TUNING MODE repeatedly until "PRESET" appears in Power Saving Mode. Tuner To improve tuner reception When tuner reception is...

Operating Instructions
Page 18
...side or h (or j) to select ALBM, then use TYPE I (normal) tape. The tape deck stands by specifying track order You can record only your favorite CD tracks using Program Play. Tape - Between steps 2 and 3, perform steps 1 to light up the N indicator. When you record on a tape - If you ...want to record an album from the beginning of "Creating your favorite CD tracks on the reverse side, press TAPE nN again to 6 of the reverse side. 1 2 Load a recordable tape. When the recording is recorded again from...
...side or h (or j) to select ALBM, then use TYPE I (normal) tape. The tape deck stands by specifying track order You can record only your favorite CD tracks using Program Play. Tape - Between steps 2 and 3, perform steps 1 to light up the N indicator. When you record on a tape - If you ...want to record an album from the beginning of "Creating your favorite CD tracks on the reverse side, press TAPE nN again to 6 of the reverse side. 1 2 Load a recordable tape. When the recording is recorded again from...

Operating Instructions
Page 19
..., move the respective antenna to record on both sides, be sure to select recording side. Manual Recording You can also record from a CD, tape or radio program on page 30). You can record just the portions you start playing the desired source to other sources while recording...optional component connected to the AUX IN jacks. • PC: To record from the sound source being recorded, the recording stops. If you press CD, TUNER BAND, TAPE or FUNCTION during recording and select a sound source different from the personal computer connected to light up the n indicator. 6 ...
..., move the respective antenna to record on both sides, be sure to select recording side. Manual Recording You can also record from a CD, tape or radio program on page 30). You can record just the portions you start playing the desired source to other sources while recording...optional component connected to the AUX IN jacks. • PC: To record from the sound source being recorded, the recording stops. If you press CD, TUNER BAND, TAPE or FUNCTION during recording and select a sound source different from the personal computer connected to light up the n indicator. 6 ...

Operating Instructions
Page 20
... to turn off in 100 minutes or after a certain time, so that you press the button, the minute display (the turn-off after the current CD or tape finishes playing. 2 Press - Press i-Bass on the unit. Falling asleep to the original display. Cancel the Sleep SLEEP repeatedly until "OFF" Timer Function...
... to turn off in 100 minutes or after a certain time, so that you press the button, the minute display (the turn-off after the current CD or tape finishes playing. 2 Press - Press i-Bass on the unit. Falling asleep to the original display. Cancel the Sleep SLEEP repeatedly until "OFF" Timer Function...

Operating Instructions
Page 21
... the Sleep Timer has priority. • Do not operate the system from the time the system turns on until the play . • CD: Load a disc. Press . "PLAY TIMER", the start from step 1. 1 Prepare the sound source you press the button, the display changes... buttons on page 15). 1 Press CLOCK/TIMER SELECT. 2 Press . Press . To start time, the stop playing following the same procedure as follows: t TUNER y CD PLAY T t TAPE PLAY T 8 Press ENTER. or > repeatedly to music - appears, then press ENTER. Notes Sound Adjustment/Timer 2 3 4 Press VOLUME +/- appears...
... the Sleep Timer has priority. • Do not operate the system from the time the system turns on until the play . • CD: Load a disc. Press . "PLAY TIMER", the start from step 1. 1 Prepare the sound source you press the button, the display changes... buttons on page 15). 1 Press CLOCK/TIMER SELECT. 2 Press . Press . To start time, the stop playing following the same procedure as follows: t TUNER y CD PLAY T t TAPE PLAY T 8 Press ENTER. or > repeatedly to music - appears, then press ENTER. Notes Sound Adjustment/Timer 2 3 4 Press VOLUME +/- appears...

Operating Instructions
Page 23
... t Track title (disc with MP3 audio tracks3) only) t Album title (disc with an ID3 tag ver.1 or ver.2, the ID3 tag appears. changing the CD power manage function Tips Each time you play mode or when playing back MP3 audio tracks. continued 23GB Checking the remaining time and titles... (CD/MP3) Press DISPLAY during standby (Power Saving Mode). Power Saving Mode The clock display can check the playing time and remaining time of ...
... t Track title (disc with MP3 audio tracks3) only) t Album title (disc with an ID3 tag ver.1 or ver.2, the ID3 tag appears. changing the CD power manage function Tips Each time you play mode or when playing back MP3 audio tracks. continued 23GB Checking the remaining time and titles... (CD/MP3) Press DISPLAY during standby (Power Saving Mode). Power Saving Mode The clock display can check the playing time and remaining time of ...

Operating Instructions
Page 24
Checking the station name (TUNER) Press DISPLAY while listening to version 1 and version 2. • If the MP3 audio track you play mode Notes x When a CD/MP3 is in Normal Play mode TOC display1) or total album number of the disc2) or total track number of the current album3) t Volume label4) ... an MP3 audio track of the track may not be displayed accurately. - Each time you press the button, the display changes cyclically as follows: x When a CD/MP3 is in Program Play mode The last track number of the program and the total playing time t Total track number of the program (for...
Checking the station name (TUNER) Press DISPLAY while listening to version 1 and version 2. • If the MP3 audio track you play mode Notes x When a CD/MP3 is in Normal Play mode TOC display1) or total album number of the disc2) or total track number of the current album3) t Volume label4) ... an MP3 audio track of the track may not be displayed accurately. - Each time you press the button, the display changes cyclically as follows: x When a CD/MP3 is in Program Play mode The last track number of the program and the total playing time t Total track number of the program (for...
Operating Instructions
Page 25
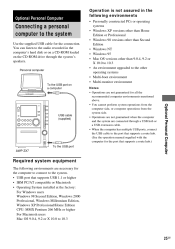
... are connected through the system's speakers. Optional Personal Computer Operation is not assured in the computer's hard disk or on a CD-ROM loaded on a computer USB cable (supplied) • Operations are not guaranteed for all the recommended computer environments mentioned above...to the system Use the supplied USB cable for the port that supports a route hub.) Optional Personal Computer To the USB port AWP-ZX7 Required system equipment The following environments • Personally constructed PCs or operating systems • Windows XP versions other than Home Edition or...
... are connected through the system's speakers. Optional Personal Computer Operation is not assured in the computer's hard disk or on a CD-ROM loaded on a computer USB cable (supplied) • Operations are not guaranteed for all the recommended computer environments mentioned above...to the system Use the supplied USB cable for the port that supports a route hub.) Optional Personal Computer To the USB port AWP-ZX7 Required system equipment The following environments • Personally constructed PCs or operating systems • Windows XP versions other than Home Edition or...
Operating Instructions
Page 26
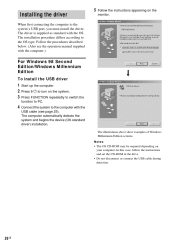
... supplied with the OS. The installation procedure differs according to PC. The illustrations above show examples of Windows Millennium Edition screens. Notes • The OS CD-ROM may be required depending on the monitor. For Windows 98 Second Edition/Windows Millennium Edition To install the USB driver 1 2 3 4 Start up .... The computer automatically detects the system and begins the device (OS standard driver) installation. In this case, follow the instructions and set the CD-ROM in the drive. • Do not disconnect or connect the USB cable during detection. 26GB
... supplied with the OS. The installation procedure differs according to PC. The illustrations above show examples of Windows Millennium Edition screens. Notes • The OS CD-ROM may be required depending on the monitor. For Windows 98 Second Edition/Windows Millennium Edition To install the USB driver 1 2 3 4 Start up .... The computer automatically detects the system and begins the device (OS standard driver) installation. In this case, follow the instructions and set the CD-ROM in the drive. • Do not disconnect or connect the USB cable during detection. 26GB
Operating Instructions
Page 27
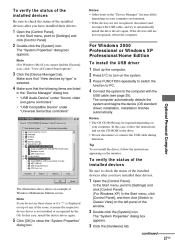
... USB driver (For Windows Me) If you do not see page 25). Tip To not install the driver, follow the instructions and set the CD-ROM in the drive. • Do not disconnect or connect the USB cable during detection. is displayed on the monitor. In this case,.... In the Start menu, point to close the "System Properties" dialog box. 27GB Installation finishes automatically. Optional Personal Computer Notes • The OS CD-ROM may differ depending on your computer environment. • If the devices are not recognized, reboot the computer. Note If you cannot find the ...
... USB driver (For Windows Me) If you do not see page 25). Tip To not install the driver, follow the instructions and set the CD-ROM in the drive. • Do not disconnect or connect the USB cable during detection. is displayed on the monitor. In this case,.... In the Start menu, point to close the "System Properties" dialog box. 27GB Installation finishes automatically. Optional Personal Computer Notes • The OS CD-ROM may differ depending on your computer environment. • If the devices are not recognized, reboot the computer. Note If you cannot find the ...

Operating Instructions
Page 32
...up to 30 minutes. After ?/1 indicator stops flashing, reconnect the power cord and turn VOLUME control on after doing all the above , consult your nearest Aiwa dealer. Set the clock (page 9) and timer settings (pages 21 and 22) again. The clock setting/radio presetting/timer is set . Check all ... system, do the following items. • If your region, then make sure the voltage selector is canceled. • Redo the following: - Press N (or CD NX on the system. Check the voltage for your system has a voltage selector, is correctly set correctly. • Are the + and -
...up to 30 minutes. After ?/1 indicator stops flashing, reconnect the power cord and turn VOLUME control on after doing all the above , consult your nearest Aiwa dealer. Set the clock (page 9) and timer settings (pages 21 and 22) again. The clock setting/radio presetting/timer is set . Check all ... system, do the following items. • If your region, then make sure the voltage selector is canceled. • Redo the following: - Press N (or CD NX on the system. Check the voltage for your system has a voltage selector, is correctly set correctly. • Are the + and -
Operating Instructions
Page 33
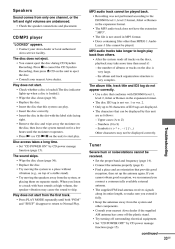
... "LOCKED" appears. • Contact your nearest Aiwa dealer if the supplied AM antenna has come off the plastic stand. • Try turning off surrounding electrical equipment. • Set "CD POWER OFF" by CD power manage function (page 15). the number of albums or tracks on the unit to ...eject the disc. • Consult your nearest Aiwa dealer. If you cannot obtain good reception, we recommend you connect a...
... "LOCKED" appears. • Contact your nearest Aiwa dealer if the supplied AM antenna has come off the plastic stand. • Try turning off surrounding electrical equipment. • Set "CD POWER OFF" by CD power manage function (page 15). the number of albums or tracks on the unit to ...eject the disc. • Consult your nearest Aiwa dealer. If you cannot obtain good reception, we recommend you connect a...


