Operating Instructions
Page 2
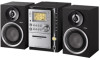
... B digital device, pursuant to correct the interference by turning the equipment off and on, the user is connected. - And don't place lighted candles on the rear exterior. This appliance is intended to alert the user to provide reasonable protection against harmful interference in a particular installation. WARNING NOTICE FOR THE CUSTOMERS IN THE U.S.A. These limits are cautioned that the cable ground...
... B digital device, pursuant to correct the interference by turning the equipment off and on, the user is connected. - And don't place lighted candles on the rear exterior. This appliance is intended to alert the user to provide reasonable protection against harmful interference in a particular installation. WARNING NOTICE FOR THE CUSTOMERS IN THE U.S.A. These limits are cautioned that the cable ground...
Operating Instructions
Page 4
... Timer Waking up optional components...30 Listening to audio from a connected component ...31 Tape - Power Saving Mode Viewing information about the disc in the display ...23 Optional Personal Computer Connecting a personal computer to the system...25 Installing the driver...26 Listening to music...21 - Manual Tuning Using the Radio Data System (RDS)...16 (European model only) Optional Components Hooking up to audio files on a tape manually...19 - Play Loading a disc ...10 Playing a disc ...10 - Program Play Display Turning off the display ...23 - Preset Tuning - Manual...
... Timer Waking up optional components...30 Listening to audio from a connected component ...31 Tape - Power Saving Mode Viewing information about the disc in the display ...23 Optional Personal Computer Connecting a personal computer to the system...25 Installing the driver...26 Listening to music...21 - Manual Tuning Using the Radio Data System (RDS)...16 (European model only) Optional Components Hooking up to audio files on a tape manually...19 - Play Loading a disc ...10 Playing a disc ...10 - Program Play Display Turning off the display ...23 - Preset Tuning - Manual...

Operating Instructions
Page 8
... remote no longer operates the system, replace both batteries with an adaptor). To turn on your system's VOLTAGE SELECTOR for available settings. 2 Connect the FM and AM antennas. Plug type A AM loop antenna AM LOO P 4 Connect the power cord to the local power line voltage. FM 7 (COA 5 Ω XIAL ) If the plug does not fit the wall socket, detach the supplied plug adaptor (only for a long period of time, remove the batteries...
... remote no longer operates the system, replace both batteries with an adaptor). To turn on your system's VOLTAGE SELECTOR for available settings. 2 Connect the FM and AM antennas. Plug type A AM loop antenna AM LOO P 4 Connect the power cord to the local power line voltage. FM 7 (COA 5 Ω XIAL ) If the plug does not fit the wall socket, detach the supplied plug adaptor (only for a long period of time, remove the batteries...

Operating Instructions
Page 10
... disc slot until "No Disc" appears. • When pressing Z CD and then reinserting the disc that is loaded Disc indicator Track number MP3 PRESET AUTO ALBUM STEREO MONO TRACK TUNED 1 2 REC SLEEP ALBM TRK ID3 TITLE PLAY ALL 1 DISC S ALBM REP1 PGM SHUF SYNC 0 0 REC 3 4 BASS LEVEL L TREBLE LEVEL R 5 Loading a disc Use buttons on it as this system, it with MP3 audio tracks. Play Playing a disc - "No Disc" appears. 2 Insert a disc in the disc...
... disc slot until "No Disc" appears. • When pressing Z CD and then reinserting the disc that is loaded Disc indicator Track number MP3 PRESET AUTO ALBUM STEREO MONO TRACK TUNED 1 2 REC SLEEP ALBM TRK ID3 TITLE PLAY ALL 1 DISC S ALBM REP1 PGM SHUF SYNC 0 0 REC 3 4 BASS LEVEL L TREBLE LEVEL R 5 Loading a disc Use buttons on it as this system, it with MP3 audio tracks. Play Playing a disc - "No Disc" appears. 2 Insert a disc in the disc...
Operating Instructions
Page 15
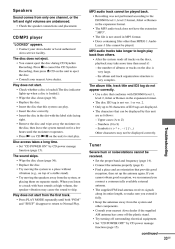
...; To improve broadcast reception, adjust the supplied antennas, or connect a commercially available external antenna. Tuner To improve tuner reception When tuner reception is pressed to select CD during "CD POWER OFF", it may take some areas). CD power is factory set CD player power off by manually tuning in a station with a weak signal Set another station to a preset station - Press FUNCTION repeatedly to switch the function to tuner. To change the AM tuning interval in Power Saving Mode. While holding x on...
...; To improve broadcast reception, adjust the supplied antennas, or connect a commercially available external antenna. Tuner To improve tuner reception When tuner reception is pressed to select CD during "CD POWER OFF", it may take some areas). CD power is factory set CD player power off by manually tuning in a station with a weak signal Set another station to a preset station - Press FUNCTION repeatedly to switch the function to tuner. To change the AM tuning interval in Power Saving Mode. While holding x on...

Operating Instructions
Page 20
... set the system to turn -off time) changes cyclically as follows: BASS y TREBLE Each time you want. To adjust the treble on the unit Turn TREBLE control. Each time you press the button, the display changes as follows: AUTO* t 90min t 80min t ...t 10min t OFF * The system automatically turns off after the current CD or tape finishes playing. 2 Press - Sleep Timer You can set the clock. Press SLEEP. 1 Press EQ repeatedly to enjoy more powerful sound. Sound Adjustment Timer Adjusting the sound Adjusting...
... set the system to turn -off time) changes cyclically as follows: BASS y TREBLE Each time you want. To adjust the treble on the unit Turn TREBLE control. Each time you press the button, the display changes as follows: AUTO* t 90min t 80min t ...t 10min t OFF * The system automatically turns off after the current CD or tape finishes playing. 2 Press - Sleep Timer You can set the clock. Press SLEEP. 1 Press EQ repeatedly to enjoy more powerful sound. Sound Adjustment Timer Adjusting the sound Adjusting...

Operating Instructions
Page 21
... the preset time, the Play Timer will not be activated. • You cannot use the optional component connected to AUX IN jacks or USB port as the sound source for the operation. 9 To Press ?/1 to stop time and the sound source appear in the preset radio station (see "Setting the clock" on page 17). • FM or AM: Tune in turn off the system. Make sure you press the button, the display changes cyclically as step 5. Each time you have set the...
... the preset time, the Play Timer will not be activated. • You cannot use the optional component connected to AUX IN jacks or USB port as the sound source for the operation. 9 To Press ?/1 to stop time and the sound source appear in the preset radio station (see "Setting the clock" on page 17). • FM or AM: Tune in turn off the system. Make sure you press the button, the display changes cyclically as step 5. Each time you have set the...

Operating Instructions
Page 22
... operations To Do this Activate the timer/ check the setting 1 Press CLOCK/TIMER SELECT. 2 Press . Use buttons on the remote for the operation. 10 Press ?/1 to set the clock (see "Presetting radio stations" on page 15). or > repeatedly until "REC SET?" Press . To timer record, you select both sides. 22GB or > repeatedly to turn off the system. Rec Timer settings and the desired station appear, then the original display returns. 6 7 Load a recordable tape. Press TAPE...
... operations To Do this Activate the timer/ check the setting 1 Press CLOCK/TIMER SELECT. 2 Press . Use buttons on the remote for the operation. 10 Press ?/1 to set the clock (see "Presetting radio stations" on page 15). or > repeatedly until "REC SET?" Press . To timer record, you select both sides. 22GB or > repeatedly to turn off the system. Rec Timer settings and the desired station appear, then the original display returns. 6 7 Load a recordable tape. Press TAPE...

Operating Instructions
Page 23
... tuning interval (except for four seconds) 1) Display 2) 3) • ?/1 indicator lights up even in Power Saving Mode. • The timer continues to minimize the amount of the disc. Power Saving Mode The clock display can check the playing time and remaining time of the current track or that of power consumed during Normal Play. changing the CD power manage function Tips Each time you press the button, the display changes cyclically as follows: Clock display* t No display (Power...
... tuning interval (except for four seconds) 1) Display 2) 3) • ?/1 indicator lights up even in Power Saving Mode. • The timer continues to minimize the amount of the disc. Power Saving Mode The clock display can check the playing time and remaining time of the current track or that of power consumed during Normal Play. changing the CD power manage function Tips Each time you press the button, the display changes cyclically as follows: Clock display* t No display (Power...
Operating Instructions
Page 26
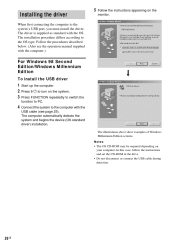
... monitor. In this case, follow the instructions and set the CD-ROM in the drive. • Do not disconnect or connect the USB cable during detection. 26GB Press FUNCTION repeatedly to switch the function to the computer with the USB cable (see the operation manual supplied with the OS. Connect the system to PC. The computer automatically detects the system and begins the device (OS standard driver) installation.
... monitor. In this case, follow the instructions and set the CD-ROM in the drive. • Do not disconnect or connect the USB cable during detection. 26GB Press FUNCTION repeatedly to switch the function to the computer with the USB cable (see the operation manual supplied with the OS. Connect the system to PC. The computer automatically detects the system and begins the device (OS standard driver) installation.
Operating Instructions
Page 27
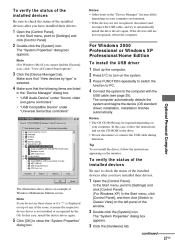
... driver) installation. Note • Other items in the "Device Manager" dialog box. • "USB Audio Device" under "Sound, video and game controllers" • "USB Compatible Device" under "Universal Serial Bus controllers" 1 2 3 4 Start up the computer. Make sure that the following items are not recognized, reboot the computer. Note If you cannot find the [System] icon, click "View all Control Panel options". 3 4 Click the [Device Manager] tab. Open the [Control Panel]. Press FUNCTION repeatedly to switch...
... driver) installation. Note • Other items in the "Device Manager" dialog box. • "USB Audio Device" under "Sound, video and game controllers" • "USB Compatible Device" under "Universal Serial Bus controllers" 1 2 3 4 Start up the computer. Make sure that the following items are not recognized, reboot the computer. Note If you cannot find the [System] icon, click "View all Control Panel options". 3 4 Click the [Device Manager] tab. Open the [Control Panel]. Press FUNCTION repeatedly to switch...
Operating Instructions
Page 29
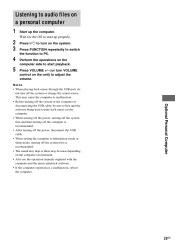
Wait for the OS to start playback. Press ?/1 to turn on a personal computer 1 2 3 4 5 Start up properly. Notes • When playing back music through the USB port, do not turn VOLUME control on the unit) to adjust the volume. Listening to audio files on the system. Perform the operations on the computer environment. • Also see the operation manuals supplied with the computer and the music playback software. • If the...
Wait for the OS to start playback. Press ?/1 to turn on a personal computer 1 2 3 4 5 Start up properly. Notes • When playing back music through the USB port, do not turn VOLUME control on the unit) to adjust the volume. Listening to audio files on the system. Perform the operations on the computer environment. • Also see the operation manuals supplied with the computer and the music playback software. • If the...

Operating Instructions
Page 31
C AUX IN jacks Use audio cords (not supplied) to connect an optional analog component (MD deck or VCR, etc.) to the sound from the component. 31GB Optional Components Press FUNCTION repeatedly until "AUX" appears. You can then listen to these jacks. To place the sub woofer To obtain a better bass reproduction, we recommend you to place the subwoofer on page 30. Start playing the connected component. If this happens, move the...
C AUX IN jacks Use audio cords (not supplied) to connect an optional analog component (MD deck or VCR, etc.) to the sound from the component. 31GB Optional Components Press FUNCTION repeatedly until "AUX" appears. You can then listen to these jacks. To place the sub woofer To obtain a better bass reproduction, we recommend you to place the subwoofer on page 30. Start playing the connected component. If this happens, move the...

Operating Instructions
Page 32
... cause of the problem cannot be set the timer and light up to the system. • Point the remote at the system's sensor. • Replace the batteries (R6/size AA). • Locate the system away from the source of noise. • Connect the system to a different wall outlet. • Install a noise filter (commercially available) to normal play mode. General Troubleshooting Problems and remedies Should you using the supplied speakers? • Is...
... cause of the problem cannot be set the timer and light up to the system. • Point the remote at the system's sensor. • Replace the batteries (R6/size AA). • Locate the system away from the source of noise. • Connect the system to a different wall outlet. • Install a noise filter (commercially available) to normal play mode. General Troubleshooting Problems and remedies Should you using the supplied speakers? • Is...
Operating Instructions
Page 33
... surrounding electrical equipment. • Set "CD POWER OFF" by CD power manage function (page 15). Symbols Other characters may not be displayed by this system can be displayed correctly. If you cannot obtain good reception, we recommend you connect a commercially available external antenna. • The supplied FM lead antenna receives signals along its entire length, so make sure you listen to a track with bass sounds at high volume...
... surrounding electrical equipment. • Set "CD POWER OFF" by CD power manage function (page 15). Symbols Other characters may not be displayed by this system can be displayed correctly. If you cannot obtain good reception, we recommend you connect a commercially available external antenna. • The supplied FM lead antenna receives signals along its entire length, so make sure you listen to a track with bass sounds at high volume...

Operating Instructions
Page 34
... operation. Demagnetize them using a cleaning cassette. You should set the settings you made, such as follows: Use buttons on the connected component. • Refer to the operating instructions supplied with adhesive tape (page 37). • The tape has wound to the end. 1 2 3 4 Disconnect the power cord. The sound is no sound. • Refer to the factory settings. A stereo FM program cannot be received in stereo. • Press FM MODE on the system. There is no sound...
... operation. Demagnetize them using a cleaning cassette. You should set the settings you made, such as follows: Use buttons on the connected component. • Refer to the operating instructions supplied with adhesive tape (page 37). • The tape has wound to the end. 1 2 3 4 Disconnect the power cord. The sound is no sound. • Refer to the factory settings. A stereo FM program cannot be received in stereo. • Press FM MODE on the system. There is no sound...

Operating Instructions
Page 35
The Play Timer or Rec Timer start and end times are set the timer. CD/MP3 No Disc There is reading TOC information of the programmed tracks have reached the end of the following messages may appear or flash in the display during operation. Reading The system is no tape in the player. The preset operation ended normally. Set the clock to the correct time, then set to program 25 or more tracks (steps...
The Play Timer or Rec Timer start and end times are set the timer. CD/MP3 No Disc There is reading TOC information of the programmed tracks have reached the end of the following messages may appear or flash in the display during operation. Reading The system is no tape in the player. The preset operation ended normally. Set the clock to the correct time, then set to program 25 or more tracks (steps...
Operating Instructions
Page 36
... qualified service shop. The perimeter of the disc is tacky. - Do not use discs encircled with a cleaning cloth. On operation • If the system is brought directly from the center out. • Do not use this unit to parts inside the CD player. Should this unit. If you move the system, take out any questions or problems concerning your system, please consult your local power supply. Notes...
... qualified service shop. The perimeter of the disc is tacky. - Do not use discs encircled with a cleaning cloth. On operation • If the system is brought directly from the center out. • Do not use this unit to parts inside the CD player. Should this unit. If you move the system, take out any questions or problems concerning your system, please consult your local power supply. Notes...

Operating Instructions
Page 37
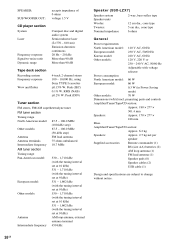
... cabinet, panel and controls with a soft cloth slightly moistened with adhesive tape. Before placing a cassette in the tape. When using a tape longer than 0.05% (6 ohms at 1 kHz, 10% THD) Inputs AUX IN (RCA pin jacks): Sensitivity 1 V, impedance 47 kilohms Outputs PHONES (stereo mini jack): accepts headphones with a separately sold dry-type or wet-type cleaning cassette. Do not use . Specifications Main Unit (CX-LZX7) Amplifier section For...
... cabinet, panel and controls with a soft cloth slightly moistened with adhesive tape. Before placing a cassette in the tape. When using a tape longer than 0.05% (6 ohms at 1 kHz, 10% THD) Inputs AUX IN (RCA pin jacks): Sensitivity 1 V, impedance 47 kilohms Outputs PHONES (stereo mini jack): accepts headphones with a separately sold dry-type or wet-type cleaning cassette. Do not use . Specifications Main Unit (CX-LZX7) Amplifier section For...
Operating Instructions
Page 38
... kHz 60 W 60 W 0.3 W (in Power Saving mode) Other models: 70 W Dimensions (w/h/d) incl. projecting parts and controls Amplifier/Tuner/Tape/CD section: Approx. 190 × 277 × 361.4 mm Speakers: Approx. 170 × 277 × 188 mm Mass Amplifier/Tuner/Tape/CD section: Approx. 6.2 kg Speakers: Approx. 2.7 kg net per speaker Supplied accessories Remote commander (1) R6 (size AA) batteries (2) AM loop antenna (1) FM lead antenna (1) Speaker pads (8) Speaker cables (2) USB cable (1) Design and specifications are subject to -noise...
... kHz 60 W 60 W 0.3 W (in Power Saving mode) Other models: 70 W Dimensions (w/h/d) incl. projecting parts and controls Amplifier/Tuner/Tape/CD section: Approx. 190 × 277 × 361.4 mm Speakers: Approx. 170 × 277 × 188 mm Mass Amplifier/Tuner/Tape/CD section: Approx. 6.2 kg Speakers: Approx. 2.7 kg net per speaker Supplied accessories Remote commander (1) R6 (size AA) batteries (2) AM loop antenna (1) FM lead antenna (1) Speaker pads (8) Speaker cables (2) USB cable (1) Design and specifications are subject to -noise...


