
AIWA CX-NA71 Support Question
AIWA CX-NA71 Support Question
Find answers below for this question about AIWA CX-NA71.Need a AIWA CX-NA71 manual? We have 1 online manual for this item!
Current Answers
Related AIWA CX-NA71 Manual Pages
Operating Instructions - Page 2
...
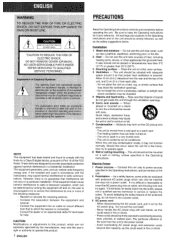
1 Water and moisture - m A~. 3
7 Condensation - The heating system has just been turned on a flat, even surface. 4 Ventilation - ...
All warnings and cautions in a particular installation.
qL
Quick stops, excessive force, and uneven surfaces may not function normally. ...then try again. Do not place the unit on the CD pickup lens when:
- PRECAUTIONS
L.--tJ l"'s'%=%"OL!"!-l_!l...
Operating Instructions - Page 3
...TABLE OF CONTENTS
Precautions l
PREPARATIONS
CONNECTIONS
m
3
REMOTE CONTROL 6
BEFORE OPERATION 7
SOUND
AUDIO ADJUSTMENTS 7 GRAPHIC EQUALIZER 8 DSP SURROUND SYSTEM 8
RADIO RECEPTION
MANUAL TUNING 9 PRESETTING STATIONS s 9
CD PLAYING
BASIC OPERATIONS 11 PROGRAMMED PLAY 12
TAPE PLAYBACK
BASIC OPERATIONS ......m 13 CONTINUOUS PLAY 14
RECORDING
BASIC RECORDING m
15...
Operating Instructions - Page 4
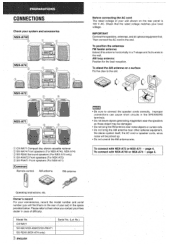
...connect the speaker cords correctly.
q Do not bring the AM antenna--near other optional equipment,
the stereo system itself, the AC cord or speaker cords, since noise will find them when you will be damaged...to ,
To stand the AM antenna on a surface Fix the claw to the slot.
~ CX-NA71 Compact disc stereo cassette reciever @ SX-NA74 Front speakers (For NSX-A740, NSX-A74) @ SX-R240 Surround ...
Operating Instructions - Page 8

... In this case, cancel the T-BASS system. Press the DEMObutton. To turn back on Press one of the top window, press the s button while pressing the CD button. To turn the unit off the... more.
Press the BBE button. When the power is being powered on.
SUPER T-BASS SYSTEM
The T-BASS system enhances the realism of the inserted disc or tape begins, or the previously tuned station is...
Operating Instructions - Page 9
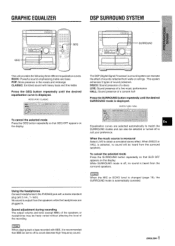
... No sound is automatically canceled,
Using the headphones Connect headphones to obtain a simulated stereo effect.
ROCK /POP / CLASSIC
until the desired SURROUND mode is selected, no sound...Press the SURROUND button repeatedly until the desired
The DSP (Digital Signal Processor) surround system can also be freely varied without affecting the level of sound presence.
While SURROLJND ...
Operating Instructions - Page 11
... tracks
Selected track number
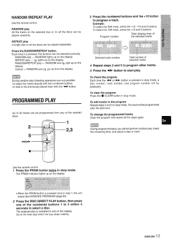
Total number of the numbered buttons 1 to 3 within 3 seconds to start play All the tracks on the selected disc or on all the :eteps again. button is ... on the display. Use the remote control. 1 Press the PRGM button twice in stop mode. The selected disc is pressed in stop mode. ENGLISH 12 RANDOM play . REPEAT play - To select the 10th track, press...
Operating Instructions - Page 12

... button.
To play when the power is off 00 NR.
2 Press the button to start play from front side to reverse side once only, select Z).
The power isturned on UU... repeatedly, select (=).
To set to 0000 when the cassette holder is also set the tape counter to stop mode.
LIIe mpuseu
31ue UUWII.
DIRECTION/ button. BASIC OPERATIONS
PLAYING BACK A TAPE
I
DOLBY NR
.,".0.,=1...
Operating Instructions - Page 14
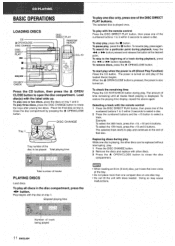
...pressing the A OPEN/CLOSE button. To stop play , press the 11 button. To remove discs, press the A OPEN/CLOSE button. . The selected track starts to play and continues to rotate the ... + or * button repeatedly. BASIC OPERATIONS
LOADING DISCS
DISC DIRECT PLAY
1'
-9,+10
Press the CD button, then press the 4 OPEN/ CLOSE button to be replaced without interrupting play of tracks
PLAYING...
Operating Instructions - Page 15
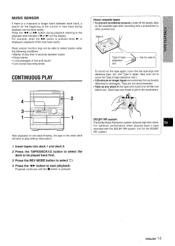
...sensor function may break cx jam in the mechanism. After playback on one deck finishes, the tape in the tape with the DOLBY NR system, turn on the DOLBY NR system.
.> ENGLISH 14...tapes are not recol'nmended. DOLBY NR system The Dolby Noise Reduction system reduces tape hiss noise. Press the < or - Slack tape may not be able to start playback. For optimum performance when playing back...
Operating Instructions - Page 16
...playback and recording start simultaneously.
15 ENGLISH
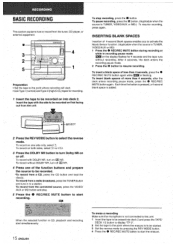
To erase a recording Make sure the microphone is not connected to this unit. 1 Insert the tape to be erased into deck 2.
To stop recording, press ...space is TUNER, VI DEO/AUX or MD.) To resume recording, press again. To record from a CD, press the CD button and load the disc(s).
q Use Type I (normal) and Type II (high/CrOz) tapes...
Operating Instructions - Page 17

.... @) For recording at highl speed, press it twice to display HIGH-DUB,
o
@
The tapes are rewound to the beginning of both tapes will start. ENGLISH i 6 to start
To stop dubbing Press the s button,
To set the Dolby NR when playin!g back the dubbed tape Press the DOLBY NR button and turn Dolby NR...
Operating Instructions - Page 18
....
The tape must ;e recorded from the'beginning o;
PRGM appears on the back (side B) starts.
To check the order of the front side, the lead segment is "pressed, the display changes... numbered buttons on the label.
A track whose playing time is broken off . Recording and CD play stop recording Press the s button. Each time it is played through for side A
I
Program number...
Operating Instructions - Page 19
... tracks for side B.
When recording on the front side (A) ends, recording on the back side (B) starts,
To stop simultaneously.
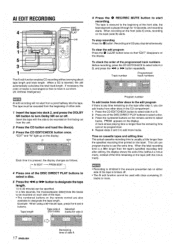
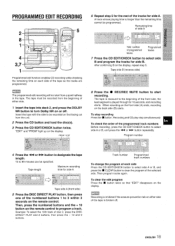
PROGRAMMED EDIT RECORDING
2
5
8 1
4
3,7 1
Programmed edit function enables CD recording while checking the remaining time on each side Press the CD EDIT/CHECK button to 3 within 3 seconds on the remote control.
Example: To select the 10th...
Operating Instructions - Page 21
.../CHECK button repeatedly. POO" is canceled. Then press the + D> button to start play
Press the E button. Then, press the numbered buttons and the + 10 button to the selected function name. To stop play with the following kinds of CD play , you can be played after the current track. Press it once more to...
Operating Instructions - Page 22
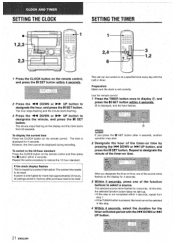
... sure the clock is
If you press the II SET button after 4 seconds, another operation may start.
O is displayed, and the hour flashes.
3 Press the UP button to designate the hour,...However, the time cannot be turned on the display and the clock starts
from 00 seconds. The hour stops flashing and the minute starts flashing.
m
To display the current time Press the CLOCK button on...
Operating Instructions - Page 23
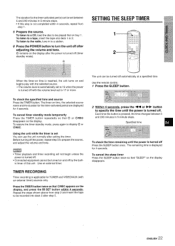
... begin unless the power is turned off with the selected source. TIMER RECORDING
Timer recording is automatically set to display @ or t3REC.
To listen to a CD, load the disc to a tape, insert the tape into deck 2 after step 5.
\2
The unit can be turned on and off (timer
standby mode). To listen...
Operating Instructions - Page 25
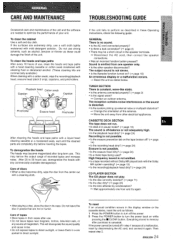
...cleaning the heads and tape paths with the Dolby
NR system operating? (+ page 13) q Is the recording/playback head dirty? (+ page 24)
CD PLAYER SECTION The CD player atoes not play.
To demagnetize the heads The heads...The tape does not run. Is the playback head dirty? (-+ page 24) Recording is not stereo. q Is the erasure prevention tab on while
pressing the ~ CLEAR button. q Is the ...
Operating Instructions - Page 26
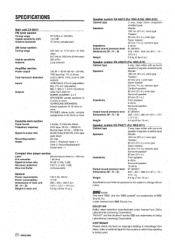
...ohms or more
Cassette deck section
Track format Frequency response
Signal-to-noise ratio
Recording system Heads
4 tracks, 2 channels stereo CrOz tape: 50 Hz -16000 Hz Normal tape: 50 Hz - 15000 Hz...discs, radio or external tape for the country in .) ccme type - SPECIFICATIONS
~
Main unit CX-NA71
FM tuner section
Tuning range
. Under license from BBE Sound, Inc.
Usable sensitivity (IHF) ...
Operating Instructions - Page 27
....
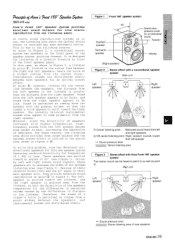
At point ~, however, located off the center
line between the speakers, the distance from
the left speaker to be heard at point@ in Figure 2, a conventional stereo
system has speakers on the center line between both speakers for the differences in Figure 2-@.
Driven by the differences in front
of the
speaker...
Operating Instructions - Page 80
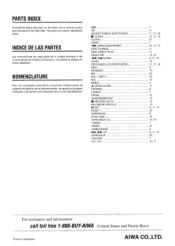
... cada parte de la unidad principal o del control remoto se indican a la derecha.
NOMENCLATURE
Pour Ies principals instructions concernant chaque partie de I 'ordre alphabetique. BBE 7
CD 11
CD EDIT/CHECK (EDIT/CHECK)
. 11, 17, 18
W CLEAR
10. 11, 13
CLOCK 21
DEMO 7
PAFITS INDEX
Instructions about each part on the main unit...
Similar Questions

How Do You Repair The Volume Control On The Aiwa Stereo Model No. Cx-na71 ?
Once the volume is up and you try to turn it back down, the volume continues to go up.
Once the volume is up and you try to turn it back down, the volume continues to go up.
(Posted by Anonymous-120754 10 years ago)

I Dont Have A Remote For My Aiwa Cx - Na222 Digital Audio System.
(Posted by littlemissbitchrpt 11 years ago)

Cx-na71 When Sound Is Turned Up, The Numbers Go 0 1 2 Then Back To 0 And No Soun
When the sound is turned up it goes 0 1 2 then 0 and no sound.
When the sound is turned up it goes 0 1 2 then 0 and no sound.
(Posted by btdia1 11 years ago)

Remote Working Intermittently, New Batteries Doesn't Help. Aiwa Cx-na71
Remote doesn't work consistently. Aiwa CX-Na71 stereo. Remote is RC-7ASO8. What are my options?
Remote doesn't work consistently. Aiwa CX-Na71 stereo. Remote is RC-7ASO8. What are my options?
(Posted by Meredieth 12 years ago)