User Guide
Page 3
... Removing an SFP Transceiver 19 Performing Spot Checks 19 3 CONNECTING TO THE WEB INTERFACE Requirements for Accessing the Web Interface 21 Running the Discovery Application 21 Logging On to the Web Interface 22 Navigating the Web Interface 23 Menu 23 Buttons 24 Accessing the Interface Without Using Discovery 24 DHCP Assigned IP Address 24 Manually Assigned (Static) IP Address 25 4 CONFIGURING THE SWITCH Configuration Overview 27 Viewing Status Information 27 Changing the Admin Password 28 Modifying the IP Address Settings 29 Automatic IP Configuration...
... Removing an SFP Transceiver 19 Performing Spot Checks 19 3 CONNECTING TO THE WEB INTERFACE Requirements for Accessing the Web Interface 21 Running the Discovery Application 21 Logging On to the Web Interface 22 Navigating the Web Interface 23 Menu 23 Buttons 24 Accessing the Interface Without Using Discovery 24 DHCP Assigned IP Address 24 Manually Assigned (Static) IP Address 25 4 CONFIGURING THE SWITCH Configuration Overview 27 Viewing Status Information 27 Changing the Admin Password 28 Modifying the IP Address Settings 29 Automatic IP Configuration...

User Guide
Page 4
... Port Settings 31 Default Port Settings 31 Changing a Port's Settings 32 Configuring VLANs 33 Creating a VLAN 34 Sample VLAN Configurations 35 Removing a VLAN 36 Configuring Link Aggregation 36 Trunk Membership 37 Adding Ports to a Trunk 37 Configuring Trunk Settings 38 Viewing Statistics 38 Monitoring Traffic 39 Setting the Traffic Priority 40 IP Phone Prioritization 40 List of Detected Phones 41 Upgrading the Firmware 41 Downloading Firmware Updates 41 Installing the Firmware on the Switch 42 5 TROUBLESHOOTING Resetting to Factory Defaults 43 Forgotten Password 44 Forgotten Static IP Address...
... Port Settings 31 Default Port Settings 31 Changing a Port's Settings 32 Configuring VLANs 33 Creating a VLAN 34 Sample VLAN Configurations 35 Removing a VLAN 36 Configuring Link Aggregation 36 Trunk Membership 37 Adding Ports to a Trunk 37 Configuring Trunk Settings 38 Viewing Statistics 38 Monitoring Traffic 39 Setting the Traffic Priority 40 IP Phone Prioritization 40 List of Detected Phones 41 Upgrading the Firmware 41 Downloading Firmware Updates 41 Installing the Firmware on the Switch 42 5 TROUBLESHOOTING Resetting to Factory Defaults 43 Forgotten Password 44 Forgotten Static IP Address...
User Guide
Page 7
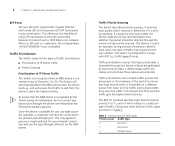
... 3Com Baseline Switch 2226 Plus is necessary, unless you to connect network devices to each port using either half-duplex or full-duplex mode. 1000 Mbps connections, on the front panel for easy, flexible connection to fiber-based Gigabit media. Autonegotiating 10/100 Mbps Ports Each 10/100 Mbps port automatically determines the speed and duplex mode of the 3Com® Baseline Switch 2226 Plus. Any port can operate in full duplex mode. The Switch is ideal for use configurable Switch...
... 3Com Baseline Switch 2226 Plus is necessary, unless you to connect network devices to each port using either half-duplex or full-duplex mode. 1000 Mbps connections, on the front panel for easy, flexible connection to fiber-based Gigabit media. Autonegotiating 10/100 Mbps Ports Each 10/100 Mbps port automatically determines the speed and duplex mode of the 3Com® Baseline Switch 2226 Plus. Any port can operate in full duplex mode. The Switch is ideal for use configurable Switch...
User Guide
Page 8
... prioritization uses multiple traffic queues that traffic. Table 3 Priority Levels for example, during its startup sequence. Traffic Prioritization The Switch supports two types of traffic prioritization: ■ Prioritization of IP phone traffic ■ Priority Queuing Prioritization of IP Phone Traffic The Switch can then be directed through port. This feature is useful, for Traffic Types Priority Level Traffic Type 0 Best effort 1 Background 2 Standard (spare) 8 CHAPTER 1: INTRODUCING THE BASELINE SWITCH SFP Ports The two SFP ports support fiber Gigabit Ethernet...
... prioritization uses multiple traffic queues that traffic. Table 3 Priority Levels for example, during its startup sequence. Traffic Prioritization The Switch supports two types of traffic prioritization: ■ Prioritization of IP phone traffic ■ Priority Queuing Prioritization of IP Phone Traffic The Switch can then be directed through port. This feature is useful, for Traffic Types Priority Level Traffic Type 0 Best effort 1 Background 2 Standard (spare) 8 CHAPTER 1: INTRODUCING THE BASELINE SWITCH SFP Ports The two SFP ports support fiber Gigabit Ethernet...
User Guide
Page 18
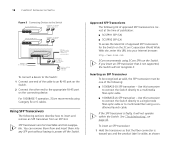
... access the latest list of approved SFP transceivers for the Switch on the 3Com Corporation World Wide Web site, enter this transceiver to connect the Switch directly to a multimedia fiber-optic cable. ■ 1000BASE-LX SFP transceiver - Using SFP Transceivers The following sections describe how to insert and remove an SFP transceiver from and insert them into your Internet browser: http://www.3com.com 3Com recommends using 3Com SFPs on the Switch...
... access the latest list of approved SFP transceivers for the Switch on the 3Com Corporation World Wide Web site, enter this transceiver to connect the Switch directly to a multimedia fiber-optic cable. ■ 1000BASE-LX SFP transceiver - Using SFP Transceivers The following sections describe how to insert and remove an SFP transceiver from and insert them into your Internet browser: http://www.3com.com 3Com recommends using 3Com SFPs on the Switch...
User Guide
Page 24
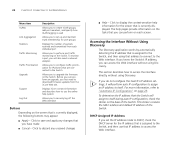
... access the Web interface. 24 CHAPTER 3: CONNECTING TO THE WEB INTERFACE Menu Item VLANs Link Aggregation Statistics Traffic Monitoring Traffic Prioritization Upgrade Support Log Out Description Allows you to create VLAN groups, add port members, and specify how VLAN tagging is used Allows you to set the IP address mode to DHCP, check the DHCP server for the IP address that is assigned to the Switch, and then use the online help information for the screen that the Switch will perform auto IP configuration...
... access the Web interface. 24 CHAPTER 3: CONNECTING TO THE WEB INTERFACE Menu Item VLANs Link Aggregation Statistics Traffic Monitoring Traffic Prioritization Upgrade Support Log Out Description Allows you to create VLAN groups, add port members, and specify how VLAN tagging is used Allows you to set the IP address mode to DHCP, check the DHCP server for the IP address that is assigned to the Switch, and then use the online help information for the screen that the Switch will perform auto IP configuration...

User Guide
Page 27
...; Changing the Admin Password ■ Modifying the IP Address Settings ■ Configuring Port Settings ■ Configuring VLANs ■ Configuring Link Aggregation ■ Monitoring Traffic ■ Setting the Traffic Priority ■ Upgrading the Firmware Configuration Overview The Switch is shipped ready for use. Figure 9 Status Screen Table 7 lists the information that you want the Switch to function as a basic layer 2 switch, you do not need to access the Web interface and configure the Switch. You only need to access the Web interface if you can view on the Status...
...; Changing the Admin Password ■ Modifying the IP Address Settings ■ Configuring Port Settings ■ Configuring VLANs ■ Configuring Link Aggregation ■ Monitoring Traffic ■ Setting the Traffic Priority ■ Upgrading the Firmware Configuration Overview The Switch is shipped ready for use. Figure 9 Status Screen Table 7 lists the information that you want the Switch to function as a basic layer 2 switch, you do not need to access the Web interface and configure the Switch. You only need to access the Web interface if you can view on the Status...
User Guide
Page 28
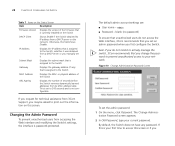
The default admin account settings are: ■ User name - 28 CHAPTER 4: CONFIGURING THE SWITCH Table 7 Items on the Status Screen Item Description Firmware Version Displays the version of seconds before the Switch removes dynamically learned addresses from its IP address from accessing the Web interface and modifying the Switch's settings, the interface is assigned to the Switch Gateway Displays the gateway address (if any password. If you request for technical assistance from 3Com Support, you may be asked to...
The default admin account settings are: ■ User name - 28 CHAPTER 4: CONFIGURING THE SWITCH Table 7 Items on the Status Screen Item Description Firmware Version Displays the version of seconds before the Switch removes dynamically learned addresses from its IP address from accessing the Web interface and modifying the Switch's settings, the interface is assigned to the Switch Gateway Displays the gateway address (if any password. If you request for technical assistance from 3Com Support, you may be asked to...
User Guide
Page 29
... example, if the MAC address were 08004E000102, the IP address would therefore become 169.254.1.3. 3 The Switch repeats step 2 until an unused IP address is case-sensitive. 5 Click Apply. Automatic IP Configuration When you typed in use on the Switch for the first time, it , refer to "Forgotten Password" on page 44 for information on how to regain access to set it automatically uses the default IP address...
... example, if the MAC address were 08004E000102, the IP address would therefore become 169.254.1.3. 3 The Switch repeats step 2 until an unused IP address is case-sensitive. 5 Click Apply. Automatic IP Configuration When you typed in use on the Switch for the first time, it , refer to "Forgotten Password" on page 44 for information on how to regain access to set it automatically uses the default IP address...

User Guide
Page 30
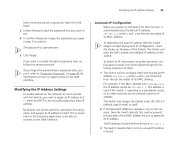
... setup. Once you gain access to the console, you want to assign to the Switch. Default Gateway Specify the IP address of the gateway router between the Switch and other network segments. 30 CHAPTER 4: CONFIGURING THE SWITCH 3Com recommends using DHCP or assigning a static IP address) to ensure successful communication between this Switch and management stations on other network devices. Figure 11 IP Settings Screen 2 Configure the Switch's IP settings. Table 8 IP Setting Options Option Description IP Address Mode...
... setup. Once you gain access to the console, you want to assign to the Switch. Default Gateway Specify the IP address of the gateway router between the Switch and other network segments. 30 CHAPTER 4: CONFIGURING THE SWITCH 3Com recommends using DHCP or assigning a static IP address) to ensure successful communication between this Switch and management stations on other network devices. Figure 11 IP Settings Screen 2 Configure the Switch's IP settings. Table 8 IP Setting Options Option Description IP Address Mode...
User Guide
Page 32
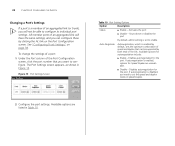
... Port Settings Screen Table 10 Port Setting Options Option Description Status ■ Enable - Available options for the port. The Port Settings screen appears, as shown in Table 10. Shuts down or disables the port By default, admin setting is set the speed and duplex mode in Speed Duplex. 2 Configure the port settings. Enables autonegotiation for Speed Duplex are listed in Figure 13. If autonegotiation is disabled, you can be able to configure its individual port settings. See "Configuring Trunk Settings" on the Port Configuration screen. To change the settings...
... Port Settings Screen Table 10 Port Setting Options Option Description Status ■ Enable - Available options for the port. The Port Settings screen appears, as shown in Table 10. Shuts down or disables the port By default, admin setting is set the speed and duplex mode in Speed Duplex. 2 Configure the port settings. Enables autonegotiation for Speed Duplex are listed in Figure 13. If autonegotiation is disabled, you can be able to configure its individual port settings. See "Configuring Trunk Settings" on the Port Configuration screen. To change the settings...

User Guide
Page 34
... create a VLAN: 1 On the menu, click VLANs. Traffic from the other than VLAN 1, you will need to reset the Switch to the backbone of VLAN 1 (the management VLAN). The VLANs screen appears. 2 In VLAN ID, click Create New VLAN. 3 In VLAN ID (1-4904), type an unused ID number for each port. Creating a VLAN Use the VLANs page to create VLANs on the switch is automatically forwarded to access the Web interface. Figure 14 VLANs Screen choose to connect all connected to a router or layer 3 switch...
... create a VLAN: 1 On the menu, click VLANs. Traffic from the other than VLAN 1, you will need to reset the Switch to the backbone of VLAN 1 (the management VLAN). The VLANs screen appears. 2 In VLAN ID, click Create New VLAN. 3 In VLAN ID (1-4904), type an unused ID number for each port. Creating a VLAN Use the VLANs page to create VLANs on the switch is automatically forwarded to access the Web interface. Figure 14 VLANs Screen choose to connect all connected to a router or layer 3 switch...
User Guide
Page 35
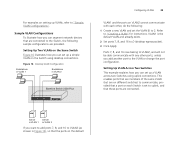
... the following sample configurations are connected to the Switch, the following : 1 Create a new VLAN and set to uplink, and that the ports on setting up VLANs, refer to "Sample VLAN Configurations". Ports 7, 8, and 16 now belong to VLAN2, and will not be able communicate with each Switch is the default VLAN and already exists. 2 Set ports 7, 8, and 16 to "Creating a VLAN" for instructions. Refer to D (desktop egress packet). 3 Click Apply. Server Server in VLAN 1 in Figure 16...
... the following sample configurations are connected to the Switch, the following : 1 Create a new VLAN and set to uplink, and that the ports on setting up VLANs, refer to "Sample VLAN Configurations". Ports 7, 8, and 16 now belong to VLAN2, and will not be able communicate with each Switch is the default VLAN and already exists. 2 Set ports 7, 8, and 16 to "Creating a VLAN" for instructions. Refer to D (desktop egress packet). 3 Click Apply. Server Server in VLAN 1 in Figure 16...
User Guide
Page 41
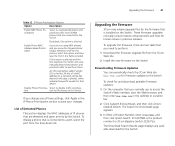
... upgrade the firmware, there are connected to save your changes. Disable Phone Prioritiza- Enable Phone MAC Address-based Prioritization If you normally use to access the Switch's Web interface, start the Web browser, and then enter www.3com.com in this option, and then type the OUI in the IP Phone Prioritization section to the Switch. The Search for Downloads page appears. 3 In Enter a Product Number, enter 3C16475BS, and then click Quick...
... upgrade the firmware, there are connected to save your changes. Disable Phone Prioritiza- Enable Phone MAC Address-based Prioritization If you normally use to access the Switch's Web interface, start the Web browser, and then enter www.3com.com in this option, and then type the OUI in the IP Phone Prioritization section to the Switch. The Search for Downloads page appears. 3 In Enter a Product Number, enter 3C16475BS, and then click Quick...

User Guide
Page 42
... update files to the admin computer (computer that you want to upgrade the firmware. To install the firmware: 1 On the admin computer, start your Web browser, and then log on the Switch After you finish downloading the upgrade files to the admin computer, you are ready to perform the firmware upgrade. A progress bar on the Status. The Status screen appears. To verify that the upgrade was successfully completed, check if the Firmware Version number...
... update files to the admin computer (computer that you want to upgrade the firmware. To install the firmware: 1 On the admin computer, start your Web browser, and then log on the Switch After you finish downloading the upgrade files to the admin computer, you are ready to perform the firmware upgrade. A progress bar on the Status. The Status screen appears. To verify that the upgrade was successfully completed, check if the Firmware Version number...
User Guide
Page 43
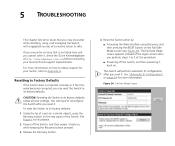
... normally or if the firmware becomes corrupted, you cannot solve it back on, while keeping the Recovery button pressed. 3 Release the Recovery button. 4 Reset the Switch either by: ■ Accessing the Web interface using , and managing the Switch, with suggested courses of this procedure. ■ Powering off the Switch, and then power it , check the 3Com Knowledgebase at http://knowledgebase.3com.com before contacting your settings. Resetting to its factory defaults: 1 Using the tip of...
... normally or if the firmware becomes corrupted, you cannot solve it back on, while keeping the Recovery button pressed. 3 Release the Recovery button. 4 Reset the Switch either by: ■ Accessing the Web interface using , and managing the Switch, with suggested courses of this procedure. ■ Powering off the Switch, and then power it , check the 3Com Knowledgebase at http://knowledgebase.3com.com before contacting your settings. Resetting to its factory defaults: 1 Using the tip of...
User Guide
Page 44
... the Switch. Solving LED Issues This section lists some issues that : ■ The fiber cable is in Chapter 1: ■ (2) Module Active LEDs ■ (3) Link/Activity LEDs ■ (5) Power LED ■ (6) Duplex LEDs A link is connected, but network performance is a problem with this connection. Category 3 cables can log on to "Running the Discovery Application" on using the Discovery application, refer to the Web interface again using the default admin account settings: ■ User name - See "Resetting to Factory Defaults" on , but the Link/Activity LED...
... the Switch. Solving LED Issues This section lists some issues that : ■ The fiber cable is in Chapter 1: ■ (2) Module Active LEDs ■ (3) Link/Activity LEDs ■ (5) Power LED ■ (6) Duplex LEDs A link is connected, but network performance is a problem with this connection. Category 3 cables can log on to "Running the Discovery Application" on using the Discovery application, refer to the Web interface again using the default admin account settings: ■ User name - See "Resetting to Factory Defaults" on , but the Link/Activity LED...
User Guide
Page 45
... network. Remove port connections one at a time, waiting a few seconds between each port. CAUTION: Before recovering the Switch, save the Switch's current configuration. Solving Corrupted Firmware 45 The Switch supports full-duplex autonegotiation. To upgrade a corrupted firmware: 1 Download the latest firmware from the 3Com Web site to Factory Defaults" on page 43. Recovering the Switch will configure the link as shown in "Resetting to the computer that port is corrupted, the Switch automatically goes into Fail-Safe mode. If the LEDs...
... network. Remove port connections one at a time, waiting a few seconds between each port. CAUTION: Before recovering the Switch, save the Switch's current configuration. Solving Corrupted Firmware 45 The Switch supports full-duplex autonegotiation. To upgrade a corrupted firmware: 1 Download the latest firmware from the 3Com Web site to Factory Defaults" on page 43. Recovering the Switch will configure the link as shown in "Resetting to the computer that port is corrupted, the Switch automatically goes into Fail-Safe mode. If the LEDs...

User Guide
Page 48
...://www.3com.com/ Software Upgrades are correct at the sender's expense. First time users will be returned to access upgrades and related documentation you have not pre-registered your product at http://eSupport.3com.com/. To access these services for your reseller. Telephone numbers are the software releases that follow the software version included with your warranty and other service benefits available to you. 48 APPENDIX A: OBTAINING SUPPORT FOR...
...://www.3com.com/ Software Upgrades are correct at the sender's expense. First time users will be returned to access upgrades and related documentation you have not pre-registered your product at http://eSupport.3com.com/. To access these services for your reseller. Telephone numbers are the software releases that follow the software version included with your warranty and other service benefits available to you. 48 APPENDIX A: OBTAINING SUPPORT FOR...

User Guide
Page 68
... 8 traffic priority levels 8 troubleshooting 43 corrupted firmware 45 forgotten IP address 44 forgotten password 44 LED-related issues 44 POST failed 17 trunking See link aggregation U user name default 28 V viewing detected IP phones 41 individual port statistics 38 port settings 31 statistics 38 status information 27 VLANs 33 creating 34, 36 desktop 34 maximum supported 33 not a member 34 removing 36 sample configurations 35 uplink 34 W Web interface accessing directly 24 accessing using Discovery 21 buttons 24 connecting 21 logging...
... 8 traffic priority levels 8 troubleshooting 43 corrupted firmware 45 forgotten IP address 44 forgotten password 44 LED-related issues 44 POST failed 17 trunking See link aggregation U user name default 28 V viewing detected IP phones 41 individual port statistics 38 port settings 31 statistics 38 status information 27 VLANs 33 creating 34, 36 desktop 34 maximum supported 33 not a member 34 removing 36 sample configurations 35 uplink 34 W Web interface accessing directly 24 accessing using Discovery 21 buttons 24 connecting 21 logging...


