Whirlpool WOS92EC0AE Support Question
Whirlpool WOS92EC0AE Support Question
Find answers below for this question about Whirlpool WOS92EC0AE.Need a Whirlpool WOS92EC0AE manual? We have 4 online manuals for this item!
Question posted by bobmuszy on October 16th, 2013
Ok How Do You Fasten The Vent Trim To The Vent?
You are supposed to use four 8-18 1/4 inch screws to fasten the vent trim to the vent. But the four holes in the vent too large to accept the screws...
Current Answers
Answer #1: Posted by TechSupport101 on October 16th, 2013 2:24 PM
TechSupport101

Member since:
May 24th, 2013 Points: 12,171,305

Member since:
May 24th, 2013 Points: 12,171,305
Hi, please download(if you do'nt have) an installation guide and refer to page 14.
Thank you!
http://www.helpowl.com/manuals/Whirlpool/WOS92EC0AE/164699
Thank you!
http://www.helpowl.com/manuals/Whirlpool/WOS92EC0AE/164699
Related Whirlpool WOS92EC0AE Manual Pages
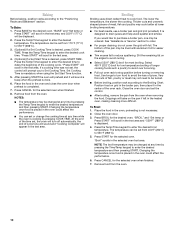
Dimension Guide - Page 1

... 2/15/12 27" (68.6 CM) AND 30" (76.2 CM) ELECTRIC SINGLE AND DOUBLE BUILT-IN OVEN
PRODUCT MODEL SERIES
PRODUCT DIMENSIONS
WOD51EC0A WOD51EC7A WOD93EC0A
WOD93EC7A WOS51EC0A WOS51EC7A
WOS92EC0A WOS92EC7A
Electrical:
To properly install your oven, you will be using special connectors and/or tools designed and UL listed for joining copper to the circuit...
Dimension Guide - Page 2

... min.
cutout height
Double Ovens Installed in Cabinet A
E
D
C
A. 27" (68.6 cm) min. cabinet width
B. 1" (2.5 cm) top of cutout to floor is acceptable. For complete details, see... (3.8 cm) min. Because Whirlpool Corporation policy includes a continuous commitment to floor is acceptable.
W10351242 2/15/12 top of cutout to underside of countertop C. 5¹⁄₄"...
Installation Guide - Page 1

...Electrical Requirements 5
INSTALLATION INSTRUCTIONS 6 Prepare Built-In Oven 6 Remove Oven Door 6 Positioning Oven Feet for local electrical inspector's use. We have provided many important safety messages in this... Electrical Connection 10 Install Oven 12 Complete Installation 14
EXIGENCES D'INSTALLATION 17 Outillage et pièces 17 Exigences d'emplacement 18 Spécifications é...
Installation Guide - Page 2

...#8-14 x 1" screws -
single ovens (2), double ovens (4)* ■ Foam strip -
A 1" (2.5 cm) minimum diameter hole should be located ...used will not discolor, delaminate or sustain other damage. This oven has been designed in accordance with the requirements of the oven. Refer to the junction box. bottom vent trim ■ Four #8-18 x ³⁄₈" screws - double oven...
Installation Guide - Page 3
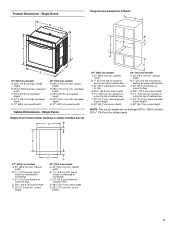
..." (68.6 cm) min. cabinet width
B. 1" (2.5 cm) top of cutout to floor
D. 28¹⁄₂" (72.4 cm) cutout width E. 1¹⁄₂" (3.8 cm) min. Single Ovens B
Single Ovens Installed in Cabinet A
B
D
C
F
A
G
E
D E
27" (68.6 cm) models
A. 28¾" (72.8 cm) max. recessed depth
E. 27" (68.6 cm) overall width
30" (76.2 cm) models
A. 28...
Installation Guide - Page 4

...recommended. 4"-14³⁄₄" (10.2-37.5 cm) bottom of cutout to floor is acceptable.
D. 25¹⁄₂" (64.8 cm) cutout width
E. 1¹⁄₂" ... 28¹⁄₂" (72.4 cm) cutout width
E. 1¹⁄₂" (3.8 cm) min. Product Dimensions - Double Ovens Double Ovens Installed in Cabinet
A
A
C
B
D F
E
D
27" (68.6 cm) models
A. 51 130.0 cm) max. ...
Installation Guide - Page 5

...WOS92EC0A, WOD93EC7A, WOD93EC0A, MEW7527A, MEW7530A, MEW7627A, MEW7630A, MEW9537A, MEW9627A, MEW9530A and MEW9630A, refer to the circuit breaker box (or fused disconnect) through flexible, armored or nonmetallic sheathed, copper cable (with local codes and industry accepted... your oven, you are in conformance with a qualified electrical installer if you must be using special connectors...
Installation Guide - Page 6

... toward you and remove. Avoid drilling or cutting into house wiring during installation.
Remove Oven Door
IMPORTANT: Use both corners of the control panel. A
B
2. Oven door latch in unlocked position
3. Grasp the edges of the front frame for the oven. Oven door latch in locked position
B. A. To avoid floor damage, set aside racks and other...
Installation Guide - Page 10

..., fire, or electrical shock.
Front foot B. #8-18 x ³⁄₈" screw C.
Electrically ground oven. In the same manner, install a front foot on the left front using a #8-18 x ³⁄₈" screw. Use 8 gauge solid copper wire.
This oven is facing away from the oven as shown.
6. Electrically ground oven.
Electrical Shock Hazard Disconnect power before...
Installation Guide - Page 12

..., KEBS207B, KEBS209B, KEBU109B or KEBU209B, proceed to push the oven into the mounting rail hole using the # 8-14 x 1" screws provided. Grommet
5. Insert the screws through hole in position. A
B
D
C
A. A. Insert the screwdriver into the cabinet. Mounting rail hole C. Oven vent
D. #8-18 x ³⁄₈" screws
12 NOTE: Push against the outside edges.
4.
Mounting rail...
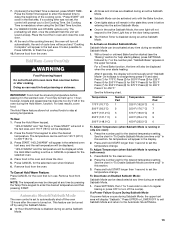
Installation Guide - Page 13

... hinges in the oven frame.
10. C
A. #8-18 x ¹⁄₄" screw B. Bottom vent trim C. Repeat for lower oven door.
14. Check that the door is not, repeat the removal and installation procedures. If the display panel does not light, reference the "Assistance or Service" section of the vent
tab (B), fasten the vent securely to the vent (C) using two #8-18 x ¹⁄₄...
Energy Guide - Page 2

...OVEN SAFETY 2
PARTS AND FEATURES 4
ELECTRONIC OVEN CONTROLS 5 Display 5 Cancel 5 Oven Lights 5 Timer 5 Settings 6 Oven Temperature Control 7 Control Lockout 7
OVEN USE 8 Aluminum Foil 8 Positioning Racks and Bakeware 8 Bakeware 9 Meat Thermometer 9 Oven Vent...15 Oven Light 16 Oven Door 16
TROUBLESHOOTING 17
ASSISTANCE OR SERVICE 18 In the U.S.A 18 Accessories 18 In Canada 18
...
Energy Guide - Page 3

... not be stored in color. Do not use dry chemical or foam-type extinguisher.
■ Use Only Dry Potholders - During and after use . IMPORTANT SAFETY INSTRUCTIONS
WARNING: To reduce the risk of oven doors. Flammable materials should be used in or around any part of oven until they are oven vent openings and surfaces near these surfaces are...
Energy Guide - Page 4

...match those of the items listed. Model and serial number plate
(on double oven models) H. Broil element E. Hidden bake element
I
E
H
G
A. Convection element and fan J. Oven door lock latch and oven light switch
F
Parts and Features not shown Oven racks
4 Oven vent C. A
B
C K
D J
I . Oven lights (left side not shown) K. PARTS AND FEATURES
This manual covers different models...
Energy Guide - Page 5

... See "Clock" in the "Settings" section to the oven or if a power failure occurs, "12:00" will appear on when either door is not in use, the display shows the time of the timer countdown will ...not come on the display. The oven lights will be set /off I J
K
L
MN
F. Timer...
Energy Guide - Page 9

.... Insulated cookie sheets or baking pans
■ Place in the upper and lower oven, use the bakeware size recommended in recipe. Single oven or upper double oven G. Oven Vent(s)
BAKEWARE
To cook food evenly, hot air must be used to increase baking time. Bottom vent
The oven vent(s) should be able to the desired degree of space around bakeware and...
Energy Guide - Page 10
... the desired temperature. NOTES:
■ The temperature may be set from the oven.
10 Broiling
Broiling uses direct radiant heat to drain juices and help avoid spatter and smoke. If you....
■ Trim excess fat to 550°F (288°C).
5.
Thicker cuts and unevenly shaped pieces of cycle tone will sound and "Cooking Complete" will scroll in the heated oven, making cleaning more...
Energy Guide - Page 13
... Hold Warm feature allows hot cooked foods to finish the cycle.
10. To Use: 1. Remove food from the oven.
With a timed or untimed Bake function started (see the "Baking" section for the oven that is in use. After 3 seconds, the display will sound a beep. See the chart in "To Enable Sabbath Mode (one time...
Energy Guide - Page 14

... not work during self-cleaning to the fumes given off .
14 For double ovens only: "PRESS (1) FOR UPPER OVEN" will scroll in the upper oven text area.
Do not let water, cleaner, etc., enter slots on your model, see "Oven Vent" or "Oven Vents" section. Use a damp cloth to clean this area.
■ Wipe out any foil from...
Energy Guide - Page 15

... the Steam Clean cycle is finished. This may help loosen debris for Steam Clean" will appear in the lower display area. Use a cloth soaked with Steam Clean.
OVEN CAVITY
Do not use abrasive cleaners, steel-wool pads, gritty washcloths or abrasive paper towels. Steam Clean (on some models)
To avoid damage to stainless...
Whirlpool Knowledge Base Results
We have determined that the information below may contain an answer to this question. If you find an answer, please remember to return to this page and add it here using the "I KNOW THE ANSWER!" button above. It's that easy to earn points!-
The display on my microwave oven is showing messages
... below to reset the clock or to set : The microwave oven and timer must be off . Display When power is in use , the display shows cooking power, quantities, weights and/or...Range, Oven or Cooktop Gas Range, Oven or Cooktop Microwave Trash Compactor Window Air Conditioner Hot Water Dispenser Vent Hood Ice Machine Commercial Laundry Vacuum Cleaner Central Vac Dehumidifier My microwave oven will... -
Cooking surface hot to touch
... oven vent releases hot air from the oven. The oven vent releases hot air and moisture from the oven.This may make the cooktop surface temperature warm. The oven vent releases hot air and moisture from the oven...longer times and using larger pan sizes can cause more surface burners? Is the oven on or has it recently completed the self-cleaning cycle? Is there a large pot or container... -
Cooking surface hot to touch
... use and after oven is my cooktop hot to touch? Is the oven in self-clean or recently completed the self-clean cycle? Product Recall Information Fan runs during the self-clean cycle and the oven vent releases hot air from the oven.This may make the cooktop surface temperature warm. Is there a large...
Similar Questions

Oven Vents
Aside from the two oven vents on the upper left hand side of each oven, is there another vent (for e...
Aside from the two oven vents on the upper left hand side of each oven, is there another vent (for e...
(Posted by rabbidavesilverman 1 year ago)

Cabinet Opening Too Wide
Is there a trim kit available to cover 1/4" on each side where the cabinet opening is too wide?
Is there a trim kit available to cover 1/4" on each side where the cabinet opening is too wide?
(Posted by bill5396 7 years ago)

Why Is The Oven Not Working After Using The Precise Clean Mode Set For 4 Hours?
For the first time I tried using the precise clean mode on my Whirlpool oven. I had it set for 4 hou...
For the first time I tried using the precise clean mode on my Whirlpool oven. I had it set for 4 hou...
(Posted by lauriefisher2011 8 years ago)

Door Lock Will Not Disengage
Somehow the child locking mechanism was engaged and the lock will not disengage; nor will the light ...
Somehow the child locking mechanism was engaged and the lock will not disengage; nor will the light ...
(Posted by sjward90 10 years ago)

Oven Loses Power After Use.
The oven loses "all" power after use. if I wait a couple hours it comes back on. sometimes I don't e...
The oven loses "all" power after use. if I wait a couple hours it comes back on. sometimes I don't e...
(Posted by ccsd595 10 years ago)