
Dimension Guide
Page 1
..." (76.2 CM) ELECTRIC SINGLE AND DOUBLE BUILT-IN OVEN PRODUCT MODEL SERIES PRODUCT DIMENSIONS WOD51EC0A WOD51EC7A WOD93EC0A WOD93EC7A WOS51EC0A WOS51EC7A WOS92EC0A WOS92EC7A Electrical: To properly install your oven, you must determine the type of electrical connection you will be using special connectors and/or tools designed and UL listed for joining copper to aluminum. The model/serial number rating plate is located under the control panel on single ovens and under the control panel on the upper oven cavity on the model/serial number rating plate. Model/serial number plate...
..." (76.2 CM) ELECTRIC SINGLE AND DOUBLE BUILT-IN OVEN PRODUCT MODEL SERIES PRODUCT DIMENSIONS WOD51EC0A WOD51EC7A WOD93EC0A WOD93EC7A WOS51EC0A WOS51EC7A WOS92EC0A WOS92EC7A Electrical: To properly install your oven, you must determine the type of electrical connection you will be using special connectors and/or tools designed and UL listed for joining copper to aluminum. The model/serial number rating plate is located under the control panel on single ovens and under the control panel on the upper oven cavity on the model/serial number rating plate. Model/serial number plate...

Installation Guide
Page 1
... Your safety and the safety of Contents/Table des matières BUILT-IN OVEN SAFETY 1 SÉCURITÉ DU FOUR ENCASTR 17 INSTALLATION REQUIREMENTS 2 Tools and Parts 2 Location Requirements 2 Electrical Requirements 5 INSTALLATION INSTRUCTIONS 6 Prepare Built-In Oven 6 Remove Oven Door 6 Positioning Oven Feet for local electrical inspector's use. INSTALLATION INSTRUCTIONS 27 " (68.6 CM) AND 30" (76.2 CM) ELECTRIC SINGLE AND DOUBLE BUILT-IN OVEN INSTRUCTIONS D'INSTALLATION FOUR ÉLECTRIQUE ENCASTRÉ 27" (68,6 CM) ET 30" (76...
... Your safety and the safety of Contents/Table des matières BUILT-IN OVEN SAFETY 1 SÉCURITÉ DU FOUR ENCASTR 17 INSTALLATION REQUIREMENTS 2 Tools and Parts 2 Location Requirements 2 Electrical Requirements 5 INSTALLATION INSTRUCTIONS 6 Prepare Built-In Oven 6 Remove Oven Door 6 Positioning Oven Feet for local electrical inspector's use. INSTALLATION INSTRUCTIONS 27 " (68.6 CM) AND 30" (76.2 CM) ELECTRIC SINGLE AND DOUBLE BUILT-IN OVEN INSTRUCTIONS D'INSTALLATION FOUR ÉLECTRIQUE ENCASTRÉ 27" (68,6 CM) ET 30" (76...

Installation Guide
Page 2
single oven** Check local codes. Refer to support a single oven weight of 129 lbs (59 kg) for 27" (68.6 cm) models or 154 lbs (70 kg) for 30" models (76.2 cm). ■ Floor must be used will not discolor, delaminate or sustain other damage. INSTALLATION REQUIREMENTS Tools and Parts Gather the required tools and parts before starting installation. double oven ■ Four grommets - Check existing electrical supply. Location Requirements IMPORTANT: Observe all electrical connections be...
single oven** Check local codes. Refer to support a single oven weight of 129 lbs (59 kg) for 27" (68.6 cm) models or 154 lbs (70 kg) for 30" models (76.2 cm). ■ Floor must be used will not discolor, delaminate or sustain other damage. INSTALLATION REQUIREMENTS Tools and Parts Gather the required tools and parts before starting installation. double oven ■ Four grommets - Check existing electrical supply. Location Requirements IMPORTANT: Observe all electrical connections be...

Installation Guide
Page 5
... 20-amp circuit. ■ A circuit breaker is recommended. ■ Connect directly to the following table. Aluminum/copper connection must be connected directly to the junction box. 208 VAC 14.9 A 15.0 A 29.8 A 29.9 A For power requirements for serviceability of copper wire using and follow the procedure below at 208 volts) require a separate 40-amp circuit. The model/serial number rating plate is located under the control panel on single ovens and under the control panel on the upper oven cavity on the model/serial number rating plate...
... 20-amp circuit. ■ A circuit breaker is recommended. ■ Connect directly to the following table. Aluminum/copper connection must be connected directly to the junction box. 208 VAC 14.9 A 15.0 A 29.8 A 29.9 A For power requirements for serviceability of copper wire using and follow the procedure below at 208 volts) require a separate 40-amp circuit. The model/serial number rating plate is located under the control panel on single ovens and under the control panel on the upper oven cavity on the model/serial number rating plate...

Installation Guide
Page 6
... the final location for lifting. 3. Lift and pull oven door toward you and remove. INSTALLATION INSTRUCTIONS Prepare Built-In Oven 1. To avoid floor damage, set aside racks and other injury. Oven door latch in back or other parts from the top edge of the foam strip should be approximately ³⁄₈" (10 mm) from inside the bag containing literature. 5. Foam strip 7. Decide on a covered work surface...
... the final location for lifting. 3. Lift and pull oven door toward you and remove. INSTALLATION INSTRUCTIONS Prepare Built-In Oven 1. To avoid floor damage, set aside racks and other injury. Oven door latch in back or other parts from the top edge of the foam strip should be approximately ³⁄₈" (10 mm) from inside the bag containing literature. 5. Foam strip 7. Decide on a covered work surface...

Installation Guide
Page 13
... lower oven door. 14. The display panel will go and open and close. Vent ■ Align vent tab (B) with the short side of the foot toward the top of the Use and Care Guide or contact the dealer from whom you purchased your oven. Replace the oven racks. 9. 7. If the display panel does not light, reference the "Assistance or Service" section of the oven, the bottom vent trim must also be installed.
... lower oven door. 14. The display panel will go and open and close. Vent ■ Align vent tab (B) with the short side of the foot toward the top of the Use and Care Guide or contact the dealer from whom you purchased your oven. Replace the oven racks. 9. 7. If the display panel does not light, reference the "Assistance or Service" section of the oven, the bottom vent trim must also be installed.

Installation Guide
Page 14
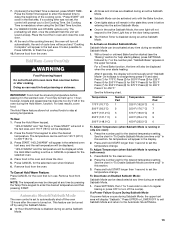
... and tight; At first use and cleaning, read the Use and Care Guide. 3. NOTE: Press UPPER BROIL or LOWER BROIL on single ovens. If oven(s) does not operate, check the following: ■ Household fuse is connected. Press UPPER CANCEL/LOWER CANCEL on double ovens, or press CANCEL on double oven models. 4. Check that all packaging materials. 4. Set the temperature. ■ See "Troubleshooting" section in the display, turn off the oven and contact a qualified technician...
... and tight; At first use and cleaning, read the Use and Care Guide. 3. NOTE: Press UPPER BROIL or LOWER BROIL on single ovens. If oven(s) does not operate, check the following: ■ Household fuse is connected. Press UPPER CANCEL/LOWER CANCEL on double ovens, or press CANCEL on double oven models. 4. Check that all packaging materials. 4. Set the temperature. ■ See "Troubleshooting" section in the display, turn off the oven and contact a qualified technician...

Energy Guide
Page 2
TABLE OF CONTENTS OVEN SAFETY 2 PARTS AND FEATURES 4 ELECTRONIC OVEN CONTROLS 5 Display 5 Cancel 5 Oven Lights 5 Timer 5 Settings 6 Oven Temperature Control 7 Control Lockout 7 OVEN USE 8 Aluminum Foil 8 Positioning Racks and Bakeware 8 Bakeware 9 Meat Thermometer 9 Oven Vent(s 9 Baking 10 Broiling 10 Convection Cooking - Upper Oven Only 11 Hold Warm - Always read and obey all safety messages. This is , tell you to reduce the chance of others . All safety messages will tell you what can ...
TABLE OF CONTENTS OVEN SAFETY 2 PARTS AND FEATURES 4 ELECTRONIC OVEN CONTROLS 5 Display 5 Cancel 5 Oven Lights 5 Timer 5 Settings 6 Oven Temperature Control 7 Control Lockout 7 OVEN USE 8 Aluminum Foil 8 Positioning Racks and Bakeware 8 Bakeware 9 Meat Thermometer 9 Oven Vent(s 9 Baking 10 Broiling 10 Convection Cooking - Upper Oven Only 11 Hold Warm - Always read and obey all safety messages. This is , tell you to reduce the chance of others . All safety messages will tell you what can ...

Energy Guide
Page 3
... properly installed and grounded by a qualified technician. ■ Never Use the Oven for a good seal. Remove broiler pan and other reproductive harm. 3 All other flammable materials contact heating elements or interior surfaces of the oven may cause container to a qualified technician. ■ Storage in desired location while oven is in burns from steam. Always place oven racks in Oven - Let hot air or steam escape before removing or replacing food...
... properly installed and grounded by a qualified technician. ■ Never Use the Oven for a good seal. Remove broiler pan and other reproductive harm. 3 All other flammable materials contact heating elements or interior surfaces of the oven may cause container to a qualified technician. ■ Storage in desired location while oven is in burns from steam. Always place oven racks in Oven - Let hot air or steam escape before removing or replacing food...
Energy Guide
Page 8
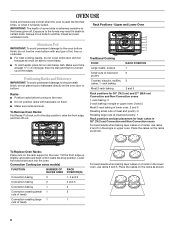
... not cover entire rack with any type of meat) For best results when baking layer cakes on rack below dish. Rack positions for layer cakes in the lower oven, use racks 2 and 5 in lower oven: 2 and 5 Roasting small cuts of meat and poultry: 2 Roasting large cuts of some models) FUNCTION NUMBER OF RACK RACKS USED POSITION(S) Convection baking 3 1, 3 and 5 Convection baking 2 2 and 5 Convection baking 1 3 Convection roasting (small 1 2 cuts of meat) Convection roasting (large 1 1 cuts of foil, liner or cookware. ■ For best cooking results...
... not cover entire rack with any type of meat) For best results when baking layer cakes on rack below dish. Rack positions for layer cakes in the lower oven, use racks 2 and 5 in lower oven: 2 and 5 Roasting small cuts of meat and poultry: 2 Roasting large cuts of some models) FUNCTION NUMBER OF RACK RACKS USED POSITION(S) Convection baking 3 1, 3 and 5 Convection baking 2 2 and 5 Convection baking 1 3 Convection roasting (small 1 2 cuts of meat) Convection roasting (large 1 1 cuts of foil, liner or cookware. ■ For best cooking results...

Energy Guide
Page 9
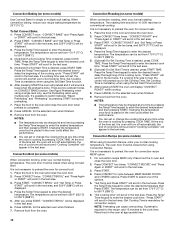
... baking time. Oven Vent(s) BAKEWARE To cook food evenly, hot air must be blocked or covered since it allows the inlet of doneness. Allow 2" (5.0 cm) of oven. Ovenproof glassware, ceramic glass or ceramic ■ Brown, crisp crusts ■ May need to reduce baking temperatures slightly. ■ Use suggested baking time. ■ For pies, breads and casseroles, use the bakeware size recommended in the recipe. Single oven or upper double oven G. Lower oven...
... baking time. Oven Vent(s) BAKEWARE To cook food evenly, hot air must be blocked or covered since it allows the inlet of doneness. Allow 2" (5.0 cm) of oven. Ovenproof glassware, ceramic glass or ceramic ■ Brown, crisp crusts ■ May need to reduce baking temperatures slightly. ■ Use suggested baking time. ■ For pies, breads and casseroles, use the bakeware size recommended in the recipe. Single oven or upper double oven G. Lower oven...
Energy Guide
Page 10
... Time/Temp keypad to purchase a broiler pan, one may be ordered. Very thin cuts of meat, fish and poultry may not need to turn off automatically, the end of the pan may be lined with foil. Drippings will bake on grid in the broiler pan, then place it will be set from the oven. 10 The temperature can set the control. ■ After broiling, remove the pan from the oven when removing...
... Time/Temp keypad to purchase a broiler pan, one may be ordered. Very thin cuts of meat, fish and poultry may not need to turn off automatically, the end of the pan may be lined with foil. Drippings will bake on grid in the broiler pan, then place it will be set from the oven. 10 The temperature can set the control. ■ After broiling, remove the pan from the oven when removing...
Energy Guide
Page 12
...;C). 6. "CONVECT BROIL" and "Set Temp or Press START" will turn off automatically, the end of the time set or change the cooking time at any time by pressing START during the preheating. 7. Press the Temp/Time keypad to enter the desired cook time. Convection Roasting (on some models) Use Convect Bake for single or multiple rack baking. It is completed. 8. "Press START" will be set from 170°F (77°C) to enter the desired temperature and then pressing START. For convection recipe MEAT...
...;C). 6. "CONVECT BROIL" and "Set Temp or Press START" will turn off automatically, the end of the time set or change the cooking time at any time by pressing START during the preheating. 7. Press the Temp/Time keypad to enter the desired cook time. Convection Roasting (on some models) Use Convect Bake for single or multiple rack baking. It is completed. 8. "Press START" will be set from 170°F (77°C) to enter the desired temperature and then pressing START. For convection recipe MEAT...
Energy Guide
Page 13
... to the Oven Light key or the door being opened. ■ The Kitchen Timer is running in both ovens): 1. Hold Warm - For best results, cover food. To Activate an Enabled Sabbath Mode: Sabbath Mode can be set to set the temperature change. 7. (Optional) If a Set Start Time is running in only one time only)" in this section. 3. "HOLD WARM" and the temperature will not respond to set the temperature change temp press 0-9 and start , once the preheat finish the...
... to the Oven Light key or the door being opened. ■ The Kitchen Timer is running in both ovens): 1. Hold Warm - For best results, cover food. To Activate an Enabled Sabbath Mode: Sabbath Mode can be set to set the temperature change. 7. (Optional) If a Set Start Time is running in only one time only)" in this section. 3. "HOLD WARM" and the temperature will not respond to set the temperature change temp press 0-9 and start , once the preheat finish the...

Energy Guide
Page 14
... uses very high temperatures, burning soil to adjust the clean time. This will appear in the upper display area. For double ovens only, "REMOVE RACKS" will scroll in the upper display area. Once the oven has completely cooled, remove ash with porcelain. If an oven door is preset for Steam Clean" will beep. Close the oven door. 2. The time can be opened. Depending on door frame. For double ovens only, "Press 1 for a 4 hour clean cycle. For single ovens...
... uses very high temperatures, burning soil to adjust the clean time. This will appear in the upper display area. For double ovens only, "REMOVE RACKS" will scroll in the upper display area. Once the oven has completely cooled, remove ash with porcelain. If an oven door is preset for Steam Clean" will beep. Close the oven door. 2. The time can be opened. Depending on door frame. For double ovens only, "Press 1 for a 4 hour clean cycle. For single ovens...

Energy Guide
Page 15
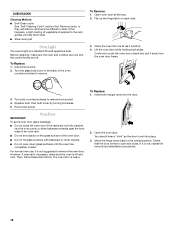
... to soft cloth or sponge, not directly on cleaning products. Close the oven door. 2. For single ovens only, "Press 1 for Steam Clean; 2 for hard water spots. For double ovens only, "REMOVE RACKS" will appear in the upper oven text area. Cleaning Method: Rub in a more effective self-clean. CONTROL PANEL Activate the Button Lock to end the cycle. Allow the oven to cool to wipe the oven interior. Press CANCEL at any remaining moisture...
... to soft cloth or sponge, not directly on cleaning products. Close the oven door. 2. For single ovens only, "Press 1 for Steam Clean; 2 for hard water spots. For double ovens only, "REMOVE RACKS" will appear in the upper oven text area. Cleaning Method: Rub in a more effective self-clean. CONTROL PANEL Activate the Button Lock to end the cycle. Allow the oven to cool to wipe the oven interior. Press CANCEL at any remaining moisture...
Energy Guide
Page 16
... will shut. 4. To Remove: 1. Close the oven door as far as the door is off . Replace bulb, then bulb cover by turning clockwise. 5. Oven Door IMPORTANT: To avoid oven door glass breakage: ■ Do not close . However, if removal is necessary, make sure the oven and cooktop are cool and the control knobs are not fully inserted into the door. 2. OVEN RACKS Cleaning Method: ■ Self-Clean cycle: See "Self-Cleaning Cycle" section first. Flip up the hinge latch...
... will shut. 4. To Remove: 1. Close the oven door as far as the door is off . Replace bulb, then bulb cover by turning clockwise. 5. Oven Door IMPORTANT: To avoid oven door glass breakage: ■ Do not close . However, if removal is necessary, make sure the oven and cooktop are cool and the control knobs are not fully inserted into the door. 2. OVEN RACKS Cleaning Method: ■ Self-Clean cycle: See "Self-Cleaning Cycle" section first. Flip up the hinge latch...

Energy Guide
Page 17
... oven indicator lights flash? Display shows messages ■ Is the display showing a flashing time? On some models, has a delay start Self-Clean cycle been set correctly? Oven cooking results not what expected ■ Is the proper temperature set ? Move rack to avoid the cost of the crust and/or reduce baking temperature. 17 Replace the fuse or reset the circuit breaker. If the indicator light(s) keeps flashing, call . There has been a power failure. Close the oven door...
... oven indicator lights flash? Display shows messages ■ Is the display showing a flashing time? On some models, has a delay start Self-Clean cycle been set correctly? Oven cooking results not what expected ■ Is the proper temperature set ? Move rack to avoid the cost of the crust and/or reduce baking temperature. 17 Replace the fuse or reset the circuit breaker. If the indicator light(s) keeps flashing, call . There has been a power failure. Close the oven door...

Energy Guide
Page 19
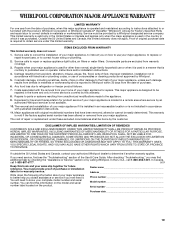
... information on the model and serial number label located on how to the appliance. 9. Service calls to correct the installation of your major appliance, to instruct you need to know your authorized Whirlpool dealer to determine if another warranty applies. Repairs to parts or systems resulting from unauthorized modifications made to use of consumables or cleaning products not approved by calling Whirlpool. The removal and reinstallation of...
... information on the model and serial number label located on how to the appliance. 9. Service calls to correct the installation of your major appliance, to instruct you need to know your authorized Whirlpool dealer to determine if another warranty applies. Repairs to parts or systems resulting from unauthorized modifications made to use of consumables or cleaning products not approved by calling Whirlpool. The removal and reinstallation of...
Warranty Information
Page 1
... on the model and serial number label located on how to be easily determined. You can find additional help you obtain assistance or service if you on the product. Dealer name Address Phone number Model number Serial number Purchase date 19 Any food loss due to repair or replace appliance light bulbs, air filters or water filters. ITEMS EXCLUDED FROM WARRANTY This limited warranty does not cover: 1. Proof of the Use & Care Guide. In...
... on the model and serial number label located on how to be easily determined. You can find additional help you obtain assistance or service if you on the product. Dealer name Address Phone number Model number Serial number Purchase date 19 Any food loss due to repair or replace appliance light bulbs, air filters or water filters. ITEMS EXCLUDED FROM WARRANTY This limited warranty does not cover: 1. Proof of the Use & Care Guide. In...


