
Installation Guide
Page 1
... ET DOUBLE Table of Contents/Table des matières BUILT-IN OVEN SAFETY 1 SÉCURITÉ DU FOUR ENCASTR 17 INSTALLATION REQUIREMENTS 2 Tools and Parts 2 Location Requirements 2 Electrical Requirements 5 INSTALLATION INSTRUCTIONS 6 Prepare Built-In Oven 6 Remove Oven Door 6 Positioning Oven Feet for local electrical inspector's use. Always read and obey...
... ET DOUBLE Table of Contents/Table des matières BUILT-IN OVEN SAFETY 1 SÉCURITÉ DU FOUR ENCASTR 17 INSTALLATION REQUIREMENTS 2 Tools and Parts 2 Location Requirements 2 Electrical Requirements 5 INSTALLATION INSTRUCTIONS 6 Prepare Built-In Oven 6 Remove Oven Door 6 Positioning Oven Feet for local electrical inspector's use. Always read and obey...

Installation Guide
Page 2
...to support a double oven weight of the oven. Tools needed ■ UL listed or CSA approved conduit connector ■ UL listed wire connectors Parts supplied ■ #8-14 x 1" screws - double oven ■ Four grommets - If you are shown must be made by a licensed,...°F (90°C). IMPORTANT: To avoid damage to undercounter installation instructions for wall cabinet installations) ■ Level ■ Flat-blade screwdriver Parts needed ■ Phillips screwdriver ■ Measuring tape ■ Hand or electric drill (for wall cabinet installations) ■ 1" (2.5 cm) drill...
...to support a double oven weight of the oven. Tools needed ■ UL listed or CSA approved conduit connector ■ UL listed wire connectors Parts supplied ■ #8-14 x 1" screws - double oven ■ Four grommets - If you are shown must be made by a licensed,...°F (90°C). IMPORTANT: To avoid damage to undercounter installation instructions for wall cabinet installations) ■ Level ■ Flat-blade screwdriver Parts needed ■ Phillips screwdriver ■ Measuring tape ■ Hand or electric drill (for wall cabinet installations) ■ 1" (2.5 cm) drill...

Installation Guide
Page 5
... VAC 208 VAC 2790 W 15.4 A 13.4 A 2820 W 15.5 A 13.6 A 5580 W 30.7 A 26.8 A 5610 W 30.8 A 27.0 A For power requirements for models WOS51EC7A, WOS51EC0A, WOD51EC7A, WOD51EC0A, WOS92EC7A, WOS92EC0A, WOD93EC7A, WOD93EC0A, MEW7527A, MEW7530A, MEW7627A, MEW7630A, MEW9537A, MEW9627A, MEW9530A and MEW9630A, refer to 7.4 kW at 208 volts) require a separate 20-amp circuit. ■ A circuit breaker... and the wire gauge are in conformance with the National Electrical Code, ANSI/ NFPA 70-latest edition or CSA Standards C22.1-94, Canadian Electrical Code, Part 1 and C22.2 No.
... VAC 208 VAC 2790 W 15.4 A 13.4 A 2820 W 15.5 A 13.6 A 5580 W 30.7 A 26.8 A 5610 W 30.8 A 27.0 A For power requirements for models WOS51EC7A, WOS51EC0A, WOD51EC7A, WOD51EC0A, WOS92EC7A, WOS92EC0A, WOD93EC7A, WOD93EC0A, MEW7527A, MEW7530A, MEW7627A, MEW7630A, MEW9537A, MEW9627A, MEW9530A and MEW9630A, refer to 7.4 kW at 208 volts) require a separate 20-amp circuit. ■ A circuit breaker... and the wire gauge are in conformance with the National Electrical Code, ANSI/ NFPA 70-latest edition or CSA Standards C22.1-94, Canadian Electrical Code, Part 1 and C22.2 No.

Installation Guide
Page 6
...-In Oven 1. Decide on a covered work surface. Avoid drilling or cutting into house wiring during installation. Locate the oven door latches in back or other parts from the foam strip and press it will no longer close to remove oven door(s). 1. A B 2. Do not use handle or any portion of the control...
...-In Oven 1. Decide on a covered work surface. Avoid drilling or cutting into house wiring during installation. Locate the oven door latches in back or other parts from the foam strip and press it will no longer close to remove oven door(s). 1. A B 2. Do not use handle or any portion of the control...

Installation Guide
Page 14
...a qualified technician. 7. Turn power on single oven models. Press BROIL on . 2. If you purchased your tools. 3. If there is an extra part, go back through the steps to see which step was skipped. 2. Press START. When oven has been on for heat. Press UPPER CANCEL/LOWER CANCEL...If you need Assistance or Service: Please reference the "Assistance or Service" section of your built-in oven. 14 Check Operation of /recycle all parts are now installed. For oven use , set up the clock and any other preferences if available. Check that all packaging materials. 4. At first...
...a qualified technician. 7. Turn power on single oven models. Press BROIL on . 2. If you purchased your tools. 3. If there is an extra part, go back through the steps to see which step was skipped. 2. Press START. When oven has been on for heat. Press UPPER CANCEL/LOWER CANCEL...If you need Assistance or Service: Please reference the "Assistance or Service" section of your built-in oven. 14 Check Operation of /recycle all parts are now installed. For oven use , set up the clock and any other preferences if available. Check that all packaging materials. 4. At first...

Energy Guide
Page 2
... happen if the instructions are very important. This is , tell you what the potential hazard is the safety alert symbol. TABLE OF CONTENTS OVEN SAFETY 2 PARTS AND FEATURES 4 ELECTRONIC OVEN CONTROLS 5 Display 5 Cancel 5 Oven Lights 5 Timer 5 Settings 6 Oven Temperature Control 7 Control Lockout 7 OVEN USE 8 Aluminum Foil 8 Positioning Racks and Bakeware 8 Bakeware...
... happen if the instructions are very important. This is , tell you what the potential hazard is the safety alert symbol. TABLE OF CONTENTS OVEN SAFETY 2 PARTS AND FEATURES 4 ELECTRONIC OVEN CONTROLS 5 Display 5 Cancel 5 Oven Lights 5 Timer 5 Settings 6 Oven Temperature Control 7 Control Lockout 7 OVEN USE 8 Aluminum Foil 8 Positioning Racks and Bakeware 8 Bakeware...

Energy Guide
Page 3
... surfaces may cause container to burst and result in an oven. ■ Do Not Use Water on Grease Fires - Moist or damp potholders on any part of the oven. ■ Wear Proper Apparel - Let hot air or steam escape before removing or replacing food. ■ Do Not Heat Unopened Food Containers... is in desired location while oven is hot, do not touch, or let clothing or other servicing should not be used in or around any part of the oven unless specifically recommended in color. If rack must be moved while oven is cool. Care should not be referred to cool. Children...
... surfaces may cause container to burst and result in an oven. ■ Do Not Use Water on Grease Fires - Moist or damp potholders on any part of the oven. ■ Wear Proper Apparel - Let hot air or steam escape before removing or replacing food. ■ Do Not Heat Unopened Food Containers... is in desired location while oven is hot, do not touch, or let clothing or other servicing should not be used in or around any part of the oven unless specifically recommended in color. If rack must be moved while oven is cool. Care should not be referred to cool. Children...

Energy Guide
Page 4
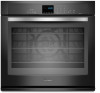
... different models. Oven vent C. Electronic oven control B. Lower oven (on center vent under control panel) D. Broil element E. Oven door lock latch and oven light switch F Parts and Features not shown Oven racks 4 The oven you have purchased may not match those of the items listed. A B C K D J I . Oven lights (left side not shown...
... different models. Oven vent C. Electronic oven control B. Lower oven (on center vent under control panel) D. Broil element E. Oven door lock latch and oven light switch F Parts and Features not shown Oven racks 4 The oven you have purchased may not match those of the items listed. A B C K D J I . Oven lights (left side not shown...
Energy Guide
Page 11
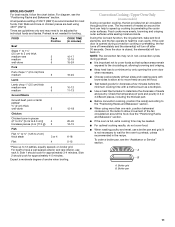
For diagram, see the "Assistance or Service" section. Fish fillets and bone-in 2 or 3 different places, including the thickest part. ■ Before convection cooking, position the rack(s) according to the "Positioning Racks and Bakeware" section. ■ When using 450°F (232°C) Times are guidelines ...
For diagram, see the "Assistance or Service" section. Fish fillets and bone-in 2 or 3 different places, including the thickest part. ■ Before convection cooking, position the rack(s) according to the "Positioning Racks and Bakeware" section. ■ When using 450°F (232°C) Times are guidelines ...

Energy Guide
Page 18
...the complete model and serial number of a service call us to better respond to local dealers, repair parts distributors, and service companies. Call the Whirlpool Customer eXperience Center toll free: 1-800-253-1301. Mississauga, Ontario L5N 0B7 Please include a daytime ...fulfill the product warranty and provide afterwarranty service, anywhere in Canada. Accessories Accessories U.S.A. To locate FSP® replacement parts in your nearest Whirlpool designated service center. Our consultants provide assistance with any questions or concerns at 1-866-664-2449 and follow the ...
...the complete model and serial number of a service call us to better respond to local dealers, repair parts distributors, and service companies. Call the Whirlpool Customer eXperience Center toll free: 1-800-253-1301. Mississauga, Ontario L5N 0B7 Please include a daytime ...fulfill the product warranty and provide afterwarranty service, anywhere in Canada. Accessories Accessories U.S.A. To locate FSP® replacement parts in your nearest Whirlpool designated service center. Our consultants provide assistance with any questions or concerns at 1-866-664-2449 and follow the ...

Energy Guide
Page 19
... installation of purchase or installation date for Factory Specified Parts and repair labor to parts or systems resulting from warranty coverage. 3. This major appliance is operated and maintained according to instructions attached to or furnished with the product, Whirlpool Corporation or Whirlpool Canada LP (hereafter "Whirlpool") will need to the appliance. 9. LIMITATION OF REMEDIES CUSTOMER...
... installation of purchase or installation date for Factory Specified Parts and repair labor to parts or systems resulting from warranty coverage. 3. This major appliance is operated and maintained according to instructions attached to or furnished with the product, Whirlpool Corporation or Whirlpool Canada LP (hereafter "Whirlpool") will need to the appliance. 9. LIMITATION OF REMEDIES CUSTOMER...
Warranty Information
Page 1
... not cover: 1. Repairs when your major appliance is located in a manner that have been removed, altered or cannot be provided by Whirlpool. 5. Expenses for travel and transportation for Factory Specified Parts and repair labor to correct defects in accordance with published installation instructions. 11. The removal and reinstallation of purchase. 6. This limited...
... not cover: 1. Repairs when your major appliance is located in a manner that have been removed, altered or cannot be provided by Whirlpool. 5. Expenses for travel and transportation for Factory Specified Parts and repair labor to correct defects in accordance with published installation instructions. 11. The removal and reinstallation of purchase. 6. This limited...


