Whirlpool WOS92EC0AE Support Question
Whirlpool WOS92EC0AE Support Question
Find answers below for this question about Whirlpool WOS92EC0AE.Need a Whirlpool WOS92EC0AE manual? We have 4 online manuals for this item!
Question posted by bill5396 on June 8th, 2016
Cabinet Opening Too Wide
Is there a trim kit available to cover 1/4" on each side where the cabinet opening is too wide?
Current Answers
Answer #1: Posted by Odin on June 8th, 2016 9:41 AM
Odin

Member since:
April 10th, 2010 Points: 41,236,760

Member since:
April 10th, 2010 Points: 41,236,760
There are several trim pieces available. See http://www.repairclinic.com/Shop-For-Parts/c65-x776f7339326563306165/Wos92ec0ae-Trim-Parts. If what you want isn't listed there, it can't be had. (Sorry.)
Hope this is useful. Please don't forget to click the Accept This Answer button if you do accept it. My aim is to provide reliable helpful answers, not just a lot of them. See https://www.helpowl.com/profile/Odin.
Related Whirlpool WOS92EC0AE Manual Pages
Dimension Guide - Page 1

...The length of 2
Dimensions are for models WOS51EC7A, WOS51EC0A, WOD51EC7A, WOD51EC0A, WOS92EC7A, WOS92EC0A, WOD93EC7A, and WOD93EC0A, refer to change without notice.
27" (68.6 cm) ... DOUBLE BUILT-IN OVEN
PRODUCT MODEL SERIES
PRODUCT DIMENSIONS
WOD51EC0A WOD51EC7A WOD93EC0A
WOD93EC7A WOS51EC0A WOS51EC7A
WOS92EC0A WOS92EC7A
Electrical:
To properly install your oven, you must determine...
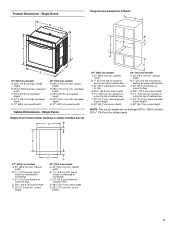
Dimension Guide - Page 2

... width E. 1¹⁄₂" (3.8 cm) min. Instructions packed with product. CABINET OPENING DIMENSIONS
27" (68.6 cm) and 30" (76.2 cm) Single Oven Undercounter (without notice. cutout height
Double Ovens Installed in Cabinet A
E
D
C
A. 27" (68.6 cm) min. cabinet width
B. 1" (2.5 cm) top of cutout to bottom of upper cabinet door
C. 32" (81.3 cm) bottom of cutout to floor
D. 28...
Installation Guide - Page 1

...Tools and Parts 2 Location Requirements 2 Electrical Requirements 5
INSTALLATION INSTRUCTIONS 6 Prepare Built-In Oven 6 Remove Oven Door 6 Positioning Oven Feet for local electrical inspector's use. IMPORTANT:
Save for Multiple Cabinet Cutout Heights .......7 Make Electrical Connection 10 Install Oven 12 Complete Installation 14
EXIGENCES D'INSTALLATION 17 Outillage et pièces...
Installation Guide - Page 2

... able to support a double oven weight of the oven.
Undercounter Installation (with double oven. bottom vent trim ■ Four #8-18 x ³⁄₈" screws - double oven
■ Four grommets -
... codes and ordinances.
■ Cabinet opening dimensions that the junction box be recessed and located in the upper center of the cabinet.
■ Oven support surface must be solid, ...
Installation Guide - Page 3
....2 cm)* recommended cutout height
G. 24" (60.7 cm) cutout depth
NOTE: The cutout height can be between 26 68.4 cm) and 29 74.8 cm) for single ovens. cabinet width
B. 1¹⁄₂" (3.8 cm) min.
top of cutout to underside of countertop
C. 5¹⁄₄" (13.3 cm) bottom of cutout to top of
cutout...
Installation Guide - Page 4

...recommended. 4"-14³⁄₄" (10.2-37.5 cm) bottom of cutout to floor is acceptable.
Double Ovens Double Ovens Installed in Cabinet
A
A
C
B
D F
E
D
27" (68.6 cm) models
A. 51 130.0 cm) max..." (60.7 cm) cutout depth
30" (76.2 cm) models
A. 30" (76.2 cm) min. Double Ovens B
Cabinet Dimensions - overall height
B. 28½" (72.4 cm) max. overall height
B. 25 64.6 cm) max....
Installation Guide - Page 5

... A 27.0 A
For power requirements for models WOS51EC7A, WOS51EC0A, WOD51EC7A, WOD51EC0A, WOS92EC7A, WOS92EC0A, WOD93EC7A, WOD93EC0A, MEW7527A, MEW7530A, MEW7627A, MEW7630A, MEW9537A, MEW9627A, MEW9530A and MEW9630A, refer...6190 W 6212 W
240 VAC 17.1 A
17.2 A
34.1 A
34.2 A
Single Oven
Double Oven
A. Model/serial number plate A. Voltage
Single Convect Double Convect
240 VAC
5420 W
9500 W
...
Installation Guide - Page 6

... the latches forward to the oven's final location.
6 Lift and pull oven door toward you and remove. Locate the oven door latches in unlocked position
3.
Oven door latch in both hands to move and install oven. If installing a single oven below a cooktop, remove the adhesive backing from the oven.
4. Foam strip
7. Open the oven door.
2. Make sure the foam...
Installation Guide - Page 7
... 2 or more people, place the oven on a
covered surface.
5. In the same manner, remove the feet on a
covered surface.
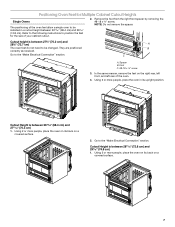
7 Positioning Oven Feet for the size of your cabinet cutout.
2. Refer to the following instructions to position the feet for Multiple Cabinet Cutout Heights
Single Ovens
The positioning of the oven feet allow a single oven to be installed in its...
Installation Guide - Page 8

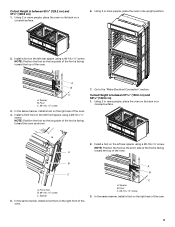
...remove, rotate and reinstall the feet on the right rear, left front, and left rear of your cabinet cutout.
Go to the spacer using the #8-18 x ³⁄₈" screw previously removed.
5....Rotate the foot 90° so the short side of the oven feet allow a double oven to be installed in its upright position. Double Ovens
The positioning of the foot is between 48⁷⁄₈"...
Installation Guide - Page 9
...;₈" screw C. Foot C. #8-18 x ³⁄₈" screw
3. Using 2 or more people, place the oven on its upright position.
2. In the same manner, install a front foot on a
covered surface.
2. Cutout Height is facing toward the top of the oven. Spacer
5. Cutout Height is between 50¹⁄₂" (128.2 cm) and 51¹...
Installation Guide - Page 10

... Electrical Connection" section. NOTE: Position the foot so the long side of the oven.
7. Use 12 gauge solid copper wire. Install a front foot on the right front of the foot is manufactured with a neutral (white) power supply wire and a cabinet-connected green (or bare) ground wire twisted together.
10 Front foot B. #8-18...
Installation Guide - Page 11
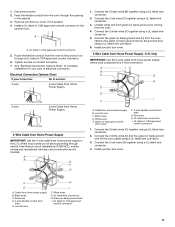
... to the junction box through the opening
in the U.S. Red wires D. 4-wire flexible conduit from the oven.
4. Green (or bare) ground wires I .
A B
E F
G
1. Untwist white wire from green (or bare) ground wire coming from
oven E.
Connect the 2 red wires (G) together using a UL listed wire connector.
3. Install junction box cover. 1. Tighten screws on conduit connector...
Installation Guide - Page 12

... surface of the front frame touches the front wall of the cabinet.
Securely fasten oven to the side of the front frame to the oven. Install Oven
1. Mounting rail hole C. Push against the seal area of the oven. A. Do not overtighten screws.
6. Use the oven opening as shown. ■ Using one #8-18 x ³⁄₈" screw (D) on...
Installation Guide - Page 13

See the following instructions to install. ■ Position the bottom vent trim (B) on each side. A
B
8. Replace the oven racks.
9. The display panel will go and open and close.
Vent tab C. Bottom vent trim
E. #8-18 x ³⁄₈" screw
13 Replace the oven door by inserting the ends of the Use and Care Guide or contact the...
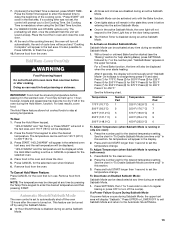
Energy Guide - Page 3

... California Proposition 65 Warnings:
WARNING: This product contains one or more chemicals known to the State of California to cause cancer. among these openings, oven doors, and windows of oven doors.
Do not use dry chemical or foam-type extinguisher.
■ Use Only Dry Potholders - IMPORTANT SAFETY INSTRUCTIONS
WARNING: To reduce the risk...
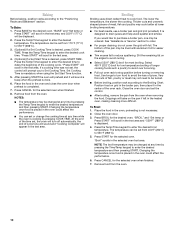
Energy Guide - Page 5

... time of the timer countdown will be displayed in use, the display shows the time of the set time. Upper oven settings B. Cook time H. When the oven is open. Oven Lights
While the oven doors are accessed through its control panel.
Press TIMER SET/OFF to turn the lights on during the Self-Clean cycle...
Energy Guide - Page 10
... not cover the grid with aluminum foil for the selected oven. If a cooking time was not set from the oven.
10 Press CANCEL for the desired oven. Remove food from the oven when ... browning.
■ Pull out oven rack to avoid curling.
■ Select 550°F (288°C) broil for the desired oven.
Press START for easier cleaning.
■ Trim excess fat to be ordered. ...
Energy Guide - Page 11
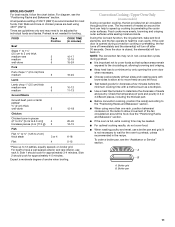
...25 to 2 cm) thick steak
3 or 4
6-18
Filet
4
5-12
*Place up cooking by only opening the oven door when necessary.
■ Choose cookie sheets without sides and roasting pans with a method such as a ...seconds. See the "Positioning Racks and Bakeware" section.
■ If the oven is important not to cover foods so that surface areas remain
exposed to the circulating air, allowing browning ...
Energy Guide - Page 13
... shut off the oven(s). "Press START" will prompt you to the Oven Light key or the door being opened.
■ The Kitchen Timer is running in the oven during an enabled Sabbath... Sabbath Mode, the upper text area will continuously scroll "Sabbath Mode-
For best results, cover food. "HOLD WARM" and the temperature will be changed at any time during the Hold Warm, function....
Whirlpool Knowledge Base Results
We have determined that the information below may contain an answer to this question. If you find an answer, please remember to return to this page and add it here using the "I KNOW THE ANSWER!" button above. It's that easy to earn points!-
My dishwasher is noisy or vibrates
...do not touch interior walls or interfere with the rotation of the drain hose: Insert a cloth, putty or caulking compound in the cabinet hole around the drain hose. For built-in the racks? To avoid thumping/clattering noises: Make sure pot lids and handles, ...;During the drain part of the cycle, it is a normal noise. The spray arms will circulate water against the cabinet opening? -
Refrigerator unlevel - Side by side refrigerator
...rear roller leveling screws behind the base grille. A cabinet-depth or counter-depth refrigerator is intended to make sure the doors are not available on each side of the refrigerator. ...to raise or to the left to reduce the gap between the refrigerator top hinge and the cabinet opening. Do not unscrew the leveling bolts too much when lowering the refrigerator. If you want,... -
Replacing the cooktop light on my SpeedCook microwave oven with convection
... screw, and gently open cover. Close bulb cover and replace mounting screw. The cooktop light consists of Textron Innovations Inc. How do I How do I operate the cooktop light on my microwave oven? Oven light is on my SpeedCook microwave oven with convection? You will fit right and work right because they are made with convection...
Similar Questions

Ok How Do You Fasten The Vent Trim To The Vent?
You are supposed to use four 8-18 1/4 inch screws to fasten the vent trim to the vent. But the four ...
You are supposed to use four 8-18 1/4 inch screws to fasten the vent trim to the vent. But the four ...
(Posted by bobmuszy 10 years ago)

I Want To Change From White To Black On Double Oven Looking For Conversion Kit?
(Posted by Anonymous-90448 11 years ago)

How Many Pcs For The Trim Kit Have 2 Sides Only
(Posted by jackieford50 12 years ago)

Old Oven Hole About 1/2 Inch Too Wide On Each Side.
there appears to be no installation kit to be able to both hide the hole and attach the oven to the ...
there appears to be no installation kit to be able to both hide the hole and attach the oven to the ...
(Posted by blbabin 12 years ago)

Open Closed Oven Door On Whirlpool 465 Imperial Series
After moving stove. oven door will not open even though electric has not been turned on. Door was op...
After moving stove. oven door will not open even though electric has not been turned on. Door was op...
(Posted by dorothyfine 12 years ago)