Ricoh Pro C651EX Support Question
Ricoh Pro C651EX Support Question
Find answers below for this question about Ricoh Pro C651EX.Need a Ricoh Pro C651EX manual? We have 1 online manual for this item!
Question posted by alisonwiblin on September 26th, 2014
How Do You Set The Cover Slip Sheet Tray?
I want to print with a different paper for the back and front paes
Current Answers
Answer #1: Posted by freginold on September 26th, 2014 3:14 AM
freginold

Member since:
December 20th, 2011 Points: 23,253,885

Member since:
December 20th, 2011 Points: 23,253,885
Hi, you can set the cover tray and slip tray in User Tools. Press the User Tools/Counter button, then select System Settings, then Tray Paper Settings. The Cover Tray and Slip Sheet Tray settings will be at the bottom of the list.
Related Ricoh Pro C651EX Manual Pages
Quick Reference Guide - Page 2
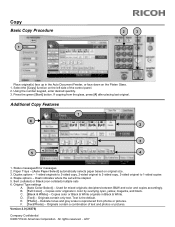
... Trays -- [Auto Paper Select] automatically selects paper based on the Platen Glass. 1. Used for mixed originals; B. [Full Color] -- D. [Text] -- F. [Text/Photo] -- Sort (collated) or Stack (non-collated) multiple sets 6. Version 2.0 (26376)
Company Confidential ©2007 Ricoh Americas Corporation. Staple options -- E. [Photo] -- Copies color or Black & White originals in color...
Quick Reference Guide - Page 3
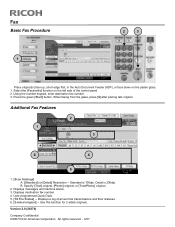
Press the green [Start] button. Additional Fax Features
2
1 3
6
4
5
1. [Scan Settings] A. [Standard] or [Detail] Resolution -- B. Specify [Text] original, [Photo] original, or [Text/Photo] original.
2. Displays a log of the control panel. 2.
Displays messages and machine status. 3. User-...
Quick Reference Guide - Page 4

... the body of the scan will be selected. 7. Some MFPs may be received as a separate attachment. Additional Scan Features
1
6
2
3
4
5
7
1. [Scan Settings] changes the default Text selection. Select destinations from available B/W or Color settings. 2. [Original Feed Type] allows for scanning 2-sided originals and Batch scanning. 3. [File Name/Type] is used to the e-mail...
Quick Reference Guide - Page 5
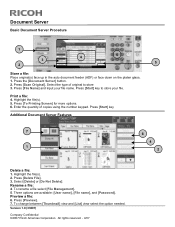
Press the [Document Server] button. 2.
Press [To Printing Screen] for more options. 6. Press [Start] key
Additional Document Server Features
7
6
4
1
2
Delete a file:
1. Press [Delete File]. 3. Select [Delete] or [Do Not Delete].... between [Thumbnail] view and [List] view select the option needed. Enter the quantity of original to store your file name.
Print a file:
4.
Quick Reference Guide - Page 6
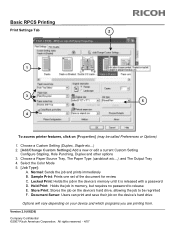
... requires no password to be called Preferences or Options)
1. Choose a Paper Source Tray, The Paper Type (cardstock etc...), and The Output Tray 4. Hold Print: Holds the job in the device's memory until it is released with a password D. Basic RPCS Printing
Print Settings Tab
2
1
3 5
4
To access printer features, click on [Properties] (may be reprinted F. Version 2.0 (68236) Company...
Quick Reference Guide - Page 7
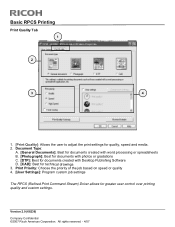
... Publishing Software D. [CAD]: Best for quality, speed and media. 2. Version 2.0 (68236)
Company Confidential ©2007 Ricoh Americas Corporation. All rights reserved. - 4/07
Print Priority: Choose the priority of the job based on speed or quality 4. [User Settings]: Program custom job settings
The RPCS (Refined Print Command Stream) Driver allows for greater user control over...
Quick Reference Guide - Page 8
... rights reserved. - 1/08
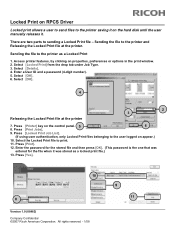
9 11 There are two parts to the user logged on appear.)
10. Sending the file to the printer and Releasing the Locked Print file at the printer
2 3
7. Press [Print Jobs].
9. Enter the password for the stored file and then press [OK]. (This password is the one that was stored as a Locked...
Quick Reference Guide - Page 9
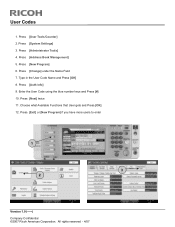
Press [Administrator Tools] 4. Press [Exit] or [New Program] if you have more users to enter
1
3 2
Version 1.0 (-----) Company Confidential ©2007 Ricoh Americas Corporation. Press [System Settings] 3. Press [New Program] 6. Choose what Available Functions that User gets and Press [OK] 12. All rights reserved. - 4/07 Press [Change] under the Name Field 7. User ...
Quick Reference Guide - Page 11
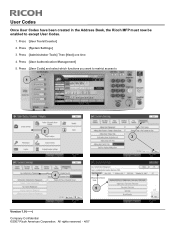
... have been created in the Address Book, the Ricoh MFP must now be enabled to
1
2 3
4 5
Version 1.0 (-----) Company Confidential ©2007 Ricoh Americas Corporation. Press [System Settings] 3. Press [Administrator Tools] Then [Next] one time 4. All rights reserved. - 4/07 Press [User Tools/Counter] 2. Press [User Authentication Management] 5. Press [User Code] and select which...
Quick Reference Guide - Page 12
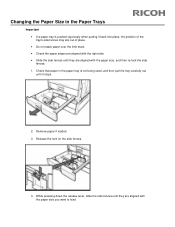
... the paper size you want to load. Changing the Paper Size in the paper tray is pushed vigorously when putting it stops.
2. Remove paper if loaded. 3. Check that paper in the Paper Trays
Important • If a paper tray is not being used, and then pull the tray carefully out until it back into place, the position of the tray's side fences may slip out...
Quick Reference Guide - Page 13
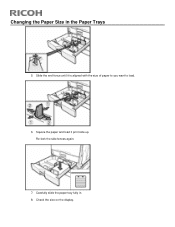
Re-lock the side fences again.
7. Carefully slide the paper tray fully in the Paper Trays
5. Square the paper and load it is aligned with the size of paper to you want to load.
6. Slide the end fence until it print side up. Changing the Paper Size in . 8. Check the size on the display.
Quick Reference Guide - Page 14

... want to load A4 paper, contact your service representative. • Each tray can load paper even while making copies from tray 1. Adding Paper into tray 1 (tandem tray), follow these steps: 1. Carefully pull out the paper tray until it print side down. • Whole tray pulled out
• Left half of the tray. • Tray 1 uses 81/2 11 paper. If you to 1,100 sheets of the paper...
Quick Reference Guide - Page 15
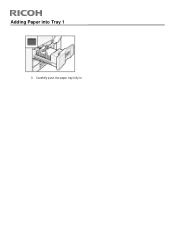
Carefully push the paper tray fully in. Adding Paper into Tray 1
3.
Quick Reference Guide - Page 16
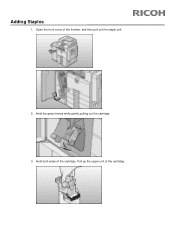
Adding Staples
1. Pull up the upper unit of the cartridge. Hold the green levers while gently pulling out the cartridge. 3. Hold both sides of the cartridge. Open the front cover of the finisher, and then pull out the staple unit.
2.
Quick Reference Guide - Page 18
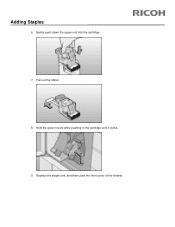
Pull out the ribbon.
8. Replace the staple unit, and then close the front cover of the finisher. Hold the green levers while pushing in the cartridge until it clicks.
9. Gently push down the upper unit into the cartridge.
7. Adding Staples
6.
Quick Reference Guide - Page 19
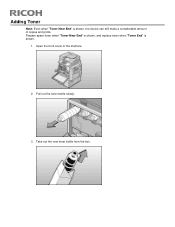
Pull out the toner bottle slowly.
3. Prepare spare toner when "Toner Near End" is shown, and replace toner when "Toner End" is shown, the device can still make a considerable amount of the machine.
2. Open the front cover of copies and prints. Adding Toner
Note: Even when "Toner Near End" is shown.
1. Take out the new toner bottle from the box.
Quick Reference Guide - Page 20
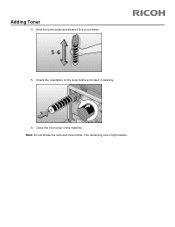
The remaining toner might scatter. Close the front cover of the toner bottle and insert it five or six times.
5. Note: Do not shake the removed toner bottle. Check the orientation of the machine. Adding Toner
4. Hold the toner bottle and shake it carefully.
6.
Similar Questions

Wanted Soft Copy Of A Ricoh C651ex Manual Including Installation Guide
Does anyone have a soft copy of a Ricoh C651EX manual including installation guide.
Does anyone have a soft copy of a Ricoh C651EX manual including installation guide.
(Posted by mlucas44197 2 years ago)

Ricoh C651ex Printer
ricoh c651ex hi Sir i am going to purchase this machine is it ok for my printing press
ricoh c651ex hi Sir i am going to purchase this machine is it ok for my printing press
(Posted by skkushubalu 3 years ago)

How Do I Set The Duplex Unit As Printer Says Duplex Unit Is Not Set Correctly Ho
How Do I Set The Duplex Unit As Printer Says Duplex Unit Is Not Set Correctly
How Do I Set The Duplex Unit As Printer Says Duplex Unit Is Not Set Correctly
(Posted by binushanmukhan96 3 years ago)

How Do I Set The Duplex Unit As Printer Says Duplex Unit Is Not Set Correctly
bought my son this for christmas last year and has never worked from then so i have tried now with n...
bought my son this for christmas last year and has never worked from then so i have tried now with n...
(Posted by rickieanderson003 8 years ago)

What Is The Difference Between The Ricohpro C651ex And The Ricohpro C651?
(Posted by Anonymous-102736 11 years ago)