
Pioneer VSX-831 Support Question
Pioneer VSX-831 Support Question
Find answers below for this question about Pioneer VSX-831.Need a Pioneer VSX-831 manual? We have 1 online manual for this item!
Question posted by gregoryger on January 23rd, 2022
Error Message Ng:lcrslsr
hello, i ve got a message when power on NG:LCRSLSR, and nothing can be done
Current Answers
Answer #1: Posted by SonuKumar on January 24th, 2022 8:38 AM
SonuKumar

Member since:
May 9th, 2021 Points: 16,622,780

Member since:
May 9th, 2021 Points: 16,622,780
https://forums.tomsguide.com/threads/pioneer-vsx-831-amp-fault-protection-mode.459653/
https://www.fixya.com/support/t27406474-cannot_resolve_pioneer_vsx_1131_error
https://jp.pioneer-audiovisual.com/manual/16avr/ts/1/en/002.html
Please respond to my effort to provide you with the best possible solution by using the "Acceptable Solution" and/or the "Helpful" buttons when the answer has proven to be helpful.
Regards,
Sonu
Your search handyman for all e-support needs!!
Answer #2: Posted by Nomvelos on January 23rd, 2022 1:20 PM
Nomvelos

Member since:
November 5th, 2021 Points: 1,680
Member since:
November 5th, 2021 Points: 1,680
hello there 2 transistor 1 for the right channel and 1 for the left first thing 2 do is a visual check in good light check for any burn't part or any bulging capacitors if everythink looks ok then check underneath the board for dry joints if then you will need a mulitmeter to start testing components
Rina Sihlahla
Related Pioneer VSX-831 Manual Pages
Basic Manual - Page 1
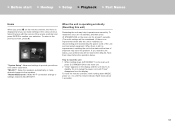
....html Advanced Manual found here > Before start > Hookup > Setup > Playback > Part Names
Basic Manual
VSX-831
AV Receiver
Hookup Step1: Connect the Speakers 3 Step2: Connect the TV 5 Step3: Connect the AV Components 7 Step4: Connect Other Cables 10 Setup Step5: Power On & Initial Setup 11 HDMI Setup 12 Playback Basic Playback 13 Network Functions 14...
Basic Manual - Page 2
... off
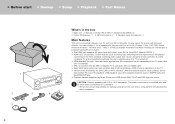
$ HDMI Standby Through: Video and audio signals from the connection of speakers to this
unit is connected between your TV and your AV components. Jacks IN1 to 3 and OUT support ...the input selector. The power cord must be connected only after all other cable connections are completed. 0 We will not accept responsibility for damage arising from AV components can connect 5.1ch of...
Basic Manual - Page 3
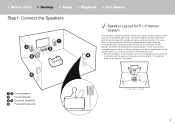
... front stereo sound and a center speaker outputs center sound such as 0.1 of a channel, giving us the name 5.1ch system.
1 2 Front Speakers 3 Center Speaker 4 5 Surround Speakers 6 Powered Subwoofer
ˎ1 ˎ2
ˎ 1: 22e to 30e, ˎ 2: 120e
3 Surround speakers create back sound field. Placing it between the center speaker and a front speaker gives...
Basic Manual - Page 4
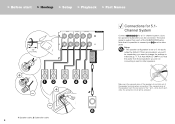
... by default. If there are not connecting is set to other speakers. Note that the audio from each other jacks. The same signal is possible to two powered subwoofers can be connected. Up to connect just 12 and no other , the protection circuit will be connecting, you won't be activated.
2
1 Speaker cable...
Basic Manual - Page 5

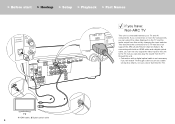
... to the TV's operation manual for directions on the TV that supports the ARC (Audio Return Channel) feature. If you connect two or more AV components, you have: ARC TV
This unit is connected between your TV and AV components. Setup 0 Settings are the connections for the TV.
1
HDMI IN (ARC)
TV
1 HDMI...
Basic Manual - Page 6
...a cable set-top box (that does not support the ARC (Audio Return Channel) feature. If you connect two or more AV components, you can also play the sound from this unit. 0 Connection...by changing the input selector. This describes the connections for a TV that is connected between your TV and AV components. > Before start > Hookup > Setup > Playback > Part Names
if you have: Non-ARC TV
This...
Basic Manual - Page 7

... HDMI cable
7 Setup 0 HDMI setup ( P12) is in standby mode. 0 To play video and audio from AV components on the TV even when this unit is required to "Bitstream output" on the connected Blu-ray Disc ...which allows you can use features such as the HDMI CEC feature that links with an AV component that conforms with the CEC (Consumer Electronics Control) standard, you to play 4K or 1080p video...
Basic Manual - Page 8
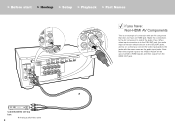
... VIDEO IN jack will be to the CBL/SAT jacks, and so on, so that does not have : Non-HDMI AV Components
This is to the CBL/SAT jack, the audio input connection should also be upconverted to HDMI signals and then output from the HDMI OUT jack.
1
Cable/Satellite set-top...
Basic Manual - Page 9
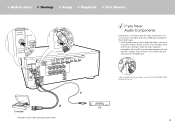
... has a ground wire, connect it
to the SIGNAL GND terminal of this unit.
1
CD 9 Further, if the turntable uses an MC type cartridge, install an audio equalizer compatible with an audio component. You can connect a turntable that has an MM-type cartridge to the PHONO jack. 0 If the turntable has a built-in...
Basic Manual - Page 10
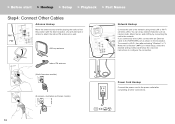
You can enjoy network features such as shown in the illustration. Indoor FM antenna (North American models)
(European, Australian and Asian models)
Power Cord Hookup
Connect the power cord to the power outlet after selecting "Wireless" in Initial Setup, select the desired setting method and follow the onscreen instructions to configure the connection. Use...
Basic Manual - Page 11
... When you turn the unit on for the first time, Initial Setup is interrupted, turn the power on the way or want to change the TV's input to make settings required for each speaker,... Setup" -
> Before start > Hookup > Setup > Playback > Part Names
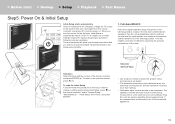
Step5: Power On & Initial Setup
Initial Setup starts automatically Once all connections are complete, change a setting made during measurement.
Basic Manual - Page 12
... ^ \
̺
A/a
Ɵ
ơ
OK
When finished, select the "OK" key.
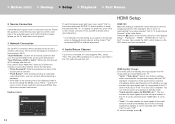
Audio Return Channel" in plain text, press +Fav on and you can connect without entering a password. ...for BD/DVD, etc.": You can reduce power consumption in the screen listing the SSIDs, select... (Eco)": Select one of these settings
when connected AV components comply with "ˎ" or display it in the Initial ...
Basic Manual - Page 13
... a variety of :
13 If content you play is standard for DTS-HD Master Audio. Press the input selector (a) on the input signal and speaker
configuration, the Dolby PL...
> Before start > Hookup > Setup > Playback > Part Names
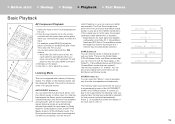
Basic Playback
a f
b e d c
AV Component Playback
1. Switch the input on the listening modes, see the Advanced Manual. Press TV to adjust the volume. Use...
Basic Manual - Page 15
... the control center of the iOS
device and select this unit will be on, so when you press BT AUDIO on the computer with all BLUETOOTH enabled devices. To reduce the amount of power consumed in standby mode, press the button on the remote controller, then in iTunes, select this unit from...
Basic Manual - Page 16

.... "AM/FM Frequency Step" or "AM Frequency Step" and select the frequency step for compressed audio.
16 AV Adjust
By pressing the button on the remote controller to register the station.
Press ..., so that the "TunMode: Auto" is found. You can preset up to adjust the audio delay when
the video is flashing. When deleted, the number on the display flashes. 3.
Frequency...
Basic Manual - Page 17
...to the defaults. If you reset the unit status, your selection. Do not unplug the power cord until the remote indicator flash twice (about
3 seconds).
17 To return to the equalizer... When there is still no improvement even after the unit is restarted, try disconnecting and reconnecting the power cords of the unit and connected equipment. > Before start > Hookup > Setup > Playback > ...
Basic Manual - Page 18
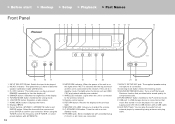
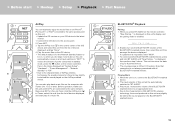
...mode. 6. +FAVORITE button: Registers a radio station. 7. AUX INPUT jack: You can also supply power (5V/1A) to the network. PURE DIRECT button: Swithes to be played. WIRELESS indicator: Lights ...audio from an external player by connecting using the TUNER, select the frequency with TUNE , or select preset stations with PRESET .
18
18
19 20
10.NETWORK indicator: When the power ...
Basic Manual - Page 19
... > Hookup > Setup > Playback > Part Names
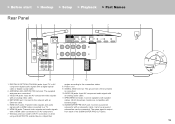
Rear Panel
1
23
4
5
6
7
8
9
10
1. DIGITAL IN OPTICAL/COAXIAL jacks: Input TV or AV component digital audio signals with an analog video cable.
4. Power cord 9. VIDEO IN jacks: Input the AV component video signals with a digital optical cable or digital coaxial cable.
2. Adjust their
11
12
angles according to two...
Basic Manual - Page 20
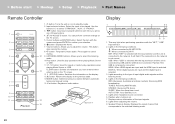
...6. CLEAR button: Deletes all characters you to cancel
muting.
4
12 9. button: Temporarily mutes audio. AUTO STBY: Auto Standby is connected to a station between automatic
7
tuning and manual tuning....the digital input is not properly connected. Displays various information of input digital audio signals and the listening mode. 4. STEREO: Receiving FM stereo. button: ...
Basic Manual - Page 21
... i dispositivi abilitati al BLUETOOTH. This product is protected by the developer to Hi-Res Audio standard defined by Bluetooth SIG, Inc. Use or distribution of such technology outside of Microsoft... locales. Google Cast and the Google Cast badge are registered trademarks owned by Japan Audio Society. "Tutti gli altri marchi di fabbrica sono di proprietà dei rispettivi ...
Similar Questions


Receiver Turns Off After Turning On With A Mcacc Error Message.
My Av receiver, turns on for about 3 seconds. The Mcacc lights up in red then cuts off. I tried the ...
My Av receiver, turns on for about 3 seconds. The Mcacc lights up in red then cuts off. I tried the ...
(Posted by Davidrny7 6 years ago)

My Pioneer Vsx-1021 Randomly Changes Sources When Powering On
(Posted by Amostaters 9 years ago)

Vsx-821-k Will Not Stay Powered On, Turns On For 1 Second Then Shuts Off.
(Posted by lilRaewet 10 years ago)

Vsx522k Receiver Gives Error Message 'no Devise' When I Plus In Itouch.
(Posted by vigorsb 11 years ago)