Pioneer AVM-P8000R Support Question
Pioneer AVM-P8000R Support Question
Find answers below for this question about Pioneer AVM-P8000R.Need a Pioneer AVM-P8000R manual? We have 1 online manual for this item!
Question posted by Anonymous-49846 on January 29th, 2012
What Is The Green Wire On The Back Of The Pioneer Avm P8000r
The person who posted this question about this Pioneer product did not include a detailed explanation. Please use the "Request More Information" button to the right if more details would help you to answer this question.
Current Answers
Related Pioneer AVM-P8000R Manual Pages
Owner's Manual - Page 1
Audio Visual Master Unit
ENGLISH
Before Using This Product
Owner's Manual
AVM-P8000R
This product conforms to CEMA cord colors.
Owner's Manual - Page 6
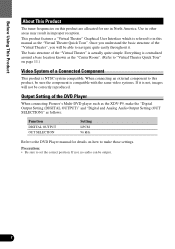
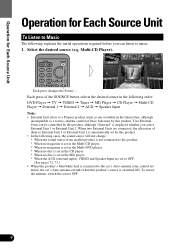
..., be correctly reproduced. Once you understand the basic structure of the DVD Player
When connecting Pioneer's Multi-DVD player such as the XDV-P9, make those settings.
Precaution: • Be...SELECTION
Setting LPCM 96 kHz
Refer to the DVD Player manual for details on page 11.)
Video System of the "Virtual Theater" is referred to set the correct position.
The basic structure...
Owner's Manual - Page 7
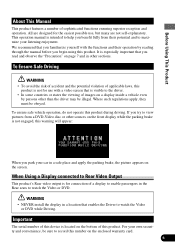
... the Video
or DVD while Driving. Important
The serial number of this device is for connection of a display to enable passengers in the Rear seats to Rear Video Output
This product's Rear video output...are designed for use with the functions and their potential and to watch the Video or DVD.
For your car in a safe place and apply the parking brake, the picture appears on the...
Owner's Manual - Page 10
...2. DISP
Each press changes the Source ... Two External Units can listen to a Pioneer product (such as one available in the future) that, although
incompatible as a...the MD player. * When the AUX (external input), VIDEO and Speaker Input are connected, the allocation of basic functions by this product....lead is connected to the car's Auto-antenna relay control ter-
To retract the antenna, switch the source...
Owner's Manual - Page 11
...
selected with the TV Tuner is displayed.) • To select the VIDEO mode, switch the VIDEO mode ON in the Set Up Menu. (See page 15.)
3. DISP
...Mobile Navigation Unit (NAVI) = TV Tuner Unit (BGTV) = Video (BGVTR) Note: • Select "Source Screen" to hear/view playback of normal audio/video sources. • You can select the Pioneer Mobile Navigation Unit only when that unit is switched on. &#...
Owner's Manual - Page 15

... Plate
• For DVDs, Video CDs and CDs, indications appear on the Source Plate as follows: For DVDs: Title list only For Video CDs: Title list and "Title Edit" for title input For CDs: Title list, "Title Edit" for 2 seconds scrolls the upper title.
7 External Devices
External Devices are VIDEO, AUX, Speaker Input and External...
Owner's Manual - Page 16

... navigation manual.) • Select the "NAVI" by moving the joystick. To select the Video mode, switch the Video in green. 3.
Note: • You can switch the picture (separately from the audio) of ... Navigation Picture
You can select the Pioneer Mobile Navigation Unit only
when that unit is switched on this product. Select "Video" by moving the joystick. Press the RETURN button.
Owner's Manual - Page 19

..." screen appears.
5. You can independently adjust Video, DVD and TV Tuner unit picture quality. dish to the picture quality when viewing with the car courtesy light ON or OFF, and store both...not perform an operation within
about 30 seconds, the "PICTURE ADJUST" screen is highlighted in green.
4. Press the MENU button.
The selected option is automatically canceled.
18
Adjust the ...
Owner's Manual - Page 28

...the tuner automatically seeks out the TP station with "Function" highlighted in green.
5. You go back to a TP station.
2. "Traffic"
Car icon
Note:
• The system switches back to the original source....
• The TA function can be activated from the display. (During
seek operation, Car icon disappears.)
• Only TP stations are tuned in a TP station by clicking the...
Owner's Manual - Page 33

... the RETURN button.
32 Click the joystick. The main menu icons whirl down, with "Function" highlighted in green.
4. Operation at the Function Menu Screen (CD)". (See page 35.)
Accessing the DVD Function Menu (DVD, Video CD)
Begin play of each function. The DVD Function Menu appears, offering you the following options:
7 DVD...
Owner's Manual - Page 34

... RPT
Display Chapter RPT Title RPT Disc RPT
Repeat range Chapter Repeat Title Repeat Disc Repeat
7 Video CD Disc RPT = Track RPT
Display Track RPT Disc RPT
Repeat range Track Repeat Disc Repeat
...
Each click changes repeat range in green. 2. Check to see "RPT" is highlighted in play range from the chapter (track), title or disc currently in green. 2. Multi-DVD Player
Operating Each ...
Owner's Manual - Page 35

... needing to go to the Function Menu each time, do the following order: Pause = RPT Mode
Press the PGM button when playing a DVD or Video CD in green.
2.
Repeat play (RPT Mode)
Switch repeat range
--- Select "PGM" by moving the joystick. Multi-DVD Player
34 PGM button
You can create a shortcut for...
Owner's Manual - Page 36

... the option by moving the joystick. Exit from the DVD Function Menu.
1. The selected option is highlighted in green.
2. The main menu icons whirl down, with "Function" highlighted in green.
4. When playing DVDs and Video CDs, refer to detailed operation of a disc before selecting options from the DVD Function Menu (CD)
• Press...
Owner's Manual - Page 67

...switching between sources. The SLA Setting Menu appears, with the selected source's level highlighted in green.
2. The display shows "+8" -
Select "SLA" by moving the joystick.
Increase or decrease...-DVD player MD player TV, Video AUX, Speaker Input External 1, External 2
Note: • Since the FM volume is the control, SLA is highlighted in green.
3. Adjusting Audio
Source Level ...
Owner's Manual - Page 73
.... Each click toggles AUX On/Off.
3. Continued overleaf.
72 "AUX" is highlighted in green.
2. Click the joystick. Select "AUX" by moving the joystick. Other Functions
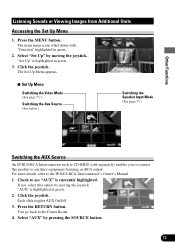
Listening Sounds ...button. The main menu icons whirl down,with "Function" highlighted in green.
3. The Set Up Menu appears.
7 Set Up Menu
Switching the Video Mode (See page 73.)
Switching the Aux Source (See below.)...
Owner's Manual - Page 74

"Off" is highlighted in green. 2.
Each click toggles Video On/Off. 3. You go back to the Center Room. 4. Click the joystick. Each click toggles SP Input/Off. 3. Press the RETURN button. Other Functions
Switching the Video Mode
When connecting an external video component to the speaker input terminal, switch the Speaker Input mode ON. 1.
Press...
Owner's Manual - Page 78

... the unused speaker leads without fail. Do not route wiring in the speakers catching fire, emitting smoke or becoming ...wiring shortcircuiting to the vehicle body. • Don't pass the yellow lead through the blue/white lead. Connect to 8 ohms. Connecting speakers with cable clamps or adhesive tape. The current capacity of 4 to an external power amp's system remote control or the car...
Owner's Manual - Page 84

... the Multi-DVD player)
RCA cable (supplied with the Multi-DVD player)
Green
3 m IP-BUS cable
(supplied)
Multi-DVD player
(sold separately)
6 m
Blue
To Front video output
Black
Yellow (FRONT VIDEO Black OUTPUT)
83 Connecting the System (A)
Installation
This Product
Gray Green
Yellow Red Black
Blue
3 m AV cable (supplied)
Red RGB cable (supplied ) 1.5 m
Yellow...
Owner's Manual - Page 86

... with the Multi-DVD player)
Gray
3 m IP-BUS cable
(supplied)
Multi-DVD player
(sold separately)
6 m
Blue
To Front video output
Black
Yellow (FRONT VIDEO Black OUTPUT)
85
Connecting the System (B)
Installation
This Product
Gray Green
Yellow Red Black
Blue
3 m
AV cable (supplied)
Red RGB cable (supplied ) 1.5 m
Yellow/black To Yellow/black lead (GUIDE...
Owner's Manual - Page 89

...
7 Mounting with Brackets
Tapping screw (4 × 12 mm)
Screw (4 × 8 mm)
Car mat or chassis Bracket Drill 2 to 2.5 mm diameter holes.
7 Mounting with the unit to drill the holes. Installation
Installation
Note: • Before finally installing the unit, connect the
wiring temporarily, making sure it is all leads and cords carefully around...
Similar Questions

Green Wire
Where does the green wire from the main harness gets connected to
Where does the green wire from the main harness gets connected to
(Posted by Jloveusmc 10 years ago)
Ok When I Hook Up My P8000r Where Do I Hook The Green Wire Thats On The Back
(Posted by willymac 12 years ago)


I Pod And I Phone Connection To Avm-p8000r For Lexus Gs3000 2000 Model
Is there cable available for I POD and Has navigation also
Is there cable available for I POD and Has navigation also
(Posted by dpatel1942 12 years ago)