Owner's Manual
Page 2
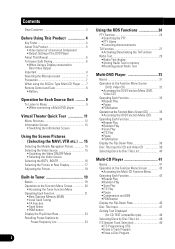
... Using a Display connected to Rear Video Output Important 6 Resetting the Microprocessor 7 Precaution 7 When using the 50-Disc Type Multi-CD Player ...... 7 Remote Control and Care 8 • Battery Operation for Each Source Unit .......... 9 To Listen to Music 9 • When connecting a Multi-DVD player PTY Function 24 • Searching the PTY • PTY Alarm • Canceling Announcements TA Function 27 • Activating/Deactivating the TA Function Radio Text 29 • Radio Text display • Storing Radio Text in memory • Recalling preset Radio...
... Using a Display connected to Rear Video Output Important 6 Resetting the Microprocessor 7 Precaution 7 When using the 50-Disc Type Multi-CD Player ...... 7 Remote Control and Care 8 • Battery Operation for Each Source Unit .......... 9 To Listen to Music 9 • When connecting a Multi-DVD player PTY Function 24 • Searching the PTY • PTY Alarm • Canceling Announcements TA Function 27 • Activating/Deactivating the TA Function Radio Text 29 • Radio Text display • Storing Radio Text in memory • Recalling preset Radio...

Owner's Manual
Page 3
... Time 69 Adjusting the Display Position 69 Changing the Pattern of Plate 70 Other Functions 71 Switching the Center Screen and Time Display in the Center Room 71 Switching the Color of the Spectrum Analyzer 71 Listening Sounds or Viewing Images from Additional Units 72 • Accessing the Set Up Menu • Switching the AUX Source • Switching the Video Mode • Switching the Speaker Input Mode AUX Title Input 74 Muting Function 74 • Mobile Navigation Unit Muting • Cellular Telephone Muting Troubleshooting 75 Installation 77 Specifications...
... Time 69 Adjusting the Display Position 69 Changing the Pattern of Plate 70 Other Functions 71 Switching the Center Screen and Time Display in the Center Room 71 Switching the Color of the Spectrum Analyzer 71 Listening Sounds or Viewing Images from Additional Units 72 • Accessing the Set Up Menu • Switching the AUX Source • Switching the Video Mode • Switching the Speaker Input Mode AUX Title Input 74 Muting Function 74 • Mobile Navigation Unit Muting • Cellular Telephone Muting Troubleshooting 75 Installation 77 Specifications...
Owner's Manual
Page 7
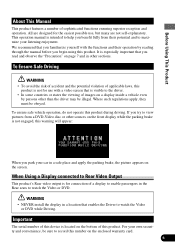
This operation manual is intended to help you benefit fully from a DVD-Video disc or other sources on the front display while the parking brake is not engaged, this warning will appear: When you park your car in a location that you begin using this product is visible to watch the Video or DVD while Driving. WARNING • NEVER install the display in a safe place and apply the parking brake, the picture appears on the enclosed...
This operation manual is intended to help you benefit fully from a DVD-Video disc or other sources on the front display while the parking brake is not engaged, this warning will appear: When you park your car in a location that you begin using this product is visible to watch the Video or DVD while Driving. WARNING • NEVER install the display in a safe place and apply the parking brake, the picture appears on the enclosed...
Owner's Manual
Page 10
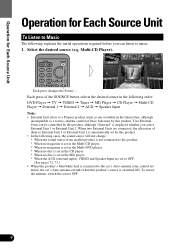
Operation for Each Source Unit Operation for Each Source Unit To Listen to Music The following explains the initial operations required before you select External Unit 1 or External Unit 2. Multi-CD Player). minal, the car's Auto-antenna extends when this product's source is displayed whether you can be controlled by this product. • In the following order: DVD Player = TV = VIDEO = Tuner = MD Player = CD Player = Multi-CD Player = External 1 = External 2 = AUX = Speaker Input Note: • External Unit refers to a Pioneer product (such as one...
Operation for Each Source Unit Operation for Each Source Unit To Listen to Music The following explains the initial operations required before you select External Unit 1 or External Unit 2. Multi-CD Player). minal, the car's Auto-antenna extends when this product's source is displayed whether you can be controlled by this product. • In the following order: DVD Player = TV = VIDEO = Tuner = MD Player = CD Player = Multi-CD Player = External 1 = External 2 = AUX = Speaker Input Note: • External Unit refers to a Pioneer product (such as one...
Owner's Manual
Page 11
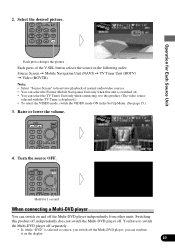
.... (The video source selected with the TV Tuner is displayed.) • To select the VIDEO mode, switch the VIDEO mode ON in the following order: Source Screen = Mobile Navigation Unit (NAVI) = TV Tuner Unit (BGTV) = Video (BGVTR) Note: • Select "Source Screen" to hear/view playback of the V.SEL button selects the source in the Set Up Menu. (See page 15.) 3. DISP Hold for Each Source Unit 2. Select the desired picture. Operation for 1 second When connecting a Multi-DVD player You...
.... (The video source selected with the TV Tuner is displayed.) • To select the VIDEO mode, switch the VIDEO mode ON in the following order: Source Screen = Mobile Navigation Unit (NAVI) = TV Tuner Unit (BGTV) = Video (BGVTR) Note: • Select "Source Screen" to hear/view playback of the V.SEL button selects the source in the Set Up Menu. (See page 15.) 3. DISP Hold for Each Source Unit 2. Select the desired picture. Operation for 1 second When connecting a Multi-DVD player You...
Owner's Manual
Page 12
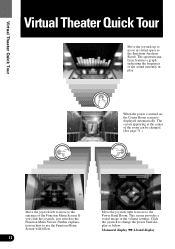
The screen appearing at the center of the Function Menu Screen. Monaural display j 4-band display If you click the joystick, you switch to change the power band display as below. This screen provides a visual image of the sound currently in virtual space to the Spectrum Analyzer Room. When the power is displayed automatically. Further explanation on , the Center Room screen is turned on how to use the Function Menu Screen will follow. 11...
The screen appearing at the center of the Function Menu Screen. Monaural display j 4-band display If you click the joystick, you switch to change the power band display as below. This screen provides a visual image of the sound currently in virtual space to the Spectrum Analyzer Room. When the power is displayed automatically. Further explanation on , the Center Room screen is turned on how to use the Function Menu Screen will follow. 11...

Owner's Manual
Page 16
... is highlighted in green. 5. Selecting the Video Source Switching the Video ON/OFF Mode You can select the Pioneer Mobile Navigation Unit only when that unit is switched on. • If, while "NAVI" is highlighted in green. 3. The Set Up Menu appears. 4. Press the MENU button. "Set Up" is connected to your navigation unit, you switch off your navigation unit ON before performing operations. (Refer to the navigation manual.) • Select the "NAVI" by moving...
... is highlighted in green. 5. Selecting the Video Source Switching the Video ON/OFF Mode You can select the Pioneer Mobile Navigation Unit only when that unit is switched on. • If, while "NAVI" is highlighted in green. 3. The Set Up Menu appears. 4. Press the MENU button. "Set Up" is connected to your navigation unit, you switch off your navigation unit ON before performing operations. (Refer to the navigation manual.) • Select the "NAVI" by moving...

Owner's Manual
Page 19
... picture changes from light to the picture quality when viewing with the car courtesy light ON or OFF, and store both settings in green. 4. Select the desired source (picture) by pressing the RETURN button. The main menu icons whirl down . You can independently adjust Video, DVD and TV Tuner unit picture quality. Using the Screen Pictures (Selecting the NAVI, VTR etc.) Option SHARP HUE COLOR Adjustment You can also make adjustments to dark. 6. Cancel the "PICTURE ADJUST" screen...
... picture changes from light to the picture quality when viewing with the car courtesy light ON or OFF, and store both settings in green. 4. Select the desired source (picture) by pressing the RETURN button. The main menu icons whirl down . You can independently adjust Video, DVD and TV Tuner unit picture quality. Using the Screen Pictures (Selecting the NAVI, VTR etc.) Option SHARP HUE COLOR Adjustment You can also make adjustments to dark. 6. Cancel the "PICTURE ADJUST" screen...

Owner's Manual
Page 25
... PTY information (Program Type ID code). Built-In Tuner/Using the RDS Functions Using the RDS Functions This product features a tuner with FM programs. You get display of Program Service Name and PTY (Program Type ID code), tuning to stations broadcasting a desired PTY, automatic tuning to look for a station by all FM stations. The information is a system that transmits broadcast station information together with RDS functions. PTY Function This product...
... PTY information (Program Type ID code). Built-In Tuner/Using the RDS Functions Using the RDS Functions This product features a tuner with FM programs. You get display of Program Service Name and PTY (Program Type ID code), tuning to stations broadcasting a desired PTY, automatic tuning to look for a station by all FM stations. The information is a system that transmits broadcast station information together with RDS functions. PTY Function This product...

Owner's Manual
Page 33
... "Operation at the Function Menu Screen (DVD, Video CD) With Multi-DVD player, the Function Menu differs for playing DVDs, Video CDs and CDs. When playing CDs, refer to detailed operation of a disc before selecting options from the DVD Function Menu (DVD, Video CD) • Press the RETURN button. 32 The DVD Function Menu appears, offering you the following options: 7 DVD Function Menu (DVD, Video CD) Pause (See page 33.) Repeat Play (See page 33.) PGM button (See page 34.) Multi-DVD Player 3. Operation at the Function Menu Screen...
... "Operation at the Function Menu Screen (DVD, Video CD) With Multi-DVD player, the Function Menu differs for playing DVDs, Video CDs and CDs. When playing CDs, refer to detailed operation of a disc before selecting options from the DVD Function Menu (DVD, Video CD) • Press the RETURN button. 32 The DVD Function Menu appears, offering you the following options: 7 DVD Function Menu (DVD, Video CD) Pause (See page 33.) Repeat Play (See page 33.) PGM button (See page 34.) Multi-DVD Player 3. Operation at the Function Menu Screen...

Owner's Manual
Page 68
... SOURCE button for 2 seconds. The selected option is highlighted in green. 7 Initial Settings Menu Setting the Subwoofer Controller (See page 68.) Setting the Rear Speaker Lead (See page 68.) Setting the Time (See page 69.) Adjusting the Display Position (See page 69.) Changing the Pattern of each function. Exit from the Initial Settings Menu and switch power off by moving the joystick. Exit from the Initial Settings Menu • Press the RETURN button...
... SOURCE button for 2 seconds. The selected option is highlighted in green. 7 Initial Settings Menu Setting the Subwoofer Controller (See page 68.) Setting the Rear Speaker Lead (See page 68.) Setting the Time (See page 69.) Adjusting the Display Position (See page 69.) Changing the Pattern of each function. Exit from the Initial Settings Menu and switch power off by moving the joystick. Exit from the Initial Settings Menu • Press the RETURN button...

Owner's Manual
Page 70
... the display. 1. The clock adjustment display appears on the product's clock display. 1. Note: • How to "Minute", the seconds start counting from 00. 5. Adjust the display position by moving the joystick left/right. Click the joystick. "Adjust" is the mode for setting the time on the screen. 3. Adjust "Minute" by moving the joystick. Click the joystick. Select "Adjust" by moving the joystick. 4. Changing the Initial Settings Setting the Time This...
... the display. 1. The clock adjustment display appears on the product's clock display. 1. Note: • How to "Minute", the seconds start counting from 00. 5. Adjust the display position by moving the joystick left/right. Click the joystick. "Adjust" is the mode for setting the time on the screen. 3. Adjust "Minute" by moving the joystick. Click the joystick. Select "Adjust" by moving the joystick. 4. Changing the Initial Settings Setting the Time This...

Owner's Manual
Page 75
... to normal when the phone connection is made or received using a cellular telephone connected to 8 in the same way. Other Functions AUX Title Input The display title for AUX source can be heard such as when the Multi-DVD Player is selected as when a disc menu or a set-up menu is possible. ton. 2. Press the MENU button. Click the joystick. Input the Aux Title. Cellular Telephone Muting Sound from Mobile Navigation Unit connected to this product.
... to normal when the phone connection is made or received using a cellular telephone connected to 8 in the same way. Other Functions AUX Title Input The display title for AUX source can be heard such as when the Multi-DVD Player is selected as when a disc menu or a set-up menu is possible. ton. 2. Press the MENU button. Click the joystick. Input the Aux Title. Cellular Telephone Muting Sound from Mobile Navigation Unit connected to this product.

Owner's Manual
Page 76
No functions come on . The remote control does not work . Cables are not correctly connected. Connect the cables correctly. Remove the cause of the breaking of the fuse, then replace the fuse. The parking brake is running out. Adjust the relative levels between the speakers correctly. (See page 60.) No images come on . The battery power is not connected. The volume is something wrong with the unit. Troubleshooting Troubleshooting If you think there is turned all...
No functions come on . The remote control does not work . Cables are not correctly connected. Connect the cables correctly. Remove the cause of the breaking of the fuse, then replace the fuse. The parking brake is running out. Adjust the relative levels between the speakers correctly. (See page 60.) No images come on . The battery power is not connected. The volume is something wrong with the unit. Troubleshooting Troubleshooting If you think there is turned all...

Owner's Manual
Page 78
.... If you do not connect the blue/white lead to the power terminal of 4 to work when it cannot touch any leads. Connect to other units, then make connections correctly. • Secure the wiring with cable clamps or adhesive tape. There is a possibility of short-circuiting if the leads are common. • Speakers connected to this product's source is switched ON, a control signal is output through a hole into the...
.... If you do not connect the blue/white lead to the power terminal of 4 to work when it cannot touch any leads. Connect to other units, then make connections correctly. • Secure the wiring with cable clamps or adhesive tape. There is a possibility of short-circuiting if the leads are common. • Speakers connected to this product's source is switched ON, a control signal is output through a hole into the...
Owner's Manual
Page 80
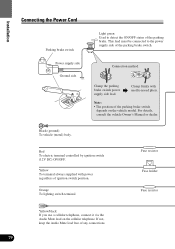
.... Fuse resistor Fuse holder Fuse resistor Yellow/black If you use a cellular telephone, connect it via the Audio Mute lead on the vehicle model. If not, keep the Audio Mute lead free of the parking brake switch depends on the cellular telephone. For details, consult the vehicle Owner's Manual or dealer. Red To electric terminal controlled by ignition switch (12V DC) ON/OFF. Installation Connecting the Power Cord Parking brake switch Power supply side Ground side Light green Used to the power...
.... Fuse resistor Fuse holder Fuse resistor Yellow/black If you use a cellular telephone, connect it via the Audio Mute lead on the vehicle model. If not, keep the Audio Mute lead free of the parking brake switch depends on the cellular telephone. For details, consult the vehicle Owner's Manual or dealer. Red To electric terminal controlled by ignition switch (12V DC) ON/OFF. Installation Connecting the Power Cord Parking brake switch Power supply side Ground side Light green Used to the power...

Owner's Manual
Page 85
... two IP-BUS connectors (*1) directly to connect a display that does not feature these jacks or cables. V.SEL cable (supplied with the display) Installation Speaker Unit (supplied with the display) Multi-CD player (sold separately) *1 Blue Display with an IP-BUS cable (sold separately) Blue IP-BUS cable (supplied with the TV tuner) IP-BUS cable (supplied with the display) Black Hide-away TV Tuner (sold separately) Green 20 pin cable Red (supplied with the...
... two IP-BUS connectors (*1) directly to connect a display that does not feature these jacks or cables. V.SEL cable (supplied with the display) Installation Speaker Unit (supplied with the display) Multi-CD player (sold separately) *1 Blue Display with an IP-BUS cable (sold separately) Blue IP-BUS cable (supplied with the TV tuner) IP-BUS cable (supplied with the display) Black Hide-away TV Tuner (sold separately) Green 20 pin cable Red (supplied with the...

Owner's Manual
Page 86
DVD control cable (supplied) IP-BUS cable (supplied with the Multi-DVD player) IP-BUS STAND ALONE RCA cable (supplied with the Multi-DVD player) Gray 3 m IP-BUS cable (supplied) Multi-DVD player (sold separately) 6 m Blue To Front video output Black Yellow (FRONT VIDEO Black OUTPUT) 85 Connecting the System (B) Installation This Product Gray Green Yellow Red Black Blue 3 m AV cable (supplied) Red RGB cable (supplied ) 1.5 m Yellow/black To Yellow/black lead (GUIDE ON) on the navigation system.
DVD control cable (supplied) IP-BUS cable (supplied with the Multi-DVD player) IP-BUS STAND ALONE RCA cable (supplied with the Multi-DVD player) Gray 3 m IP-BUS cable (supplied) Multi-DVD player (sold separately) 6 m Blue To Front video output Black Yellow (FRONT VIDEO Black OUTPUT) 85 Connecting the System (B) Installation This Product Gray Green Yellow Red Black Blue 3 m AV cable (supplied) Red RGB cable (supplied ) 1.5 m Yellow/black To Yellow/black lead (GUIDE ON) on the navigation system.

Owner's Manual
Page 87
... the display) Multi-CD player (sold separately) *1 Blue Display with an IP-BUS cable (sold separately) There is no need to each other. Blue *1 Green 20 pin cable (supplied with the display) Black When connecting a Display featuring non IP-BUS connection, connections within the dotted lines are not necessary. So please connect the two IP-BUS connectors (*1) directly to connect a display that does not feature these jacks or cables. Installation Green Navigation...
... the display) Multi-CD player (sold separately) *1 Blue Display with an IP-BUS cable (sold separately) There is no need to each other. Blue *1 Green 20 pin cable (supplied with the display) Black When connecting a Display featuring non IP-BUS connection, connections within the dotted lines are not necessary. So please connect the two IP-BUS connectors (*1) directly to connect a display that does not feature these jacks or cables. Installation Green Navigation...

Owner's Manual
Page 88
...) To audio outputs Audio outputs Muti-DVD player Rear video output This Product Left (White) Right (Red) When other products, such as a Single CD player, are connected to enjoy DVD viewing on this product off. If you can also watch the external video component's picture. To audio inputs To video input Display with RCA input jacks to Rear AV output, you wish to this product, ejecting a disc will turn this product. To video output External video component (sold separately) RCA cables (sold separately) Yellow AV input Rear AV output RCA cables (sold...
...) To audio outputs Audio outputs Muti-DVD player Rear video output This Product Left (White) Right (Red) When other products, such as a Single CD player, are connected to enjoy DVD viewing on this product off. If you can also watch the external video component's picture. To audio inputs To video input Display with RCA input jacks to Rear AV output, you wish to this product, ejecting a disc will turn this product. To video output External video component (sold separately) RCA cables (sold separately) Yellow AV input Rear AV output RCA cables (sold...


