Pioneer CD-VS33 - A/V Switcher Support and Manuals
Get Help and Manuals for this Pioneer item
View All Support Options Below
Free Pioneer CD-VS33 manuals!
Problems with Pioneer CD-VS33?
Ask a Question
Free Pioneer CD-VS33 manuals!
Problems with Pioneer CD-VS33?
Ask a Question
Popular Pioneer CD-VS33 Manual Pages
Owner's Manual - Page 2

... Using this Product 2
About this Product 2 Precaution 2
Connecting the Units 3
Connecting the Power Cord and Controller Unit 4
Connecting the System (1 5 Connecting the System (2 7 Connecting the Audio/Video equipment 9
Installation 10
Installing Hide-away Unit 10 Installing Controller Unit 11
Part Names And Applications 14
Controller Unit 14 Hide-away Unit 15
Specifications 16
1
Owner's Manual - Page 3
... by the driver. Listening to high vol- ENGLISH
ESPAÑOL
DEUTSCH
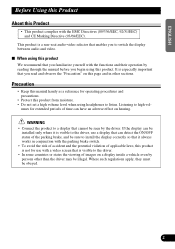
Before Using this Product
About this product from moisture. • Do not set a high volume level when using this product is not for use a display that can have an adverse effect on hearing.
This product is a rear-seat audio-video selector that cannot...
Owner's Manual - Page 4
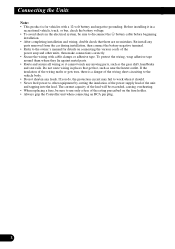
... holder. • Always grip the Controller unit when connecting an RCA pin plug.
3 The current capacity of the lead will be exceeded, causing overheating. • When replacing a fuse, be sure to the vehicle body. • Do not shorten any leads. Re-install any moving parts, such as near the heater outlet. If you do...
Owner's Manual - Page 5
ENGLISH
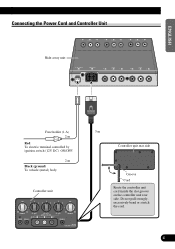
Connecting the Power Cord and Controller Unit
Hide-away unit
ESPAÑOL
DEUTSCH
FRANÇAIS
ITALIANO NEDERLANDS
Fuse holder (1 A) 2 m
Red To electric terminal controlled ...
Owner's Manual - Page 6
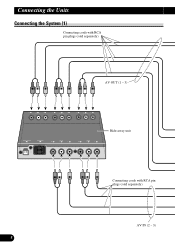
Connecting the Units
Connecting the System (1)
Connecting cords with RCA pin plugs (sold separately)
AV OUT (1 - 3)
Hide-away unit
Connecting cords with RCA pin plugs (sold separately)
AV IN (2 - 3)
5
Owner's Manual - Page 8
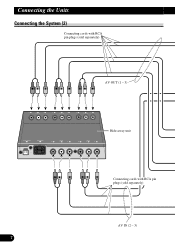
CAoTnintlec(tEinnggtlhisehU) nits
Connecting the System (2)
Connecting cords with RCA pin plugs (sold separately)
AV OUT (1 - 3)
Hide-away unit
Connecting cords with RCA pin plugs (sold separately)
AV IN (2 - 3)
7
Owner's Manual - Page 10
Connecting the Units
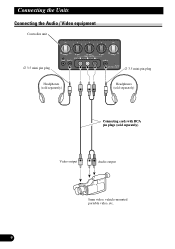
Connecting the Audio / Video equipment
Controller unit
∅ 3.5 mini pin plug
Headphones (sold separately)
∅ 3.5 mini pin plug
Headphones (sold separately)
Connecting cords with RCA pin plugs (sold separately)
Video output
Audio output
8mm video, vehicle-mounted portable video, etc.
9
Owner's Manual - Page 11
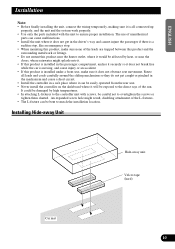
...driver's way and cannot injure the passenger if there is installed under a front seat, make sure none of the L-fixtures. • The L-fixture can be easily operated from the rear seat. • Never install...will be bent to ensure proper installation. Route
all connected up
properly, and the unit and the system work properly. • Use only the parts included with screws, be affected by...
Owner's Manual - Page 12
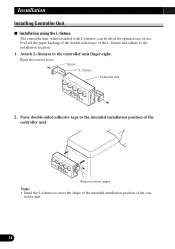
... paper backing of the double-sided tape of the L-fixture and adhere to meet the shape of the intended installation position of use. Installation
Installing Controller Unit
I Installation using the L-fixture The controller unit, when installed with L-fixtures, can be tilted for optimal ease of the con- Keep the screws loose. troller unit.
11 Screw...
Owner's Manual - Page 13
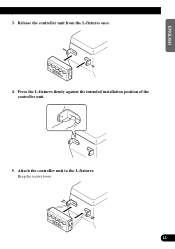
Attach the controller unit to the L-fixtures. Keep the screws loose.
12
FRANÇAIS
ITALIANO NEDERLANDS Release the controller unit from the L-fixtures once.
4. Press the L-fixtures firmly against the intended installation position of the controller unit.
5. ENGLISH
ESPAÑOL
DEUTSCH
3.
Owner's Manual - Page 14
... careful not to the back of use.
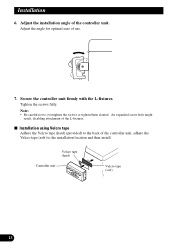
7.
Adjust the angle for optimal ease of the controller unit, adhere the Velcro tape (soft) to the installation location and then install. s Installation using Velcro tape Adhere the Velcro tape (hard) (provided) to overtighten the screws or tighten them slanted. Tighten the screws fully. Adjust the...
Owner's Manual - Page 15
... be connected to connect 8mm
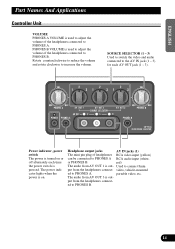
put from AV OUT 1 is out- Used to PHONES A RCA audio input (white,
or PHONES B.
put from AV OUT 3 is out- Rotate counterclockwise to reduce the volume and rotate clockwise to the AV IN jack (1 - 3) for each time the power switch is pressed. SOURCE SELECTOR (1 - 3) Used to switch the video and audio connected to increase...
Owner's Manual - Page 16
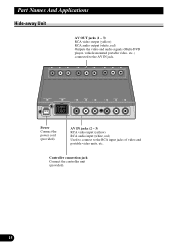
Controller connection jack Connect the controller unit (provided).
15
AV IN jacks (2 - 3) RCA video input (yellow) RCA audio input (white, red) Used to connect to the AV IN jack.
Power Connect the power cord (provided). Part Names And Applications
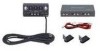
Hide-away Unit
AV OUT jacks (1 - 3) RCA video output (yellow) RCA audio output (white, red) Outputs the video and audio signals (Multi-DVD ...
Owner's Manual - Page 17
...ÇAIS
ITALIANO NEDERLANDS
16
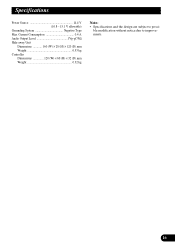
ble modification without notice due to possi- Current Consumption 0.4 A Audio Output Level 1Vp-p/75Ω Hide-away Unit
Dimensions 160 (W) × 28 (H) × 120 (D) mm Weight 0.53 kg Controller Dimensions 120 (W) × 60 (H) × 32 (D) mm Weight 0.32 kg
Note: • Specifications and the design are subject to improvements.
Owner's Manual - Page 82
... MEXICO, S.A. San Lorenzo Num 1009 3er piso Desp. 302 Col. C.P. 03100 TEL: 5-688-52-90
Published by Pioneer Corporation. Copyright © 2000 by Pioneer Corporation.
PIONEER CORPORATION 4-1, MEGURO 1-CHOME, MEGURO-KU, TOKYO 153-8654, JAPAN
PIONEER ELECTRONICS (USA) INC. All rights reserved.
Printed in Japan Imprimé au Japon
E Tous droits de reproduction et...
Pioneer CD-VS33 Reviews
We have not received any reviews for Pioneer yet.