
Owner's Manual
Page 2
Contents Before Using this Product 2 About this Product 2 Precaution 2 Connecting the Units 3 Connecting the Power Cord and Controller Unit 4 Connecting the System (1 5 Connecting the System (2 7 Connecting the Audio/Video equipment 9 Installation 10 Installing Hide-away Unit 10 Installing Controller Unit 11 Part Names And Applications 14 Controller Unit 14 Hide-away Unit 15 Specifications 16 1
Contents Before Using this Product 2 About this Product 2 Precaution 2 Connecting the Units 3 Connecting the Power Cord and Controller Unit 4 Connecting the System (1 5 Connecting the System (2 7 Connecting the Audio/Video equipment 9 Installation 10 Installing Hide-away Unit 10 Installing Controller Unit 11 Part Names And Applications 14 Controller Unit 14 Hide-away Unit 15 Specifications 16 1
Owner's Manual
Page 3
... the driver, use a display that can detect the ON/OFF status of the parking brake, and be sure to install the display correctly so that it always works in other than the driver may be seen by reading through the manual before you read and observe the "Precaution" on hearing. WARNING • Connect the product to listen. It is a rear-seat audio-video selector...
... the driver, use a display that can detect the ON/OFF status of the parking brake, and be sure to install the display correctly so that it always works in other than the driver may be seen by reading through the manual before you read and observe the "Precaution" on hearing. WARNING • Connect the product to listen. It is a rear-seat audio-video selector...
Owner's Manual
Page 4
Re-install any parts removed from the car during installation, then connect the battery negative terminal. • Refer to other units, then make connections correctly. • Secure the wiring with a 12-volt battery and negative grounding. If you do, the protection circuit may fail to work when it should. • Never feed power to the owner's manual for vehicles with cable clamps or adhesive tape. To protect the wiring, wrap...
Re-install any parts removed from the car during installation, then connect the battery negative terminal. • Refer to other units, then make connections correctly. • Secure the wiring with a 12-volt battery and negative grounding. If you do, the protection circuit may fail to work when it should. • Never feed power to the owner's manual for vehicles with cable clamps or adhesive tape. To protect the wiring, wrap...
Owner's Manual
Page 5
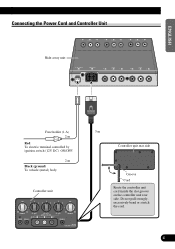
Controller unit 3 m Controller unit rear side Groove Cord Route the controller unit cord inside the slot groove on the controller unit rear side. ENGLISH Connecting the Power Cord and Controller Unit Hide-away unit ESPAÑOL DEUTSCH FRANÇAIS ITALIANO NEDERLANDS Fuse holder (1 A) 2 m Red To electric terminal controlled by ignition switch (12V DC) ON/OFF. 2 m Black (ground) To vehicle (metal) body. Do not pull strongly, excessively bend or stretch the cord. 4
Controller unit 3 m Controller unit rear side Groove Cord Route the controller unit cord inside the slot groove on the controller unit rear side. ENGLISH Connecting the Power Cord and Controller Unit Hide-away unit ESPAÑOL DEUTSCH FRANÇAIS ITALIANO NEDERLANDS Fuse holder (1 A) 2 m Red To electric terminal controlled by ignition switch (12V DC) ON/OFF. 2 m Black (ground) To vehicle (metal) body. Do not pull strongly, excessively bend or stretch the cord. 4
Owner's Manual
Page 6
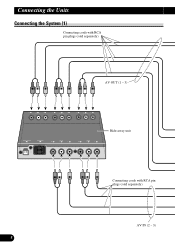
Connecting the Units Connecting the System (1) Connecting cords with RCA pin plugs (sold separately) AV OUT (1 - 3) Hide-away unit Connecting cords with RCA pin plugs (sold separately) AV IN (2 - 3) 5
Connecting the Units Connecting the System (1) Connecting cords with RCA pin plugs (sold separately) AV OUT (1 - 3) Hide-away unit Connecting cords with RCA pin plugs (sold separately) AV IN (2 - 3) 5
Owner's Manual
Page 8
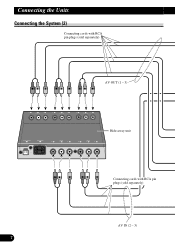
CAoTnintlec(tEinnggtlhisehU) nits Connecting the System (2) Connecting cords with RCA pin plugs (sold separately) AV OUT (1 - 3) Hide-away unit Connecting cords with RCA pin plugs (sold separately) AV IN (2 - 3) 7
CAoTnintlec(tEinnggtlhisehU) nits Connecting the System (2) Connecting cords with RCA pin plugs (sold separately) AV OUT (1 - 3) Hide-away unit Connecting cords with RCA pin plugs (sold separately) AV IN (2 - 3) 7
Owner's Manual
Page 10
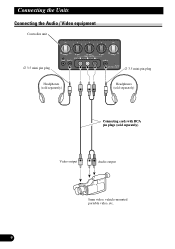
Connecting the Units Connecting the Audio / Video equipment Controller unit ∅ 3.5 mini pin plug Headphones (sold separately) ∅ 3.5 mini pin plug Headphones (sold separately) Connecting cords with RCA pin plugs (sold separately) Video output Audio output 8mm video, vehicle-mounted portable video, etc. 9
Connecting the Units Connecting the Audio / Video equipment Controller unit ∅ 3.5 mini pin plug Headphones (sold separately) ∅ 3.5 mini pin plug Headphones (sold separately) Connecting cords with RCA pin plugs (sold separately) Video output Audio output 8mm video, vehicle-mounted portable video, etc. 9
Owner's Manual
Page 11
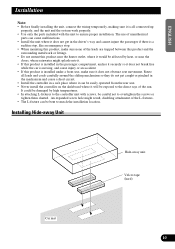
.... ENGLISH ESPAÑOL DEUTSCH Installation Note: • Before finally installing the unit, connect the wiring temporarily, making sure it is all leads and cords carefully around the sliding mechanism so they do not get in the driver's way and cannot injure the passenger...L-fixtures to the controller unit with the unit to ensure proper installation. Installing Hide-away Unit Hide-away unit Velcro tape (hard) Car mat 10 FRANÇAIS ITALIANO NEDERLANDS Route all connected up properly, and the unit and the system work properly. • Use only the parts included with screws,...
.... ENGLISH ESPAÑOL DEUTSCH Installation Note: • Before finally installing the unit, connect the wiring temporarily, making sure it is all leads and cords carefully around the sliding mechanism so they do not get in the driver's way and cannot injure the passenger...L-fixtures to the controller unit with the unit to ensure proper installation. Installing Hide-away Unit Hide-away unit Velcro tape (hard) Car mat 10 FRANÇAIS ITALIANO NEDERLANDS Route all connected up properly, and the unit and the system work properly. • Use only the parts included with screws,...
Owner's Manual
Page 12
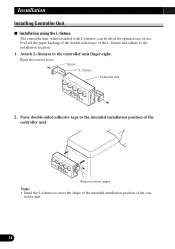
... screws loose. troller unit. 11 Remove release paper Note: • Bend the L-fixtures to the controller unit finger-tight. Paste double-sided adhesive tape to the installation location. 1. Screw L-fixture Controller unit 2. Peel off the paper backing of the double-sided tape of the L-fixture and adhere to the intended installation position of use. Installation Installing Controller Unit I Installation using the L-fixture The controller unit, when installed with L-fixtures...
... screws loose. troller unit. 11 Remove release paper Note: • Bend the L-fixtures to the controller unit finger-tight. Paste double-sided adhesive tape to the installation location. 1. Screw L-fixture Controller unit 2. Peel off the paper backing of the double-sided tape of the L-fixture and adhere to the intended installation position of use. Installation Installing Controller Unit I Installation using the L-fixture The controller unit, when installed with L-fixtures...
Owner's Manual
Page 13
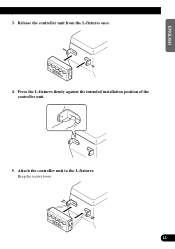
Release the controller unit from the L-fixtures once. 4. Keep the screws loose. 12 FRANÇAIS ITALIANO NEDERLANDS Press the L-fixtures firmly against the intended installation position of the controller unit. 5. ENGLISH ESPAÑOL DEUTSCH 3. Attach the controller unit to the L-fixtures.
Release the controller unit from the L-fixtures once. 4. Keep the screws loose. 12 FRANÇAIS ITALIANO NEDERLANDS Press the L-fixtures firmly against the intended installation position of the controller unit. 5. ENGLISH ESPAÑOL DEUTSCH 3. Attach the controller unit to the L-fixtures.
Owner's Manual
Page 14
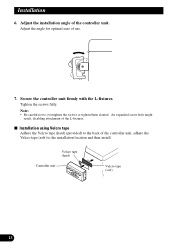
...: • Be careful not to the installation location and then install. Secure the controller unit firmly with the L-fixtures. Velcro tape (hard) Controller unit Velcro tape (soft) 13 Installation 6. s Installation using Velcro tape Adhere the Velcro tape (hard) (provided) to the back of the L-fixtures. Adjust the installation angle of use. 7. Adjust the angle for optimal ease of the controller unit. An expanded screw hole might result, disabling...
...: • Be careful not to the installation location and then install. Secure the controller unit firmly with the L-fixtures. Velcro tape (hard) Controller unit Velcro tape (soft) 13 Installation 6. s Installation using Velcro tape Adhere the Velcro tape (hard) (provided) to the back of the L-fixtures. Adjust the installation angle of use. 7. Adjust the angle for optimal ease of the controller unit. An expanded screw hole might result, disabling...
Owner's Manual
Page 15
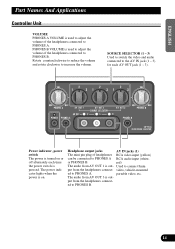
... turned on . Headphone output jacks AV IN jacks (1) The mini pin plug of the headphones connected to PHONES A. video, vehicle-mounted ed to PHONES B. 14 ENGLISH Part Names And Applications Controller Unit VOLUME PHONES A VOLUME is pressed. The power indicator lights when the power is out- portable video, etc. The audio from AV OUT 1 is used to adjust the volume of headphones RCA video input (yellow) can be connected to connect 8mm put from the headphones connect- Used to PHONES A RCA audio input (white...
... turned on . Headphone output jacks AV IN jacks (1) The mini pin plug of the headphones connected to PHONES A. video, vehicle-mounted ed to PHONES B. 14 ENGLISH Part Names And Applications Controller Unit VOLUME PHONES A VOLUME is pressed. The power indicator lights when the power is out- portable video, etc. The audio from AV OUT 1 is used to adjust the volume of headphones RCA video input (yellow) can be connected to connect 8mm put from the headphones connect- Used to PHONES A RCA audio input (white...
Owner's Manual
Page 16
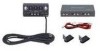
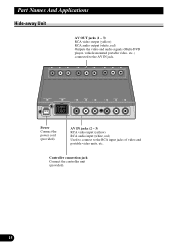
AV IN jacks (2 - 3) RCA video input (yellow) RCA audio input (white, red) Used to connect to the AV IN jack. Power Connect the power cord (provided). Controller connection jack Connect the controller unit (provided). 15 Part Names And Applications Hide-away Unit AV OUT jacks (1 - 3) RCA video output (yellow) RCA audio output (white, red) Outputs the video and audio signals (Multi-DVD player, vehicle-mounted portable video, etc.) connected to the RCA input jacks of video and portable video units, etc.
AV IN jacks (2 - 3) RCA video input (yellow) RCA audio input (white, red) Used to connect to the AV IN jack. Power Connect the power cord (provided). Controller connection jack Connect the controller unit (provided). 15 Part Names And Applications Hide-away Unit AV OUT jacks (1 - 3) RCA video output (yellow) RCA audio output (white, red) Outputs the video and audio signals (Multi-DVD player, vehicle-mounted portable video, etc.) connected to the RCA input jacks of video and portable video units, etc.
Owner's Manual
Page 17
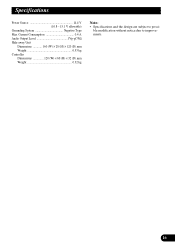
ble modification without notice due to possi- ENGLISH Specifications Power Source 14.4 V (10.8 - 15.1 V allowable) Grounding System Negative Type Max. Current Consumption 0.4 A Audio Output Level 1Vp-p/75Ω Hide-away Unit Dimensions 160 (W) × 28 (H) × 120 (D) mm Weight 0.53 kg Controller Dimensions 120 (W) × 60 (H) × 32 (D) mm Weight 0.32 kg Note: • Specifications and the design are subject to improvements. ESPAÑOL DEUTSCH FRANÇAIS ITALIANO NEDERLANDS 16
ble modification without notice due to possi- ENGLISH Specifications Power Source 14.4 V (10.8 - 15.1 V allowable) Grounding System Negative Type Max. Current Consumption 0.4 A Audio Output Level 1Vp-p/75Ω Hide-away Unit Dimensions 160 (W) × 28 (H) × 120 (D) mm Weight 0.53 kg Controller Dimensions 120 (W) × 60 (H) × 32 (D) mm Weight 0.32 kg Note: • Specifications and the design are subject to improvements. ESPAÑOL DEUTSCH FRANÇAIS ITALIANO NEDERLANDS 16
Owner's Manual
Page 82
... rights reserved. Printed in Japan Imprimé au Japon E Del Valle, Mexico D.F. Box 1760, Long Beach, California 90801, U.S.A. de C.V. Copyright © 2000 Pioneer Corporation. Haven 1087 Keetberglaan 1, 9120 Melsele, Belgium TEL: (0) 3/570.05.11 PIONEER ELECTRONICS AUSTRALIA PTY. Publication de Pioneer Corporation. P.O. TEL: (800) 421-1404 PIONEER EUROPE N.V. LTD. 178-184 Boundary Road, Braeside, Victoria...
... rights reserved. Printed in Japan Imprimé au Japon E Del Valle, Mexico D.F. Box 1760, Long Beach, California 90801, U.S.A. de C.V. Copyright © 2000 Pioneer Corporation. Haven 1087 Keetberglaan 1, 9120 Melsele, Belgium TEL: (0) 3/570.05.11 PIONEER ELECTRONICS AUSTRALIA PTY. Publication de Pioneer Corporation. P.O. TEL: (800) 421-1404 PIONEER EUROPE N.V. LTD. 178-184 Boundary Road, Braeside, Victoria...

