Optoma H77 Support Question
Find answers below for this question about Optoma H77.Need a Optoma H77 manual? We have 1 online manual for this item!
Question posted by morerajuancarlos on November 22nd, 2012
My Screen Flikers After 5 Minutes
my screen flickers after 5 minutes
Current Answers
There are currently no answers that have been posted for this question.
Be the first to post an answer! Remember that you can earn up to 1,100 points for every answer you submit. The better the quality of your answer, the better chance it has to be accepted.
Be the first to post an answer! Remember that you can earn up to 1,100 points for every answer you submit. The better the quality of your answer, the better chance it has to be accepted.
Related Optoma H77 Manual Pages
User Manual - Page 1
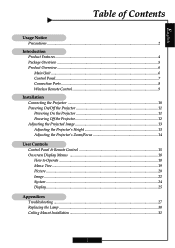

... Main Unit ...6 Control Panel ...7 Connection Ports ...8 Wireless Remote Control 9
Installation Connecting the Projector 10 Powering On/Off the Projector 11 Powering On the Projector 11 Powering Off the Projector 12 Adjusting the Projected Image 13 Adjusting the Projector's Height 13 Adjusting the Projector's Zoom/Focus 14
User Controls Control Panel & Remote Control 15 Onscreen Display...
User Manual - Page 2


...onscreen menu. Warning- Do not use lens cap when projector is about to cool down before changing the lamp; To reduce the... of electric shock, do not expose this occurs, the projector will burn
out and may cause eye injury. Warning-
Before...fan to replace the lamp when it will not turn back on the projector first and then select the signal sources. Warning- Warning- Warning- Warning...
User Manual - Page 4


English
Introduction
Product Features
This product is a WXGA single chip 0.79-inch DLPTM projector featuring:
‹ True WXGA resolution 1280 x 720 addressable pixels ‹ Single chip DLPTM technology ‹ Power zoom and focus ‹ HDTV compatible (480i/p, 576i/p, 720p, ...
User Manual - Page 5
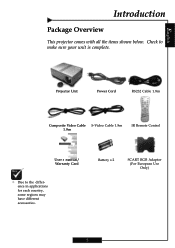

Battery x 2
SCART RGB Adaptor (For European Use Only)
5
English
Introduction
Package Overview
This projector comes with all the items shown below. Projector Unit
Power Cord
RS232 Cable 1.8m
Composite Video Cable S-Video Cable 1.8m 1.8m
IR Remote Control
User's Manual/ Warranty Card
™ Due to make sure ...
User Manual - Page 10
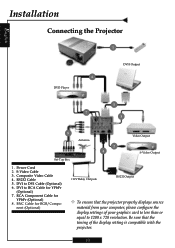

... card to less than or equal to DVI Cable (Optional) 6. Composite Video Cable 4. English
Installation
Connecting the Projector
1
6 DVD Player
DVI-I Output
5 7
3
8 Antenna
2 4
Video Output S-Video Output
Set-Top Box
1. Be sure that the projector properly displays source
material from your computer, please configure the display settings of the display setting is...
User Manual - Page 11
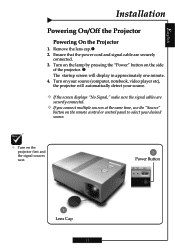

...The startup screen will automatically detect your source.
™ If the screen displays "No Signal," make sure the signal cables are securely
connected. 3. English
Installation
Powering On/Off the Projector
Powering On the Projector
1. ... sources at the same time, use the "Source"
button on the side
of the projector. Turn on the lamp by pressing the "Power" button on the remote control or...
User Manual - Page 12
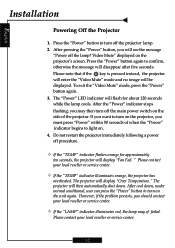

..., press the "Power" button again. 3. If you want to turn off the main power switch on the projector's screen. Please contact your local reseller or service center.
™ If the "TEMP" indicator illuminates orange, the projector has
overheated. Press the "Power" button to light on the unit again. Please note that if the...
User Manual - Page 13
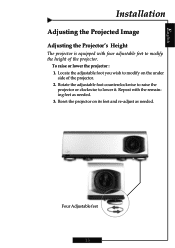

... foot you wish to modify on its feet and re-adjust as needed .
Reset the projector on the under
side of the projector.
Four Adjustable feet
13 English
Installation
Adjusting the Projected Image
Adjusting the Projector's Height
The projector is equipped with the remaining feet as needed . 3. Rotate the adjustable foot counterclockwise to raise...
User Manual - Page 14

Zoom/ Focus Shift
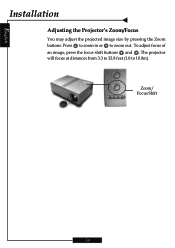
14 The projector will focus at distances from 3.3 to 32.8 feet (1.0 to zoom out. Press to zoom in or to 10.0m). To adjust focus of an image, press the focus shift buttons and .
English
Installation
Adjusting the Projector's Zoom/Focus
You may adjust the projected image size by pressing the Zoom buttons.
User Manual - Page 15
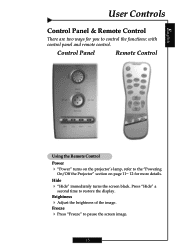

... of the image. Press "Hide" a
second time to pause the screen image.
15 Freeze 4 Press "Freeze" to restore the display.
Control Panel
Remote Control
Using the Remote Control Power 4 "Power" turns on the projector's lamp, refer to the "Powering
On/Off the Projector" section on page 11~ 12 for you to control the...
User Manual - Page 16
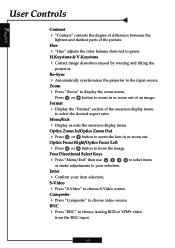

Re-Sync
4 Automatically synchronizes the projector to zoom in or zoom out.
Press or button to the input source. to select ... Press or button to display the zoom menu. H.Keystone & V.Keystone
4 Correct image distortion caused by rotating and tilting the
projector.
Optics Zoom In/Optics Zoom Out
4 Press or button to choose video source. Four Directional Select Keys
4 Press "Menu/Exit...
User Manual - Page 17
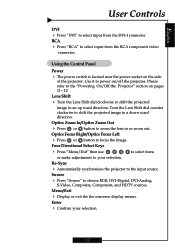

.... Optics Zoom In/Optics Zoom Out
4 Press or button to power on the side
of the projector. English
User Controls
DVI 4 Press "DVI" to select input from the RCA component video
connector....Using the Control Panel
Power
4 The power switch is located near the power socket on /off the projector.
Four Directional Select Keys
4 Press "Menu/Exit" then use
or make adjustments to select input ...
User Manual - Page 18
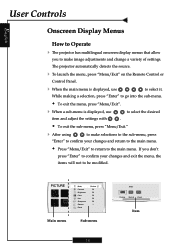

...233;ma Normal Vivant
Item English
User Controls
Onscreen Display Menus
How to Operate
4 The projector has multilingual onscreen display menus that allow
you don't
press "Enter" to confirm your ... menu, the
items will not to make image adjustments and change a variety of settings. The projector automatically detects the source.
4 To launch the menu, press "Menu/Exit" on the Remote Control...
User Manual - Page 22
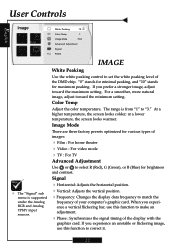

...image, adjust toward the minimum setting.
At a higher temperature, the screen looks colder; If you experience a vertical flickering bar, use this function to "3." Image Mode
There are three ...maximum setting.
Color Temp
Adjust the color temperature. When you experience an unstable or flickering image, use this function to set the white peaking level of the DMD chip...
User Manual - Page 24
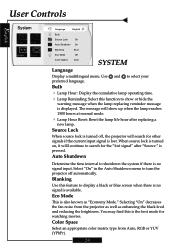

...no signal is pressed. Auto Shutdown
Determine the time interval to display a black or blue screen when there is no signal input. Selecting "On" decreases the fan noise from Auto, RGB... or YUV (YPbPr).
24 Color Space
Select an appropriate color matrix type from the projector as well as "Economy Mode."
You may find this function to select your preferred language. Bulb
...
User Manual - Page 25

... zoom
10
DISPLAY
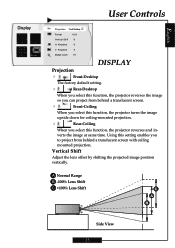
Projection
4
Front-Desktop
The factory default setting.
4
Rear-Desktop
When you select this function, the projector reverses the image
so you can project from behind a translucent screen.
4
Front-Ceiling
When you select this function, the projector reverses and in- English
Display
User Controls
Projection Front Desktop
Format
16:9
Vertical Shift
0
H.
User Manual - Page 26


.... 4Letterbox: Letterbox mode zooms a letterboxed image intended
for 4:3 display to fit the image onto the screen without
changing the projection distance. Keystone
Correct image distortion caused by tilting the projector vertically. Digital Zoom
Provide different magnification ratios to zoom an image. English
User Controls
Display
Projection Front Desktop
Format
4:3
Vertical Shift...
User Manual - Page 27


...
If you may need to 1280 x 720. If a problem persists, please contact your projector, please refer to the following instructions.
27
To do this, please refer to the following...the "Replacing the lamp" section.
4 Ensure that you have removed the lens cap and that the projector
is turned on screen. 4 Ensure that all the cables and power cord are not bent or broken. 4 Make sure...
User Manual - Page 28
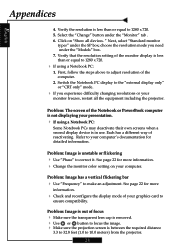

... or your presentation. 4 If using a Notebook PC:
1. Problem: The screen of your computer. Problem: Image has a vertical flickering bar 4 Use "Frequency" to correct it. Click on your graphics card... more information. 4 Change the monitor color setting on "Show all the equipment including the projector. Each has a different way of the computer.
2. Select the "Change" button under the...
User Manual - Page 30

... the lamp module, reverse the above . English
Appendices
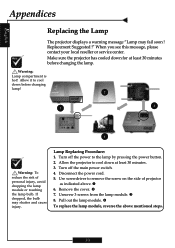
Replacing the Lamp
The projector displays a warning message "Lamp may shatter and cause injury.
Warning: Lamp compartment is ...reseller or service center. Make sure the projector has cooled down at least 30 minutes before changing lamp!
2
1
3
4
Warning: To
reduce the risk of projector
as indicated above mentioned steps.
30
Turn...
Similar Questions
Screen Flickers When Mac Laptop Connected At 1080p, 1080i Stops The Flicker
(Posted by dnielson 11 years ago)
We Have A Dark Shadow Or Spot On The Left Side Of The Screen. Ep719 Projector.
We have dark spots or shadow on our EP719 Projector. Already replaced the light bulb and it still th...
We have dark spots or shadow on our EP719 Projector. Already replaced the light bulb and it still th...
(Posted by karlita71 11 years ago)
The Projector Shuts Itself Off After Running For About 15 Minutes.
Reasons ?
(Posted by nnemani42 11 years ago)
Projector Stared To Show On Screen White Points As Stars On The Sky.
we have 2 projector ES522 at church, and one projector stared to show few white points (as stars in ...
we have 2 projector ES522 at church, and one projector stared to show few white points (as stars in ...
(Posted by dhouglas11 11 years ago)

