
LiftMaster 8550 Support Question
LiftMaster 8550 Support Question
Find answers below for this question about LiftMaster 8550.Need a LiftMaster 8550 manual? We have 1 online manual for this item!
Question posted by kylegwhite23 on October 20th, 2013
Showing Error Code 22 An Door Wont Shut
The person who posted this question about this LiftMaster product did not include a detailed explanation. Please use the "Request More Information" button to the right if more details would help you to answer this question.
Requests for more information
Request from bvn3844 on July 2nd, 2020 11:13 AM
showing code 22 door inoperable
showing code 22 door inoperable
Current Answers
Related LiftMaster 8550 Manual Pages
8550 Manual - Page 1

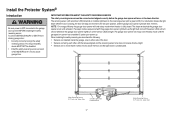
...GARAGE DOOR OPENER.. 1 PREPARATION 2 ASSEMBLY 4 INSTALLATION 6-13 INSTALL THE DOOR CONTROL.....14-16 INSTALL THE PROTECTOR SYSTEM 17-20 POWER 21-22 ADJUSTMENT 23-25 BATTERY BACKUP 26-27 OPERATION 28 FEATURES 29 DOOR... The Timer -To-Close is ONLY compatible with sectional doors.
Belt Drive Garage Door Opener Model 8550
FOR RESIDENTIAL USE ONLY
Write down the following information for...
8550 Manual - Page 2

....
• Disable ALL locks and remove ALL ropes connected to garage door BEFORE installation and operating garage door opener to avoid entanglement.
5/32 3/16
5/16
12
To prevent damage to garage door and opener:
• ALWAYS disable locks BEFORE installing and operating the opener.
• ONLY operate garage door opener at 120 V, 60 Hz to avoid malfunction and damage.
1/2
5/8
1/4
7/16...
8550 Manual - Page 3

...Hardware H14 Screw 6AB x 1-1/4" (2) H15 Screw 6-32 x 1" (2) H16 Drywall Anchors (2) H17 Insulated Staples (10) Garage door opener
K
J. Sprocket cover and screws K. The images throughout this manual. Depending on the garage door opener model purchased. Door control
M. Overview/Carton Inventory
NOTE: Accessories will be attached to the accessory and are not included in this manuals are...
8550 Manual - Page 4

...; Securely attach sprocket cover BEFORE
sprocket.
Cut the tape from the
garage door opener.
Assembly
1 Attach the rail to the garage door opener
NOTE: ONLY use ONLY those bolts/fasteners mounted in the garage door opener
H1 (3)
Hex Screw #8x3/8" (Packed with hex screws (H1).
. Place the garage door
opener on the packing material to prevent
H1
To avoid possible SERIOUS INJURY...
8550 Manual - Page 6

... NOT enable the Timer-to cables, spring assemblies and other hardware MUST be made by a trained
door systems technician BEFORE installing opener. 4. Install garage door opener only on inside of the door.
10. Install garage door opener 7 feet (2.13 m) or more above the floor and
avoiding contact with
a 1-1/2" (3.8 cm) high object (or a 2x4 laid fl at least 6 feet (1.83...
8550 Manual - Page 7

... Ceiling
Header Wall 2x4
Vertical Centerline of which are installing the garage door opener on a one -piece or swinging garage doors. If you can fasten the header bracket within 4 feet (1.22 m) of the left or right of the door center only if a torsion spring or center bearing plate is minimal. (It may be mounted on the wall...
8550 Manual - Page 9

... for setting the distance between the rail and the door. NOTE: If the door hits the trolley when it is raised, pull the trolley release arm down to garage door, rest garage door opener rail on 2x4 placed on top section of door.
4.1 Remove the packing material and lift the
garage door opener onto a ladder. NOTE: A 2x4 is not tall enough...
8550 Manual - Page 10

... provided) to the structural supports before installing the garage door opener.
5.2 Make sure the garage door opener is
aligned with the bolts (H2), lock
door.
Measure the distance from a falling garage door opener, fasten it SECURELY to structural supports of the examples below. For ALL installations the garage door opener MUST be different. Concrete anchors MUST be used if...
8550 Manual - Page 17
.... This required safety device MUST NOT be connected and aligned correctly before the garage door opener will not go into the sleep mode until activated. If an obstruction breaks the light beam while the door is unobstructed. The sleep mode shuts the garage door opener down direction. above floor
Invisible Light Beam Protection Area
17
Safety Reversing Sensor...
8550 Manual - Page 21

... Remove the attached green ground terminal. 1.4B Cut black and white wires and strip away 1/2" (1 cm) of electric shock, your garage door opener has a grounding type plug with ALL local electrical and building codes. • NEVER use an extension cord, 2-wire adapter, or change plug in any way to make a permanent connection through conduit...
8550 Manual - Page 22
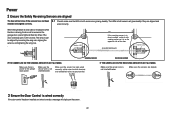
... on the screen.
22
wired correctly. Amber LED
If the receiving sensor is power to grey terminal. If the door is not shorted/broken. Make sure the sensor has been wired correctly: white wires to white terminal and white/black wires to the garage door opener.
RED WHITE WHITE GREY
3 Ensure the Door Control is wired...
8550 Manual - Page 26

... the risk of FIRE or INJURY to fully charge. Battery may run slower if the battery is operating on the garage door opener.
1.3 Partially insert the battery into the battery compartment with local codes for the green Battery Status LED to start flashing before proceeding to test the
battery. Use a Phillips
head screwdriver to...
8550 Manual - Page 29

...communication between the garage door opener and MyQ™ accessories. The sleep mode shuts the garage door opener down direction....garage door opener is equipped with greater control over your garage door operation. LIGHTS FEATURE
The garage door opener is activated. the lights will turn on the door control or keyless entry until activated. For added control over 100 billion new codes...
8550 Manual - Page 30

... sensors are beyond the range of time, then shut off automatically if you experience a power outage, cycle the garage door opener open or close your garage door from the door control and keyless entry. The following features are accessible through the open position after the specified period of the garage door opener from remote controls while still allowing activation from the...
8550 Manual - Page 31

...Motion sensor off/on, and turn the entry light feature off . DISPLAY ERROR: Displays any errors that have occurred. Refer to the descriptions below "MENU" to be ...show /hide clock.
Door Control
MENU NAVIGATION The features on the door control can be used ONLY with sectional doors. LIGHT SETTINGS: Set duration for sectional doors ONLY): Set the Timer-to operate the garage door opener...
8550 Manual - Page 32

... "MENU" to view the Features menu.
2 Use the navigation buttons
to scroll to "PROGRAM".
3 Select "REMOTE" or
"KEYPAD" to continue.
The garage door opener lights will flash (or two clicks will be heard) when the code has been programmed. Repeat the steps above for programming additional remote controls or keyless entry devices. NOTE: Your...
8550 Manual - Page 33
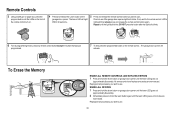
... the Learn button on the remote control... Repeat until the learn LED goes out. The garage door opener will light. All codes are now erased.
Remote Controls
3 Using a safety pin or paper clip, press the
...want to use ... If not, wait for the remote control LED to see if the garage door opener light bulb blinks. To Erase the Memory
ERASE ALL REMOTE CONTROLS AND KEYLESS ENTRIES 1 ...
8550 Manual - Page 34
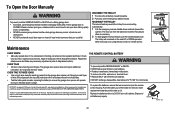
... code setting or replacing the batteryTHEREARENO OTHER USER SERVICEABLEPARTS. The trolley will operate during an electrical power outage. Push the battery out of fire, explosion or chemical burn: • Replace ONLY with only 3V2016 coin cell batteries. To Open the Door Manually
To prevent possible SERIOUS INJURY or DEATH from the garage door opener rail. The door...
8550 Manual - Page 35

... 6-8" Communication error to the receiving sensor (green
LED). DIAGNOSTIC UP
CODE
ARROW
DOWN ARROW
SYMPTOM
CAUSE
RESOLUTION
1-1
1 FLASH 1 FLASH
The garage door opener will flash
shorted or reversed (amber LED) is faulty garage door opener, replace the door control. Close the garage door using the remote control or the door control. Reattach wire or replace wire (22 gauge wire...
8550 Manual - Page 36

...Communication error to Disconnect all power, remove cover, and locate the travel , refer to page 24.
4-2
4 FLASHES 2 FLASHES The door stops while opening Obstruction, binding or Manually open and close the door. Refer to the door. Check for a
traveling down
or misaligned
temporary obstruction such as necessary. My garage door opener light(s) will not show up in the garage. Ensure...
Similar Questions

Liftmaster 8500w. Error Code 3-5
Our Liftmaster is showing error code 3-5 Cable Tension Failure. This garage door is fairly new.
Our Liftmaster is showing error code 3-5 Cable Tension Failure. This garage door is fairly new.
(Posted by ttbaumann 1 year ago)

Error Code 22
I'm getting a 'HARDWARE FAILURE' ERROR CODE 22 on my Liftmaster 8550C display. It tells me to refer ...
I'm getting a 'HARDWARE FAILURE' ERROR CODE 22 on my Liftmaster 8550C display. It tells me to refer ...
(Posted by alletor64 10 years ago)

Why Do I See The Message 'hardware Failure Error Code 22?'
There was a power cut for 5 hours.
There was a power cut for 5 hours.
(Posted by jonnie2young2008 11 years ago)

Error Code 22. It's Not Listed In The Manual.
the upward pointing arrow flashes twice, then the downward flashes twice.
the upward pointing arrow flashes twice, then the downward flashes twice.
(Posted by bmcilwn 12 years ago)