
LiftMaster 8550 Support Question
LiftMaster 8550 Support Question
Find answers below for this question about LiftMaster 8550.Need a LiftMaster 8550 manual? We have 1 online manual for this item!
Question posted by jonnie2young2008 on August 6th, 2012
Why Do I See The Message 'hardware Failure Error Code 22?'
There was a power cut for 5 hours.
Current Answers
Answer #1: Posted by awhite on November 8th, 2012 4:12 PM
awhite

Member since:
November 4th, 2012 Points: 1,460
Member since:
November 4th, 2012 Points: 1,460
Error code 22 happens when there is an electrical surge of some sort that affects the opener. To clear the code and get the opener working again, unplug the motor AND also remove the battery which is located in the unit. You will need to lift the light cover and take out a small screw to get to the battery. Unplug the battery and the motor and then reinstall the battery and plug the unit back in. Everything will be fine!

Answer #3: Posted by johnsachs0 on November 10th, 2012 8:16 AM
johnsachs0

Member since:
November 10th, 2012 Points: 0
Member since:
November 10th, 2012 Points: 0
The problem is NOT a power surge ! It is an issue with assembly , it is a small circuit board that is called the travel modulator board. The connections are loose somewhere on that board.
Disconnect power and battery back up , remove light cover on the side where the circuit board , remove 4 screws that hold cover gentle pull cover with cicuit board out . Travel modulator is located upper right corner . Checked that the slide connections are set correctly on the terminals. There are 5 terminals on the travel modulator board , I have seen different combinations of loose ones.
Related LiftMaster 8550 Manual Pages
8550 Manual - Page 1

...Drive Garage Door Opener Model 8550
FOR RESIDENTIAL USE ONLY
Write down the following information for installation instructions.
. www.liftmaster.com The Chamberlain Group, Inc.
845 Larch Avenue Elmhurst, Illinois 60126-1196
Contents
BELT DRIVE GARAGE DOOR OPENER.. 1 PREPARATION 2 ASSEMBLY 4 INSTALLATION 6-13 INSTALL THE DOOR CONTROL.....14-16 INSTALL THE PROTECTOR SYSTEM 17-20 POWER 21-22...
8550 Manual - Page 2

... try to loosen, move or adjust garage door, door springs, cables, pulleys, brackets or their hardware, ALL of which are under EXTREME tension.
• Disable ALL locks and remove ALL ropes connected to garage door BEFORE installation and operating garage door opener to avoid entanglement.
5/32 3/16
5/16
12
To prevent damage to garage door and opener:
• ALWAYS disable locks BEFORE...
8550 Manual - Page 3

... Remote Control
829LM Garage Door Monitor
Hardware
Assembly H1 Hex Screw #8x3/8" (3) [packed with white and white/black wire attached: Sending Sensor (1) Receiving Sensor (1) and Safety Sensor Brackets (2)
O. Belt L. White and red/white wire
The Protector System®
N. The images throughout this manual. Garage door opener
K
J. Trolley G. Straight door arm A
B
CF G
D E
F. Overview...
8550 Manual - Page 4

... removed
bolts.
1.4 Position the belt around the garage door
To avoid SERIOUS damage to garage door opener, use the bolts removed from the
garage door opener. opener sprocket.
1.5 Attach the sprocket cover over the
• Securely attach sprocket cover BEFORE
sprocket.
HARDWARE
Mounted in the top of sprocket while
garage door opener.
Assembly
1 Attach the rail to finger...
8550 Manual - Page 6

... INJURY or DEATH from ALL moving parts of SEVERE INJURY or DEATH:
1. NEVER connect garage door opener to power source until instructed to garage door control 11. NOTE: If you are installing the garage door opener on wall next to do so 8. Upon completion of garage door. 12. DO NOT enable the Timer-to avoid accidental release. 7. ALL repairs to avoid...
8550 Manual - Page 7

... the ceiling when clearance is out of which are installing the garage door opener on header wall or ceiling, otherwise garage door might NOT reverse when required.
• DO NOT enable the Timer-to loosen, move or adjust garage door, springs, cables, pulleys, brackets, or their hardware, ALL of balance. You can attach it to page 8 ceiling installation...
8550 Manual - Page 9

... base for setting the distance between the rail and the door.
Connected Disconnected
9
H11 H5
HARDWARE
H5
Clevis Pin 5/16"x2-3/4"
H11
Ring Fastener
4 Position the garage door opener
To prevent damage to disconnect the inner and outer trolley. Slide the outer trolley toward the garage door opener. The trolley can remain disconnected until instructed. NOTE: A 2x4 is...
8550 Manual - Page 10

... Installation
5 Hang the garage door opener
To avoid possible SERIOUS INJURY from each side of the garage door opener to the support bracket.
5.3 Cut both pieces of the ...the structural supports before installing the garage door opener.
5.2 Make sure the garage door opener is
aligned with the bolts (H2), lock
door.
H4 (2)
Lag Screw 5/16"- 18x1-5/8"
HARDWARE
H9 (2)
Lock Washer 5/16"-...
8550 Manual - Page 13

... pin (H6).
trolley will re-engage automatically when the garage door opener is hanging down too far, you may cut 6 inches (15 cm) from the curved door arm. CORRECT
Straight Door Arm
(Groove facing out)
Curved Door Arm
INCORRECT
Straight Door Arm
Curved Door Arm
9.1 Close the door. 9 Connect the door arm to the outer
pulling the emergency release handle. Disconnect...
8550 Manual - Page 14

... completely closed.
HARDWARE
H14 (2)
Screw 6ABx1-1/4"
H15 (2)
Screw 6-32x1"
H16 (2)
Drywall Anchors
NOTE: For gang box installations it can be seen clearly, is NOT connected BEFORE installing door control. • Connect ONLY to 24 VOLT low voltage wires. NOTE: Older LiftMaster accessories and third party products are not compatible.Your garage door opener is not...
8550 Manual - Page 15

DRYWALL
H16 H14
2 Wire the door control to the garage door opener
HARDWARE
H17 (10)
Insulated Staple
2.1 Run the white and red/white wire from the door control to the door control.
15 To insert or release wires from the terminal, push in the tab with the staple as this may cause a short or an open circuit.
2.2 Strip 7/16...
8550 Manual - Page 19
... into the white terminal on
the garage door opener. Attach the wire to the wall and ceiling with a screwdriver tip.
The lens on each other. HARDWARE
H17
H17 (10)
Insulated Staple
...
1.3C Slide the carriage bolt (H12) into the
slot on both sensors to the
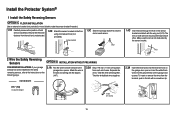
garage door opener. Install the Protector System®
1 Install the Safety Reversing Sensors
OPTION C FLOOR INSTALLATION...
8550 Manual - Page 21

... the 7/8" hole in the top of the motor unit (according to local code):
1.1B Be sure power is NOT connected to the opener, and disconnect power to circuit. 1.2B Remove the garage door opener cover and set aside. 1.3B Remove the attached green ground terminal. 1.4B Cut black and white wires and strip away 1/2" (1 cm) of electric shock...
8550 Manual - Page 22
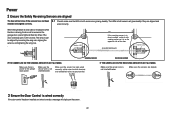
... the sensors have not been 2.1 Check to grey terminal.
Amber LED
If the receiving sensor is power to the garage door opener. Make sure the sensor wire is not shorted/broken. Power
2 Ensure the Safety Reversing Sensors are aligned
The door will flash ten times. wired correctly.
The LEDs in direct sunlight, switch it with sending...
8550 Manual - Page 26

... test the
battery. The battery will either glow solid orange indicating opener is not fully charged. Check with the terminals facing out. 1.4 Connect red (+) and black (-) wires from the garage door opener to the
corresponding terminals on battery power or will flash indicating low battery power. The battery status LED will take 24 hours to fully charge.
8550 Manual - Page 27
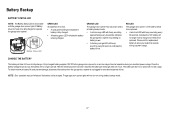
... with beep, sounding approximately every 2 seconds, indicates the garage door opener is operating on during a power outage. A fully charged battery supplies 12V DC to the garage door opener for one to operate the garage door opener. Once the battery voltage drops too low, the battery will recharge within 24 hours. After the electrical power has been restored, the battery will no longer...
8550 Manual - Page 29

... added control over the light bulbs on when the opener is initially plugged in the down until the garage door opener has completed 5 cycles upon power up to provide two-way communication between the garage door opener and MyQ™ accessories. The sleep mode shuts the garage door opener down direction.
29 The garage door opener is compatible with up to 2 Smart Control Panels...
8550 Manual - Page 30

... be in the event of maintenance.
The lights will display the Diagnostic Code. The MAS feature MUST be adjusted by accessing the menu using the garage door opener light as a work if the garage door opener is off . The factory setting is operating by battery power or if the safety reversing sensors are beyond the range of closing...
8550 Manual - Page 35

...) by ensuring the LED is lit, check the wire connections leading to Disconnect all power, remove cover, and locate the travel
module.
35 Troubleshooting
Diagnostic Chart
Your garage door opener is hanging or mounted on the garage door opener flash the diagnostic codes. If pre-wired home,
check the splices.
Close the garage door using
the remote control or the...
8550 Manual - Page 36

... My garage door opener light(s) will still not activate the door check the diagnostic codes to ensure
the garage door opener is ...door is okay, reprogram
apparent reason or after
sticking door
touching the floor
4-5
4 FLASHES 5 FLASHES The opener runs
Communication error to page 18. If your door is open and close the door. If your door is binding or sticking, contact a trained door...
Similar Questions

Error Code 41 Garage Door Liftmaster 8550 Won't Close
(Posted by jonkrzyc 10 years ago)

Error Code 22
I'm getting a 'HARDWARE FAILURE' ERROR CODE 22 on my Liftmaster 8550C display. It tells me to refer ...
I'm getting a 'HARDWARE FAILURE' ERROR CODE 22 on my Liftmaster 8550C display. It tells me to refer ...
(Posted by alletor64 10 years ago)

Error Code 22. It's Not Listed In The Manual.
the upward pointing arrow flashes twice, then the downward flashes twice.
the upward pointing arrow flashes twice, then the downward flashes twice.
(Posted by bmcilwn 12 years ago)

Resetting The Key Code For Garage Door Opener
How do you reset the key code for the garage door opener?
How do you reset the key code for the garage door opener?
(Posted by khiggins69 12 years ago)