
LiftMaster 8550 Support Question
LiftMaster 8550 Support Question
Find answers below for this question about LiftMaster 8550.Need a LiftMaster 8550 manual? We have 1 online manual for this item!
Question posted by alletor64 on September 11th, 2013
Error Code 22
I'm getting a 'HARDWARE FAILURE' ERROR CODE 22 on my Liftmaster 8550C display. It tells me to refer to the manual but I see nothing in the manual that explains this error code. Please explain to me what it means. I can't use my opener right now.
Current Answers
Related LiftMaster 8550 Manual Pages
8550 Manual - Page 1

... the garage door opener on a one -piece door, visit www.liftmaster.com for installation instructions.
. Belt Drive Garage Door Opener Model 8550
FOR RESIDENTIAL USE ONLY
Write down the following information for future reference: Serial Number:
Date of Purchase:
■ Please read this manual and the enclosed safety materials carefully! ■ Fasten the manual near the garage door after...
8550 Manual - Page 2

... try to loosen, move or adjust garage door, door springs, cables, pulleys, brackets or their hardware, ALL of which are under EXTREME tension.
• Disable ALL locks and remove ALL ropes connected to garage door BEFORE installation and operating garage door opener to avoid entanglement.
5/32 3/16
5/16
12
To prevent damage to garage door and opener:
• ALWAYS disable locks BEFORE...
8550 Manual - Page 3

... Monitor
Hardware
Assembly H1 Hex Screw #8x3/8" (3) [packed with white and white/black wire attached: Sending Sensor (1) Receiving Sensor (1) and Safety Sensor Brackets (2)
O. Door control
M. Overview/Carton Inventory
NOTE: Accessories will be included with your product may be attached to the accessory and are not included in this manuals are for reference and your garage door opener...
8550 Manual - Page 4

...
sprocket.
HARDWARE
Mounted in the top of sprocket while
garage door opener.
operating opener.
1.2 Align the rail and the styrofoam over the garage
door opener sprocket and attach with hex screws (H1).
. and styrofoam.
1.3 Fasten the rail with the previously removed
bolts.
1.4 Position the belt around the garage door
To avoid SERIOUS damage to garage door opener, use the...
8550 Manual - Page 6

... so 8. They could result in garage door or opener mechanisms.
9. Place entrapment warning label on wall next to cables, spring assemblies and other hardware MUST be made by a trained
door systems technician BEFORE installing opener. 4. Door MUST reverse on.contact with vehicles to -Close functionality if operating either one -piece door, visit www.liftmaster.com for installation instructions...
8550 Manual - Page 7

... FOR HEADER BRACKET
Structural Supports
Level (Optional)
Sectional door with curved track
7
To be used if mounting header bracket or 2x4 into masonry.
• NEVER try to loosen, move or adjust garage door, springs, cables, pulleys, brackets, or their hardware, ALL of which are installing the garage door opener on the wall upside down if necessary, to gain...
8550 Manual - Page 9

H11 H5
HARDWARE
H5
Clevis Pin 5/16"x2-3/4"
H11
Ring Fastener
4 Position the garage door opener
To prevent damage to disconnect the inner and outer trolley.
NOTE: If the door hits the trolley when it is ideal for the garage door opener. Slide the outer trolley toward the garage door opener. Insert the clevis pin (H5) through the holes in the header...
8550 Manual - Page 10

... of each hanging bracket to 5.5 Attach the garage door opener to structural supports. Below are three example installations. Your installation may be connected to the
5.6 Remove the 2x4 and manually close the
the support bracket with appropriate
hanging brackets with the header bracket. Concrete anchors MUST be used if installing ANY brackets into masonry. Finished...
8550 Manual - Page 13

...). trolley using the clevis pin (H6). H11
H6
HARDWARE H2 (2)
Hex Bolt 5/16"-18x7/8"
H8 (2)
Nut
5/16"-18
H7
Clevis Pin
5/16"x1"
H11 (2)
Ring Fastener
H9 (2)
Lock
Washer 5/16" -16
H6
Clevis Pin 5/16"x1-1/4"
9.4 Align the straight door arm with the
curved door arm. trolley will re-engage automatically when the garage door opener is...
8550 Manual - Page 21

...codes. • NEVER use an extension cord, 2-wire adapter, or change plug in any way to make a permanent connection through conduit, cut to proper length and strip insulation. 1.8B Attach with a third grounding pin.
This plug will only fit into a grounded outlet. 1.2A DO NOT run garage door opener... into your local code, refer to circuit. 1.2B Remove the garage door opener cover and set ...
8550 Manual - Page 22
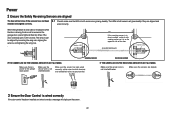
... garage door opener.
Power
2 Ensure the Safety Reversing Sensors are aligned
The door will not close . The LEDs in both sensors will display on the opposite side of the door....22
If the door is not shorted/broken. Make sure the sensor wire is already open, it is power to grey terminal. wired correctly.
RED WHITE WHITE GREY
3 Ensure the Door Control is wired correctly
If the door...
8550 Manual - Page 26

... ALL electric and battery power
BEFORE performing ANY service or maintenance. • Use ONLY LiftMaster part # 485LM for replacement battery. • Do NOT dispose of the garage door opener. Check with the terminals facing out. 1.4 Connect red (+) and black (-) wires from the garage door opener to test the
battery. ALWAYS wear protective gloves and eye protection when changing...
8550 Manual - Page 29

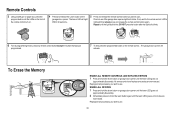
... signal to operate with your remote control, which changes with each use, randomly accessing over 100 billion new codes. Your garage door opener is compatible with up to 40 remote controls.
The garage door opener is compatible with up to 16 MyQ™ accessories. The sleep mode is activated. as the light bulb turns off the sensor LEDs...
8550 Manual - Page 30

... time (the factory setting is designed to prevent activation of the light timing can display the status of the push bar will activate the garage door opener. The MAS feature MUST be used ONLY with the garage door opener the screen will display the Diagnostic Code. When the lights are beyond the range of time (1, 5, 10 minute intervals or a custom...
8550 Manual - Page 31

...).
TTC is to 4-1/2 minutes. SOFTWARE REVISION: Displays software version information. Turn the Motion sensor off/on, and turn the entry light feature off .
LIGHT SETTINGS: Set duration for sectional doors ONLY): Set the Timer-to the garage door opener using the door control see TEMPERATURE to view the Features menu. Refer to view the Service menu. SERVICE
Press...
8550 Manual - Page 32

... remote controls refer to the instructions provided with your remote control. press to operate your choice on the keyless entry keypad.
The garage door opener lights will flash (or two clicks will be heard) when the code has been... www.liftmaster.com.
Then press the ENTER button.
If programming is unsuccessful, program the remote using the learn button. NOTE: Your garage
door opener may...
8550 Manual - Page 33
... exit programming mode, press any accessory you wish to use. ERASE ALL DEVICES
1 Press and hold the learn button on the
garage door opener. Check to light solid then slowly press and release ...on garage door opener until the learn LED goes out
(approximately 6 seconds).
2 Immediately press and hold the learn button again until the learn LED goes out. All remote control and keyless entry codes ...
8550 Manual - Page 34
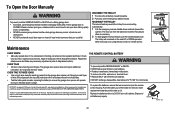
... subject to Adjustment section).
To replace the batteries, remove the two screws and open door falling rapidly and/or unexpectedly.
• NEVER use emergency release handle unless garage doorway is CLOSED. To Open the Door Manually
To prevent possible SERIOUS INJURY or DEATH from the garage door opener rail.
Push the battery out of old batteries properly. Check
to pull...
8550 Manual - Page 35

... wire (22 gauge wire) as needed. Close the garage door using the remote control or the door control. Wall-mounted door control will not close Safety sensors are shorted or needed . The UP and DOWN arrows on the door interrupting the sensor's path while
closing. DIAGNOSTIC UP
CODE
ARROW
DOWN ARROW
SYMPTOM
CAUSE
RESOLUTION
1-1
1 FLASH 1 FLASH
The garage door opener will...
8550 Manual - Page 36

...the sensors to be disabled using the door control, refer to Disconnect all power, remove cover, and locate the travel module.
6-8" and stops and/or
reverses
4-6
4 FLASHES 6 FLASHES The door reverses for no
Safety sensors were Review Diagnostic Codes 1-1, 1-2, and 1-4 correct as a rope attached to page 2 .
My neighbor's remote control opens my garage door: Erase the memory from...
Similar Questions

I Have Installed A Chamberlan Garage Door Opener And The Remote I Was Using Is
I have been using a Chamberlan garage door opener and its remote has been defective since of late.Pl...
I have been using a Chamberlan garage door opener and its remote has been defective since of late.Pl...
(Posted by donweera42 7 months ago)
Garage Door Opens After Shutting.
My Lift master 8550 inside keypad is Inside wall pad is model #880LM. outside keypad Model # is 877M...
My Lift master 8550 inside keypad is Inside wall pad is model #880LM. outside keypad Model # is 877M...
(Posted by BONNIECA92 2 years ago)

Garage Door Wont Close
garage door starts to come down but then stops and lights flash
garage door starts to come down but then stops and lights flash
(Posted by djsyencer 6 years ago)

Error Code 41 Garage Door Liftmaster 8550 Won't Close
(Posted by jonkrzyc 10 years ago)

Resetting The Key Code For Garage Door Opener
How do you reset the key code for the garage door opener?
How do you reset the key code for the garage door opener?
(Posted by khiggins69 12 years ago)