
Lexmark X5630 Support Question
Lexmark X5630 Support Question
Find answers below for this question about Lexmark X5630.Need a Lexmark X5630 manual? We have 3 online manuals for this item!
Question posted by mailacf on September 20th, 2014
Carrier Jam There Is No Objects,cartrage Was Replaced
The person who posted this question about this Lexmark product did not include a detailed explanation. Please use the "Request More Information" button to the right if more details would help you to answer this question.
Current Answers
Related Lexmark X5630 Manual Pages
User's Guide - Page 9
...Refer service or repairs, other replacement parts. Connect the power supply cord to abrasion or stress.
Do not pinch the power cord between objects such as the power supply ... tested, and approved to meet strict global safety standards with this product or the manufacturer's authorized replacement power supply and power supply cord. Lexmark is misused, a risk of fire or electrical shock...
User's Guide - Page 17
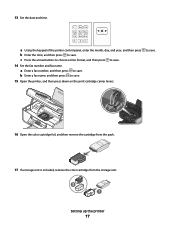
a Using the keypad of the printer control panel, enter the month, day, and year, and then press b Enter the time, and then press to save . 13 Set the date ...remove the cartridge from the pack.
17 If a storage unit is included, remove the color cartridge from the storage unit. 2 1
Setting up the printer
17 to save . 15 Open the printer, and then press down on the print cartridge carrier levers.
User's Guide - Page 18
18 Remove the tape from the color print cartridge, insert the cartridge in the right carrier, and then close the color
cartridge carrier lid.
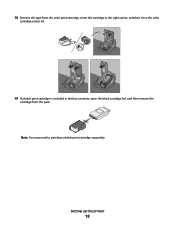
19 If a black print cartridge is included in the box contents, open the black cartridge foil, and then remove the
cartridge from the pack. Note: You may need to purchase a black print cartridge separately. Setting up the printer
18
User's Guide - Page 19
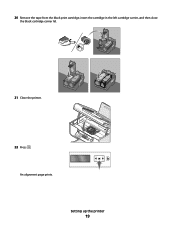
An alignment page prints. Setting up the printer
19
20 Remove the tape from the black print cartridge, insert the cartridge in the left cartridge carrier, and then close
the black cartridge carrier lid.
21 Close the printer.
22 Press .
User's Guide - Page 22
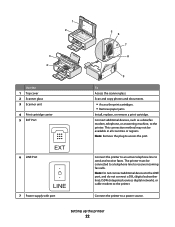
... unit 4 Print cartridge carrier 5 EXT Port
6 LINE Port
EXT
LINE
7 Power supply with port
5 6
7
8
9
To Access the scanner glass. Note: Remove the plug to a power source. Scan and copy photos and documents.
• Access the print cartridges. • Remove paper jams.
Install, replace, or remove a print cartridge. Setting up the printer
22
Connect the...
User's Guide - Page 61
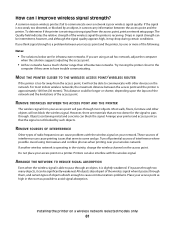
... distance could be longer or shorter, depending upon the layout of the network and the limitations of the wireless signal the printer is too weak, too distorted, or blocked by such objects. These sources of radio frequencies can cause problems with the wireless signal. Turn off potential sources of the following:
Notes...
User's Guide - Page 66
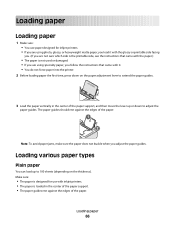
... • The paper guides rest against the edges of the paper.
1
2
Note: To avoid paper jams, make sure the paper does not buckle when you adjust the paper guides. Loading paper
66 Loading paper
Loading... paper
1 Make sure: • You use with inkjet printers. • The paper is not used or damaged. • If you are using photo, glossy, ...
User's Guide - Page 67
...
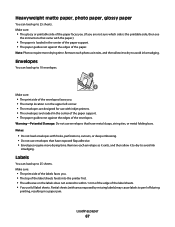
smudging. Remove each photo as it exits, and then allow it to dry to 25 sheets. Loading paper
67 Partial sheets (with inkjet printers. • The envelopes are not sure which side is in the center of the paper support. • The paper guides rest against ... may cause labels to 10 envelopes.
1
2
Make sure:
• The print side of the envelopes faces you are loaded in a paper jam.
User's Guide - Page 70
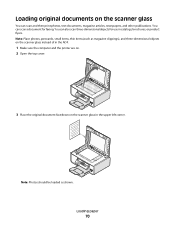
... for use in the upper left corner. Note: Photos should be loaded as magazine clippings), and three-dimensional objects on the scanner glass instead of in the ADF.
1 Make sure the computer and the printer are on. 2 Open the top cover.
3 Place the original document facedown on the scanner glass
You can...
User's Guide - Page 80

...size matches the label sheet size, then create a custom size.
Using Macintosh
a Customize the settings as needed in the printer.
The Define Custom Paper Size dialog appears. d Click OK to peel off during
printing, resulting in the Page Setup dialog... list, select Custom Size.
Remove each label sheet as needed in a paper jam. b Click Properties, Preferences, Options, or Setup.
User's Guide - Page 87
... the instructions that are on the display prompting you to designate the device you want the printer to recognize. If you want to customize the photos before stacking, displaying, or storing.... and then press . Working with your fingers or sharp objects. For best results, remove each time you make a selection.
7 Press . Note: The printer recognizes one of the following: • If you are ...
User's Guide - Page 91
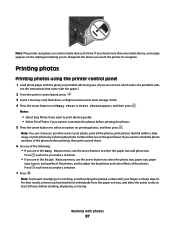
...press . 5 Press the arrow buttons to select an option to save your fingers or sharp objects.
For best results, remove each printed sheet individually from the paper exit tray, and then... touching the printed surface with photos
91
Notes:
• If you insert the camera while the printer is the printable side, then see the instructions in the circles completely.
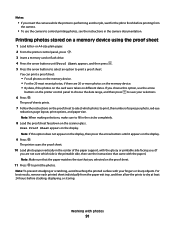
8 Load the proof sheet...
User's Guide - Page 92

...the paper.)
2 Insert a memory card. If your fingers or sharp objects. Note: If you insert the memory card into the printer or connect the camera to print, how many of each printed sheet individually... glossy or printable side facing you. (If you are not sure which photos to the printer. The printer recognizes these settings when you specify a photo size while the memory card is still in ...
User's Guide - Page 98
... size is the printable side,
then see the instructions that came with your fingers or sharp objects. Note: Make sure you loaded a photo paper into the ADF.
Copying
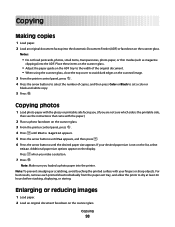
Making copies
1 ... reducing images
1 Load paper. 2 Load an original document facedown on the scanner glass. 3 From the printer control panel, press . 4 Press until Photo Reprint appears. 5 Press the arrow buttons until Yes appears,...
User's Guide - Page 111
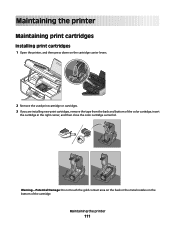
... or the metal nozzles on the cartridge carrier levers.
2 Remove the used print cartridge or cartridges. 3 If you are installing new print cartridges, remove the tape from the back and bottom of the cartridge.
Maintaining the printer
Maintaining print cartridges
Installing print cartridges
1 Open the printer, and then press down on the bottom...
User's Guide - Page 112
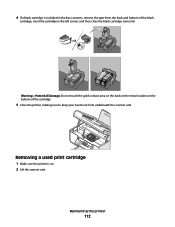
... sure to keep your hands out from underneath the scanner unit. Removing a used print cartridge
1 Make sure the printer is included in the left carrier, and then close the black cartridge carrier lid. Maintaining the printer
112
Warning-Potential Damage: Do not touch the gold contact area on the back or the metal nozzles...
User's Guide - Page 113
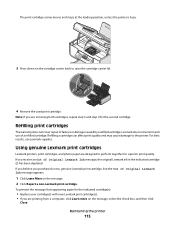
... and stops at the loading position, unless the printer is busy.
3 Press down on the cartridge carrier latch to perform together for superior print quality. Note: If you are removing both cartridges, repeat step 3 and step 4 for the indicated cartridge(s):
• Replace your cartridge(s) with new Lexmark print cartridge(s). • If you purchased...
User's Guide - Page 117
...
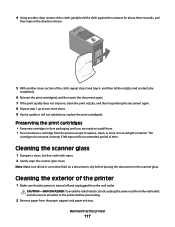
1 Dampen a clean, lint-free cloth with water. 2 Gently wipe the scanner glass clean. Cleaning the exterior of the printer
1 Make sure that the printer is dry before proceeding.
2 Remove paper from the printer except to replace, clean, or store it in the direction shown.
5 With another clean section of the cloth, gently hold the...
User's Guide - Page 145
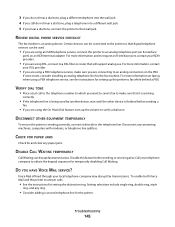
... finished before sending or receiving a fax. If none exists, consider installing an analog telephone line for and clear any paper jams.
DISABLE CALL WAITING TEMPORARILY
Call Waiting can be connected to the printer so that it directly to an analog telephone port (an R-interface
port) on an ISDN terminal adapter. DISCONNECT OTHER...
Fax Guide - Page 7
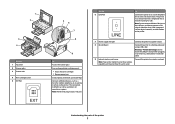
... 3 Scanner unit 4 Print cartridge carrier 5 EXT Port
EXT
5 6
7
8
9
To Access the scanner glass. Scan and copy photos and documents.
• Access the print cartridges. • Remove paper jams. Install, replace, or remove a print cartridge.
....
Note: Remove the plug to send and receive faxes. Note: Your printer model may not have this print server. Connect additional devices, such as ...
Similar Questions

Why X5630 Lexmark Printer Paper Jam?
Why X5630 Lexmark printer paper jam?
Why X5630 Lexmark printer paper jam?
(Posted by lethogonolomolotsane 8 years ago)

Error Message; Free Carrier Jam; Cannot Fit New Cartridges
I have the above error message. I reoved cartridges to check and they will not be accepted by holder...
I have the above error message. I reoved cartridges to check and they will not be accepted by holder...
(Posted by jwybrew 10 years ago)


Why Does My Lexmark X5630 Printer Says Left Cartridge Incorrect
i bought my lexmark mark x5630 printer from games in ballito ,south africa ,its not even 6 months ol...
i bought my lexmark mark x5630 printer from games in ballito ,south africa ,its not even 6 months ol...
(Posted by shantelsofficework 12 years ago)