
Lexmark X342N Support Question
Lexmark X342N Support Question
Find answers below for this question about Lexmark X342N - Multi Function Printer.Need a Lexmark X342N manual? We have 6 online manuals for this item!
Question posted by cromptondoug on September 7th, 2012
Printing Faint On Right Hand Side Of Paper ... Even With New Original Toner.
Printing faint of RH side of page ... even with new original toner. Anything I can do?
Current Answers
Answer #1: Posted by LexmarkListens on September 12th, 2012 2:40 PM
LexmarkListens

Member since:
July 1st, 2011 Points: 1,410,550

Member since:
July 1st, 2011 Points: 1,410,550
Make sure the Photocondutor Kit is properly installed. Please also Check the transfer roll for signs of toner buildup and contamination. Inspect the High Voltage Power Supply (HVPS) contact (transfer roll) for contamination. Verify the high voltage cable is plugged into the LVPS/HVPS.
If all components appear free of contamination, replace the following FRUs one at a time in the order shown:
• Transfer roll
• LVPS/HVPS board
If you require further details, please contact our Technical Support Hotline.
If all components appear free of contamination, replace the following FRUs one at a time in the order shown:
• Transfer roll
• LVPS/HVPS board
If you require further details, please contact our Technical Support Hotline.
Lexmark Listens
Phone:
USA: 1-800-539-6275
Canada: (877) 856-5540
UK: 0800 121 4726
South Africa: 0800 981 435
Related Lexmark X342N Manual Pages
Troubleshooting Guide - Page 2

...paper into the MFP. Print speed is slow.
• Close all applications not in use new, dry paper...print or respond
• Remove and reinstall the software. or Click Start Control Panel Printers and Other Hardware Printers and Faxes.
2 Double-click the Lexmark X340/X340n/
X342n icon.
3 Click Printer, and make sure the guides are scanning a document, wait until Toner...
Troubleshooting Guide - Page 3
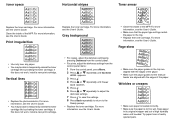
... more information, see the User's Guide. For more
information, see the User's Guide. Print irregularities
AaBbCc AaBbCc AaBbCc AaBbCc AaBbCc
• Use only new, dry paper. • You may be able to temporarily extend the toner
cartridge life by shaking the toner cartridge.
For more information, see the User's Guide.
• Make sure that the...
User's Guide - Page 3
... 24 Setting the Timeout option 24 Setting the network options (X342n only 25 Using the MFP software 26 Using Print Properties 26 Using Presto! PageManager (USB attach only 27 Using QLINK (USB attach only 27
Chapter 4: Loading paper and original documents 28
Loading paper in the paper tray 28 Loading paper in the manual feeder 32
Contents 3
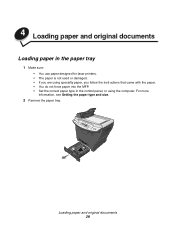
User's Guide - Page 28
For more
information, see Setting the paper type and size.
2 Remove the paper tray. Loading paper and original documents 28 4 Loading paper and original documents
Loading paper in the paper tray
1 Make sure:
• You use paper designed for laser printers. • The paper is not used or damaged. • If you are using specialty paper, you follow the instructions that came with...
User's Guide - Page 63
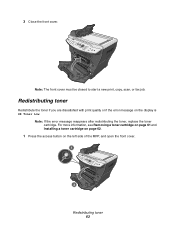
... cover must be closed to start a new print, copy, scan, or fax job.
Redistributing toner
Redistribute the toner if you are dissatisfied with print quality or if the error message on the left side of the MFP, and open the front cover.
1
2
Redistributing toner 63 For more information, see Removing a toner cartridge on page 61 and Installing...
User's Guide - Page 64
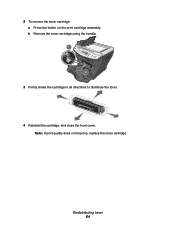
b Remove the toner cartridge using the handle.
1 2
3 Firmly shake the cartridge in all directions to distribute the toner.
4 Reinstall the cartridge, and close the front cover. Note: If print quality does not improve, replace the toner cartridge. Redistributing toner 64
2 To remove the toner cartridge:
a Press the button on the print cartridge assembly.
User's Guide - Page 75
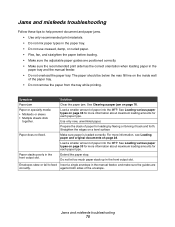
...; Use only recommended print materials. • Do not mix paper types in the paper tray. • Do not use creased, damp, or curled paper. • Flex, fan, and straighten the paper before loading. • Make sure the adjustable paper guides are
correctly. Paper stacks poorly in the front output slot. Use only new, unwrinkled paper.
Jams and misfeeds troubleshooting...
User's Guide - Page 87
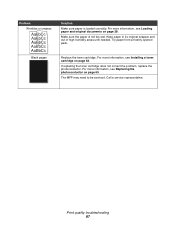
... and original documents on page 62. Call a service representative. If replacing the toner cartridge does not correct the problem, replace the photoconductor.
The MFP may need to be serviced. For more information, see Installing a toner cartridge on page 28. Black pages
Replace the toner cartridge.
Print quality troubleshooting 87
Try paper from a freshly opened pack.
Make...
User's Guide - Page 91
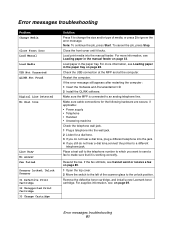
... fax. Remove the defective toner cartridge, and install a new Lexmark toner cartridge. To cancel the job...print media into the jack. 4 If you want to send a fax to a different
telephone jack. For more information, see Loading paper in the paper tray. For more information, see Loading paper in the paper...you do not hear a dial tone,connect the printer to make sure that it locks. Place a ...
User's Guide - Page 102
... an image 53 entering characters 50 envelopes
loading 33 printing 39 error messages 200 Paper Jam 92 201 Paper Jam 92 202 Paper Jam 92 241 Paper Jam 93 242 Paper Jam 93 251 Paper Jam 93 Change Cartridge 91 Change Media 91 close front door 91 Defective Toner Cartridge 91 Digital Line Detected 91 Fax failed 91...
Service Manual - Page 22
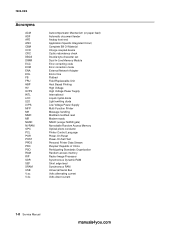
... Charge coupled device Cyclic redundancy check Double byte character set Dual In-Line Memory Module Error correcting code Error correction mode External Network Adapter End of line Flatbed Field Replaceable Unit Host Based Printing High Voltage High Voltage Power Supply International Liquid crystal diode Light emitting diode Low Voltage Power Supply Multi Function Printer Message...
Service Manual - Page 28

...
Using the MFP menus
Reports Print Menus Demo Page Network Setup Fax Call Log FaxJob Log Phonebook
Copy Defaults Darkness Content Number Scale Collate Paper Source Paper Saver
Network Setup Enable DHCP IP Address Netmask Gateway
Fax Defaults Content Original Size Darkness Rings Distinct Ring Redials Redial Wait Paper Source Speaker Volume Prefix ECM Station...
Service Manual - Page 32
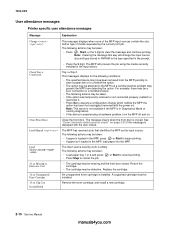
...; If paper is loaded in the MPF, press or Start to begin printing. • If paper isn't ...print job.
Remove the toner cartridge, and install a new cartridge.
2-10 Service Manual
manuals4you.com See "Cover interlock switch service check" on page 2-22 if this way will process the job using the media currently installed in Diagnostics Mode or running diagnostics. • If the device...
Service Manual - Page 53
...: Incorrect laser exposure or incorrect charging of service. Verify ground on page 2-20. manuals4you.com
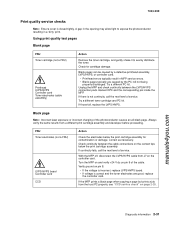
Diagnostic information 2-31 7003-XXX
Print quality service checks
Note: Ensure cover is correct and the toner electrodes are caused by the PC roll not being
properly discharged.
Unplug the MFP and check continuity between the cable...
Service Manual - Page 54
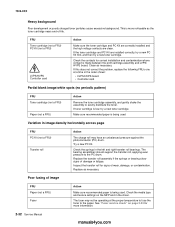
... the problem, replace the following FRUs one at the proper temperature to fuse the toner to the paper. Try a new PC Kit. The fuser may have an unbalanced pressure against the photoconductor (PC) drum. Variation in the left and right transfer roll bearings. The bearing assemblies should support the transfer roll, applying even pressure...
Service Manual - Page 55

... continues, install a new toner cartridge.
Toner on back of page
FRU PC Kit (not a FRU) Fuser
Transfer roll
Action
Inspect the overall paper path for signs of spilled toner. Replace the fuser ...the paper. 7003-XXX
Light print
FRU Toner cartridge (not a FRU)
Transfer roll LVPS/HVPS board
Action
Make sure the toner cartridge and PC Kit are installed correctly and that the toner cartridge...
Service Manual - Page 57
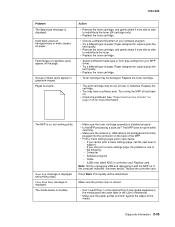
... form type setting from side to side to save space.
- Make sure the printer cover is on paper. Solid black areas on transparencies or white streaks on , but nothing prints.
Replace the toner cartridge.
• The print cartridge may be diminished. See "Paper feed service checks" on page 2-29 for copiers gives the
best quality. •...
Service Manual - Page 67

... support to obtain the latest firmware build.
The scanner registration function is set the left margin to the Registration menu item. 2. The top, right, and bottom margins are fully visible. Use the Up or Down keys to scroll to the Reports menu and print a menu page. Scanner Registration
Go to the Scanner submenu...
Service Manual - Page 76

Remove the left cover to disengage it from the
scanner top cover.
6. 7003-XXX
3. Remove the three screws (C) that secure the left side cover.
4-4 Service Manual
manuals4you.com Release the latches with the right hand while applying opening force with the left cover upwards to the rear cover.
4. While pulling the left side cover away from the MFP, lift the left hand. 5.
Service Manual - Page 105

... the transfer roll as little as possible.
1. The springs should remain in place.
Place a sheet of the transfer roll, squeeze the holder arms with the right hand while lifting with the left holder is unlatched.
4. At the left side of paper around the transfer roll to protect it. 3.
Similar Questions

Received Faxes Fail To Print
After receiving a fax, the printer doesn't print it automatically... eventhough the fax is registere...
After receiving a fax, the printer doesn't print it automatically... eventhough the fax is registere...
(Posted by jeanpierrehurteau 9 years ago)

Solid Black Strip Down The Right Hand Side?
When I scan a document I get a thick, solid black strip down the right hand side. What would be caus...
When I scan a document I get a thick, solid black strip down the right hand side. What would be caus...
(Posted by bryguy52 9 years ago)

Lexmark X543 - 'yellowed' Printed And Copied Pages On Right Hand Side.
My Lexmark X543 is having an issue with printing and copying. It is producing "yellowed" pages, prim...
My Lexmark X543 is having an issue with printing and copying. It is producing "yellowed" pages, prim...
(Posted by kgrandstaff 9 years ago)

Paper Does Not Load Into Copier
(Posted by linngoetz 12 years ago)

Paper Jam 200.00
first printout always jammed and when it print well when remove and then jammed again when print ano...
first printout always jammed and when it print well when remove and then jammed again when print ano...
(Posted by cindercam 12 years ago)