
Lexmark C782 Support Question
Lexmark C782 Support Question
Find answers below for this question about Lexmark C782.Need a Lexmark C782 manual? We have 11 online manuals for this item!
Question posted by son7btow on February 18th, 2014
How To Clear Paper Jam In Lexmark C782 Without Logging In
The person who posted this question about this Lexmark product did not include a detailed explanation. Please use the "Request More Information" button to the right if more details would help you to answer this question.
Current Answers
Related Lexmark C782 Manual Pages
IPDS Emulation User’s Guide - Page 26
...Page
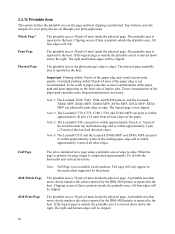
The printable area is 50 pels (4 mm) inside the physical page.
Note 2: The Lexmark C770, C772, C780, C782, and X782e MFP can physically print edge to the host.
All four edges will be ... paper path can result in the menu when supported by the IBM 4028 printer is formatted for your print jobs are set through your print application. Full page will only appear in paper jams ...
User's Guide - Page 4
... waste container ...62 Fuser and ITU ...62 Recycling Lexmark products ...63
Chapter 5: Clearing paper jams 64
Identifying jams ...64 Access doors and trays ...65 Understanding jam messages ...66 Clearing the entire paper path ...67 Clearing mailbox, finisher, or output expander jams (Area M 71 Clearing fuser jams ...71 Clearing image transfer unit jams ...73 If you still need help ...77
Chapter...
User's Guide - Page 48
...°F) for laser printers.
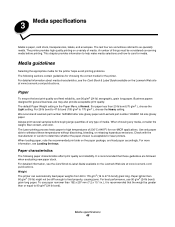
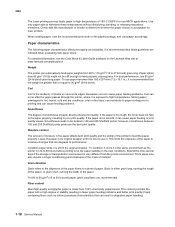
The Laser printing process heats paper to care for the printer. For more information, see the Card Stock & Label Guide available on the paper package, and load paper accordingly. Paper characteristics
The following sections contain guidelines for choosing the correct media for media. The printer provides high quality printing on the Lexmark Web site...
User's Guide - Page 64
... jam.
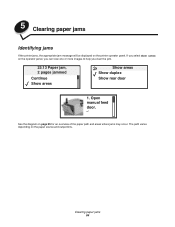
23.13 Paper jam, 2 pages jammed
Continue Show areas
Show areas Show duplex Show rear door
1. Clearing paper jams 64 The path varies depending on the operator panel, you can view one or more images to help you select Show areas on the paper source and output bins. Open manual feed door. 5 Clearing paper jams
Identifying jams
If the printer jams, the appropriate jam...
User's Guide - Page 65
Clearing paper jams
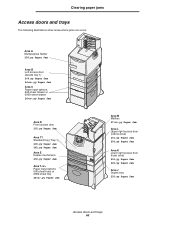
Access doors and trays
The following illustrations show areas where jams can occur.
Area A Multipurpose feeder 250.yy Paper Jam
Area B Left access door (beside tray 1) 200.yy Paper Jam 24.yy Paper Jam Area C Paper input options: 500-sheet drawer or 2000-sheet drawer 24.yy Paper Jam
Area D Front access door 201.yy Paper Jam
Area T1 Standard tray (Tray 1) 200...
User's Guide - Page 66
....yy Paper Jam (fuser area)
202.yy Paper Jam (fuser area)
230.yy Paper Jam (duplex area)
24.yy Paper Jam (trays 1-4)
250 Paper Jam (multipurpose feeder)
27.yy Paper Jam (mailbox and output expander)
Check Areas B, T1
D, K, L
K, L
E, J B,C, T A,D M
What to do Follow the instructions for clearing Area A and Area D. Follow the instructions for clearing Area B, and Area T1. Clearing paper jams...
User's Guide - Page 67

Clearing paper jams
Clearing the entire paper path
When a paper jam occurs, the printer stops operating and displays 2.yy Paper Jam and a message to resume printing. Note: The printer also displays Pages Jammed. Be sure to remove all visible media.
Note: Remove any torn media from the printer.
3 Close the door. Area B
1 Open the left access door until it flat.
2 Press the pick ...
User's Guide - Page 68
...-sheet drawer: a Open the 2000-sheet drawer access door.
b Close the door. Remove jams
in the rollers under the image transfer unit. Pull the jam down into the tray. Note: Any image printed will not be fused to the page. Clearing paper jams
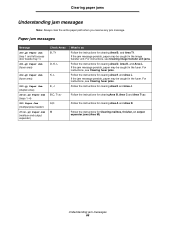
Area C
1 If you have one or more optional 500-sheet drawers: a Open...
User's Guide - Page 69
... then close the 2000-sheet drawer. Area E
1 Pull the duplex tray E completely out. Clearing the entire paper path 69 b Remove any paper caught in the printer. Remove any jams. Note: Make sure the paper is pushed all the 500-sheet drawer jams from Area C: a Open the 2000-sheet drawer. b Close trays 2 through 4 (all 500-sheet trays) and...
User's Guide - Page 70
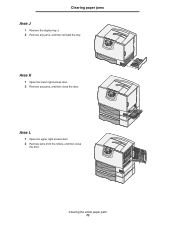
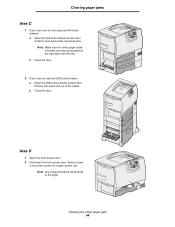
Clearing the entire paper path 70 Clearing paper jams Area J
1 Remove the duplex tray J. 2 Remove any jams, and then close
the door.
Area L
1 Open the upper right access door. 2 Remove jams from the rollers, and then close the door.
Area K
1 Open the lower right access door. 2 Remove any jams, and then reinstall the tray.
User's Guide - Page 71

Let it cool before continuing.
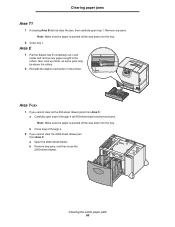
Clearing fuser jams
1 Clear the paper path. CAUTION: The fuser assembly may be hot. If the jam error message persists, go to step 2. 2 Open both the upper right and the lower right access doors (Areas K and L). Clearing paper jams
Clearing mailbox, finisher, or output expander jams (Area M)
1 Open the rear door of the 5-bin mailbox or...
User's Guide - Page 72
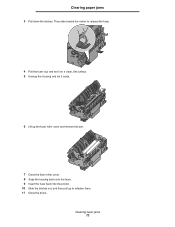
... set it aside.
6 Lift up the fuser roller cover and remove the jam.
7 Close the fuser roller cover. 8 Snap the housing back onto the fuser. 9 Insert the fuser back into the printer. 10 Slide the latches out, and then pull up to refasten them. 11 Close the doors.
Clearing paper jams
3 Pull down the latches.
User's Guide - Page 73
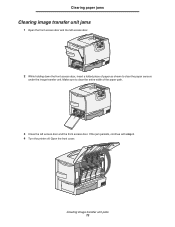
... step 4. 4 Turn the printer off. Clearing image transfer unit jams 73 Make sure to clear the entire width of the paper path.
3 Close the left access door.
2 While holding down the front access door, insert a folded piece of paper as shown to clear the paper sensors under the image transfer unit.
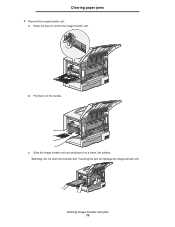
Open the front cover. Clearing paper jams
Clearing image transfer unit...
User's Guide - Page 74
Clearing paper jams
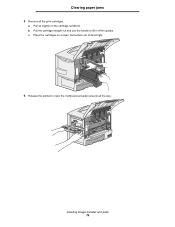
5 Remove all the way.
a Pull up slightly on a clean, flat surface out of direct light.
6 Release the latches to lift it off the guides. b Pull the cartridge straight out and use the handle to open the multipurpose feeder (area A) all the print cartridges. c Place the cartridges on the cartridge handhold. Clearing image transfer unit jams 74
User's Guide - Page 75
a Raise the lever to unlock the image transfer unit.
Clearing paper jams
7 Remove the image transfer unit. c Slide the image transfer unit out and place it on the handle. Touching the belt will damage the image transfer unit. Clearing image transfer unit jams 75
b Pull down on a clean, flat surface. Warning: Do not touch the transfer belt.
User's Guide - Page 76
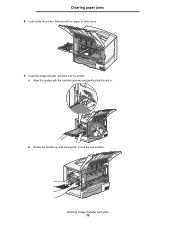
b Rotate the handle up, and push gently to lock the unit in . Clearing image transfer unit jams 76 Clearing paper jams
8 Look inside the printer. Remove all torn paper or other jams.
9 Insert the image transfer unit back into the printer.
a Align the guides with the insertion grooves and gently slide the unit in place.
User's Guide - Page 77
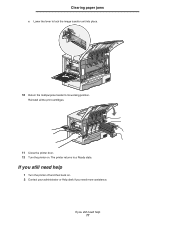
.... If you still need help
1 Turn the printer off and then back on . Clearing paper jams
c Lower the lever to lock the image transfer unit into place.
10 Return the multipurpose feeder to a Ready state. Reinstall all the print cartridges.
11 Close the printer door. 12 Turn the printer on . 2 Contact your administrator or Help desk...
User's Guide - Page 111
... 61 output bins linking 41
P
pad, numeric 28 panel, display 28 paper
letterhead 50 preprinted forms 50 recommended types 48 storing 46 unacceptable 49 paper jams areas 65 avoiding 47 clearing 64 fuser 71 Parallel Interface Card 20 PIN entering at the printer 43 entering from the driver 42 Power Saver, adjusting 80 preprinted forms...
Service Manual - Page 38
... recommended print side on the Lexmark Web site at its performance. Paper lighter than 182 x 257 mm (7.2 x 10.1 in the original wrapper. Moisture content
The amount of moisture in the paper affects both print quality and the ability of the printer to determine whether the paper chosen is acceptable for laser printers. Thick paper may also require a longer...
Service Manual - Page 73
....
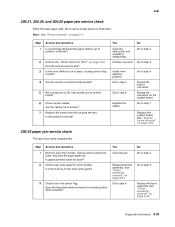
Check fuser entry guide for toner buildup. 5061
200.21, 200.28, and 200.29 paper jam service check
Either the laser paper path, S2,or narrow media sensor is obstructed. Yes
Clear the jam. Note: See "Printer sensors" on page A-44. Is paper jammed inside the fuser?
Replace the fuser assembly. Is the problem resolved? See "Fuser assembly...
Similar Questions


What Causes A Lexmark C782 Printer To Jam In Only Duplex Mode
(Posted by bermeleo 10 years ago)
Paper Jam In The Input Sensor
Recently after replacing the photo conductor kit on my E238 Lexmark printer I have had problems with...
Recently after replacing the photo conductor kit on my E238 Lexmark printer I have had problems with...
(Posted by jsiringagency 11 years ago)