Gateway MX6447 Support Question
Gateway MX6447 Support Question
Find answers below for this question about Gateway MX6447.Need a Gateway MX6447 manual? We have 5 online manuals for this item!
Question posted by smuzzell on September 9th, 2011
Dc Power Jack Replacement, How To Do And How Difficult.
The person who posted this question about this Gateway product did not include a detailed explanation. Please use the "Request More Information" button to the right if more details would help you to answer this question.
Current Answers
Related Gateway MX6447 Manual Pages
8511418 - Component Replacement Manual - Page 1

... must be damaged.
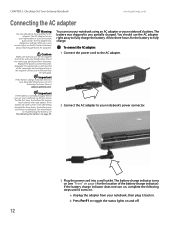
2 Connect the AC adapter to your hardware guide for Customer Care Information.
Replacing the AC Adapter
3 Plug the power cord into a wall outlet.
Power indicator
If the power indicator does not turn blue after three hours, contact Gateway Customer Care at the Web address or telephone number shown on the label...
8511418 - Component Replacement Manual - Page 2

...8 Turn your notebook into an AC outlet. 10 Open the LCD panel and press the power button.
To replace the battery:
1 If your notebook.
See your hardware guide for your notebook is on the... Support See the label on and is not connected to AC power, save your notebook is connected to AC power, you can
replace the battery while the notebook is turned on.
in this device...
8511418 - Component Replacement Manual - Page 4

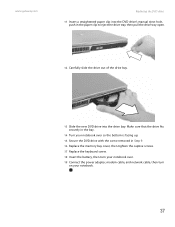
...notebook over.
16 Connect the power adapter, modem cable, and network cable, then turn on the DVD bracket. See your notebook.
17 Reconnect all peripheral devices and replace any PC Cards. 10 Slide... Information. Gateway and eMachines are trademarks or registered trademarks of Gateway, Inc. DVD bracket
Replacing the DVD Drive
11 Slide the new DVD drive into the drive bay.
All rights ...
8511418 - Component Replacement Manual - Page 6

... the new drive, label side up, onto the cover so the screw holes line up.
11 Replace the four screws that secure the hard drive to you see a blank screen, restart your notebook,....
13 Insert the battery and turn your notebook over.
14 Connect the power adapter, modem cable, and network cable.
15 Reconnect all peripheral devices and replace any PC Cards.
16 Turn on your notebook.
17 If the hard ...
8511418 - Component Replacement Manual - Page 8

...9 Replace the two optional keyboard screws.
10 Replace the memory bay cover and wireless network bay cover.
11 Replace the keyboard screw.
12 Insert the battery, then turn your notebook over.
13 Connect the power adapter... panel.
17 Slide the black keyboard connector clip to not damage the LCD panel.
6 Replace the keyboard cover. Be careful not to touch or damage any other brands and product names...
8511418 - Component Replacement Manual - Page 10

... notch in the module lines up with the tab in place.
12 Replace the memory bay cover, then tighten the six cover screws.
13 Replace the keyboard screw.
14 Insert the battery, then turn your notebook over.
15 Connect the power adapter, the modem cable, and the network cable.
16 Reconnect all peripheral...
8511418 - Component Replacement Manual - Page 12

... cover, then tighten the cover screw.
16 Insert the battery, then turn your notebook over.
17 Connect the power adapter, the modem cable, and the network cable.
18 Reconnect all peripheral devices and replace any PC Cards.
19 Turn on your notebook.
in one direction. All other countries. See your hardware guide...
8511369 - Gateway Notebook Hardware Reference - Page 10
... Out Your Gateway Notebook
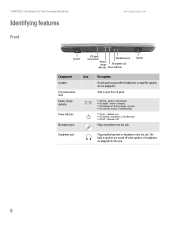
Identifying features
Front
www.gateway.com
Speaker
LCD panel release latch
Headphone jack
Battery charge
Microphone jack
indicator Power indicator
Speaker
Component
Icon
Speakers
LCD panel release latch
Battery charge indicator
Power indicator
Microphone jack
Description
Provide audio output when headphones or amplified speakers are plugged into this...
8511369 - Gateway Notebook Hardware Reference - Page 14
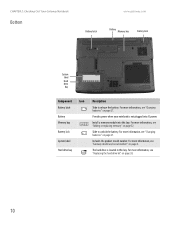
For more information, see "Replacing the hard drive kit" on page 38.
10 For more information, see "Changing batteries" on ...For more information, see "Gateway model and serial number" on page 27. Provides power when your notebook is located in this bay. For more information, see "Adding or replacing memory" on page 27.
For more information, see "Changing batteries" on page ...
8511369 - Gateway Notebook Hardware Reference - Page 16
....
The battery charge indicator turns on (see "Recalibrating the battery" on page 29.
2 Connect the AC adapter to fully charge. Replace the power cord if it turns on and off.
12 The replacement cord must be
much shorter than you partially charged. Important
If the battery is not fully charged before you use...
8511369 - Gateway Notebook Hardware Reference - Page 17
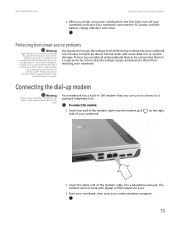
... No. 26 AWG or larger telecommunications line
cord.
Connecting the dial-up modem
4 When you have a telephone modem, use a surge protector that has a modem jack.
During a power surge, the voltage level of your notebook through both the surge
protector and the modem.
If you can enter your notebook. The modem will not...
8511369 - Gateway Notebook Hardware Reference - Page 31

...not plugged into an AC outlet, you can change the battery:
1 If your notebook is incorrectly replaced.
Replace only with a battery specifically manufactured for your notebook is on the taskbar, click the show
hidden ...°F (100°C), or incinerate. If your notebook is connected to AC power, you must turn off your notebook.
2 Close the LCD panel.
3 Turn your notebook over so the ...
8511369 - Gateway Notebook Hardware Reference - Page 33
... accurate battery charge. Batteries If you can swap batteries when necessary.
See "Adding or replacing memory" on page 27 for accessories or supplies. If your notebook.
2 As soon ...take several hours.
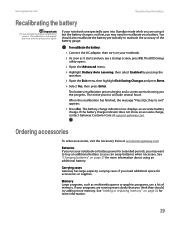
To recalibrate the battery:
1 Connect the AC adapter, then turn on battery power for more information.
29
You should , try adding more information about using it starts and you...
8511369 - Gateway Notebook Hardware Reference - Page 36
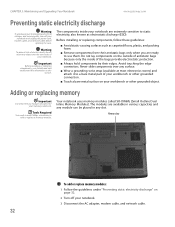
...Remove components from their edges. The components inside of
your Gateway notebook. Before installing or replacing components, follow these guidelines:
■ Avoid static-causing surfaces such as electrostatic discharge ... your
notebook and unplug the power cord, modem cable, and network cable before
opening the case.
Adding or replacing memory
Important
Use only memory modules designed for ...
8511369 - Gateway Notebook Hardware Reference - Page 39
... network cable.
5 Disconnect all peripheral devices and remove any PC Cards.
6 Turn your notebook over .
15 Connect the power adapter, modem cable, and network cable, then turn on your notebook. www.gateway.com
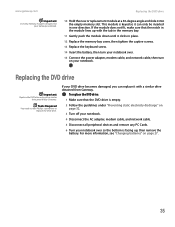
Replacing the DVD drive
Important
Use only memory modules designed for
your Gateway notebook.
10 Hold the new or...
8511369 - Gateway Notebook Hardware Reference - Page 41
...
14 Turn your notebook over . 19 Connect the power adapter, modem cable, and network cable, then turn
on your notebook.
37 www.gateway.com
Replacing the DVD drive
11 Insert a straightened paper clip into...the DVD drive's manual eject hole, push in Step 9. 16 Replace the memory bay cover, then tighten the captive screws. 17 Replace the keyboard screw. 18 Insert the battery, then turn your notebook ...
8511369 - Gateway Notebook Hardware Reference - Page 63
... drive 8 headphone 6 i.Link 8 IEEE 1394 8 keyboard 8 microphone 6 modem 8, 13 monitor (VGA) 9 mouse 8 network 8, 14 power 9, 12 printer 8 scanner 8 speaker 6 S-Video (TV) out 7
USB 8 VGA 9 video camera 8 copyright notice 57
D
dial-...35 locating 7 replacing 35 using 24 DVD/CD-RW drive See DVD drive DVD±RW drive See DVD drive
E
electrostatic discharge (ESD) 32 Ethernet
connecting 14 jack 8, 14 ...
8511369 - Gateway Notebook Hardware Reference - Page 64

...G
Gateway model number 2, 10 serial number 2, 3 Support 3
H
hard drive bay 10 indicator 17 installing 38 replacing 38
headphone jack 6 hot-swapping 26
I
i.Link port 8 IEEE 1394 port 8 indicators
See status indicators inkjet printer 30 installing
battery...memory cards 25
pointer identifying 21 moving 21
power AC adapter 12 battery 27, 29 button 11, 19 connector 9, 12 indicator 6, 15 source problems ...
8511369 - Gateway Notebook Hardware Reference - Page 65
...closing unresponsive 16 opening 22
R
RAM See memory
rebooting notebook 16 recalibrating battery 29
replacing See installing
resetting notebook 16 restarting notebook 16 right-clicking 22
rocker switch 21
S... 11 numeric keypad 17 Pad Lock 17 power 6 toggle on or off 19
Support getting specifications 3
surge protector 13
Suspend 19
S-Video (TV) out jack 7
system identification label 2, 10
system ...
8511264 - User Guide Gateway Notebook - Page 158

... display, contact Gateway Customer Care to identify whether a repair or replacement is justified based on the number of electrical interference, such as ... CHAPTER 14: Troubleshooting
www.gateway.com
You see "Changing power modes" on page 91.
■ The notebook may be ... ■ Run Error checking on the display is dim or difficult to read ■ Adjust the brightness and contrast using the...
Similar Questions


How Do You Get The Old Power Jack Out And How Do You Replace The Power Jack
(Posted by kennyharer 9 years ago)

How To Replace Ac Power Jack
I have M7347U and on battery works fine but ac power jack is shaking how to disassemble it to reach ...
I have M7347U and on battery works fine but ac power jack is shaking how to disassemble it to reach ...
(Posted by bhardwajn38 12 years ago)

How Do I Remove Old And Replace A New Gateway M6864fx Power Jack
(Posted by dbabcock 12 years ago)