
Brother International CB3-B917 Support Question
Brother International CB3-B917 Support Question
Find answers below for this question about Brother International CB3-B917.Need a Brother International CB3-B917 manual? We have 2 online manuals for this item!
Question posted by deekayknitwear on April 8th, 2015
How To Thread This Machine
how do i thread this machine?
Current Answers
Answer #1: Posted by TommyKervz on April 9th, 2015 5:08 AM
TommyKervz

Member since:
January 10th, 2013 Points: 17,776,813

Member since:
January 10th, 2013 Points: 17,776,813
Download a user guide on the link http://www.helpowl.com/manuals/Brother%20International/CB3B917/154895 and start reading from page 9
Related Brother International CB3-B917 Manual Pages
Service Manual - Page 3
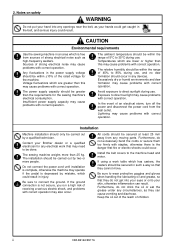
... All cords should be secured at least 25 mm away from any devices.
ii
CB3-B916A/B917A Sources of receiving a serious electric shock, and problems with correct operation ... the casters should be carried out by two or more than the requirements for the sewing machine's electrical consumption.
2.
Contact your skin, otherwise inflammation can cause vomiting and diarrhoea. ...
Service Manual - Page 4
... applications other than sewing.
Then contact your nearest Brother dealer or a qualified technician.
If the power switch needs to observe all safety devices before using a work . • When threading the needle • When replacing the needle • When not using the machine and when leaving the machine unattended
If using the machine.
Wait until the...
Service Manual - Page 5
...
iv
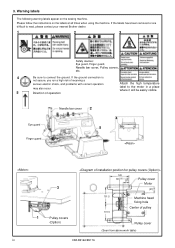
3
Pulley covers (Option)
120
60
(37)
Pulley cover Motor
(37)
101.5 101.5
Machine head fixing hole
Center of operation
Attach the high temperature label to connect the ground. 3. If the ...of pulley
Pulley cover
(Seen from above work table)
CB3-B916A/B917A Please follow the instructions on the sewing machine. Warning labels
The following warning labels appear on the labels at...
Service Manual - Page 14
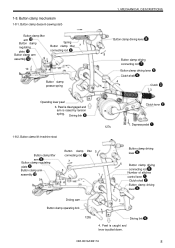
Button clamp lift (machine stop)
127s
2 Clutch lever 1.
Pawl is disengaged and arm is pulled down. Pawl...
Clutch shaft
Button clamp driving
2
lever
Driving cam
3
Button clamp operating fork
128s
Driving link
4. CB3-B916A/B917A
8 1-8. Button clamp descent (sewing start)
Button clamp lifter
arm Button clamp regulating
plate Button clamp arm
assembly
Spring Button clamp lifter 7...
Service Manual - Page 15
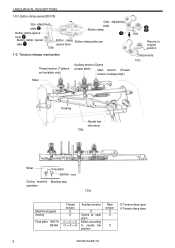
...Tension discs close
9
CB3-B916A/B917A Tension release mechanism
Thread tension (Tightens on final stitch only)
Auxiliary tension (Opens at each stitch) Main tension (Thread
tension is always kept.)
Disconnects 131s
Slider
Rocking
132s
Needle bar drive lever
Slider
Final stitch (B916A : non)
During machine Machine stop operation
133s
Machine stopped Sewing
Final stitch B917A B916A...
Service Manual - Page 16
... of the sewing machine should only be carried out by a qualified technician. Be sure to wear protective goggles and gloves when handling the lubricating oil and grease, so that they can result. Disassembly of the motor's inertia. Clutch
9. Ball bearing (5/16)
3. Spring
201s
8. Ball presser plate
7.
Cover
4. Brake 2. Pulley 5. Face plate thread guide...
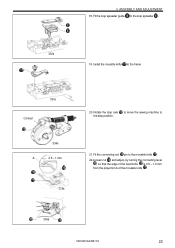
Service Manual - Page 21
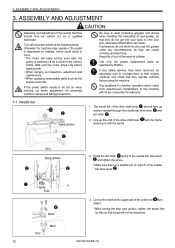
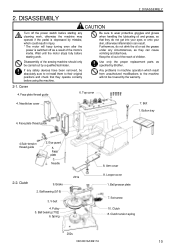
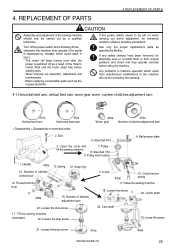
ASSEMBLY AND ADJUSTMENT
CAUTION
Assembly and adjustment of the sewing machine should face up and be inserted through the needle bar drive lever ... washer put on when carrying out some adjustment, be excessive.
303s
Mark
15
CB3-B916A/B917A Line up the mark at the following times, otherwise the machine may operate if the pedal is depressed by a qualified technician.
The screw flat ...
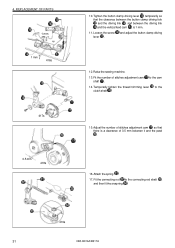
Service Manual - Page 25
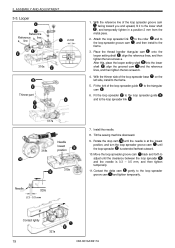
... and temporarily tighten in a position 2 mm from the
metal piece.
2. Tilt the sewing machine downward.
9.
Looper
Reference
Reference a line
b line
2 mm
316s
Thinner part
1.... spreader and the needle is extended farthest outward.
10. 3. Place the thread handler triangular cam onto the looper setting shaft , align the reference lines,...CB3-B916A/B917A ASSEMBLY AND ADJUSTMENT
3-3.
Service Manual - Page 28
... connecting lever
, so that the edge of the fixed knife is 0.5 - 1.0 mm from the projection A of the movable knife .
336s
CB3-B916A/B917A
22 3. Rotate the stop cam to move the sewing machine to the loop spreader .
332s
19. Fit the loop spreader guide to the stop position.
21. ASSEMBLY AND ADJUSTMENT 18.
Service Manual - Page 29
...
30. to the frame.
24. Align the arrow mark on the feed bracket .
27. Put the sewing machine in the stop cam and adjust the feed plate so that the needle will pass through at the four corners... of the square hole of entry
341s
23
CB3-B916A/B917A Rotate the stop position, or align the arrow mark on the vertical feed adjustment lever to...
Service Manual - Page 31
... nut and adjust the screw so that order to spring hangers and .
344s Apply grease
4. Tilt the sewing machine downward
2. Clutch
10 - 12 mm
1. Fit the pulley return spring , the steel ball 7/32 ,...pulley in that there is 10 - 20 mm.
3. With the sewing machine in the thrust direction of the pulley .
0.8 mm
346s
25
CB3-B916A/B917A Attach the clutch tension spring to the drive shaft . ...
Service Manual - Page 32
...B
348s
Take-in A
349s
350s
351s
B917A
B916A
3. Cover
347s
3. For B916A
When the sewing machine is stopped and the button clamp is lifted, loosen set screw to adjust so that the take ...3-6. For B917A
When the sewing machine is stopped and the button clamp is aligned with take -in A.
, and rotate the eccentric shaft , and rotate the eccentric shaft
CB3-B916A/B917A
26 ASSEMBLY AND...
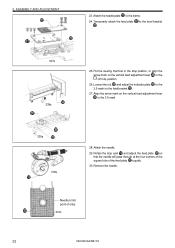
Service Manual - Page 33
... .
6. Attach the bolt to the frame. (Face plate thread guard , needle bar cover , face plate thread guide , and sub-tension thread guide )
5. Attach the eye guard .
352s
7. Attach the button tray on either the left or right side of the machine bed table.
353s
27
CB3-B916A/B917A 3. ASSEMBLY AND ADJUSTMENT
4. Attach the face plate...
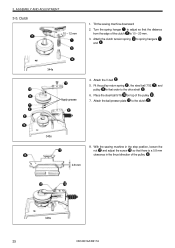
Service Manual - Page 34
...sewing machine
8. Needle
405s
16. Loosen the stop screw
410s
409s
CB3-B916A/B917A
28 Loosen the screw
20. Cam shaft
19.
Wait until the motor stops fully before using the machine.
Number of the sewing machine...32
9. Thread trimming lever
408s
15. Loosen the stop screw
17. Tilt the sewing machine
downward
22. Raise the sewing machine
18. Clutch shaft
24...
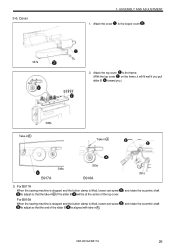
Service Manual - Page 37
Temporarily tighten the thread trimming lever clutch shaft .
Fit the connecting rod to the
15. Raise the sewing machine.
13. to the connecting rod shaft , and then fit the snap ring .
419s
31
CB3-B916A/B917A Loosen the screw and adjust the button clamp driving lever .
12. Fit the number of 0.5 mm between it and...
Service Manual - Page 42

... the pulley separates from the fixed knife.
5-9.Number of stitches adjustment cam
Start the sewing machine by pressing the rear part of the driving rod claw are aligned at the final needle position.
5-10.Pawl of thread trimming lever
Thread trimming lever
0.5 mm
312s
Pawl
Number of stitches adjustment cam
The clearance between the...
Service Manual - Page 52
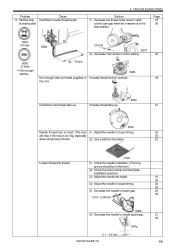
...thread supplied to needle guard gap.
0.1 - 0.2 mm CB3-B916A/B917A
647s
21 35
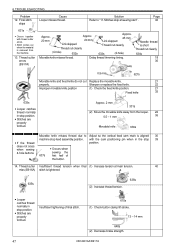
46 TROUBLESHOOTING
Solution (1) Decrease the thread cutter lever to stitch
control cam gap when the machine is too big, especially
35
when using heavy thread...thread tension opening.
38
the rotor.
629s
Insufficient rotor thread take -up . Stitches skip Insufficient needle thread length
at sewing start
6.
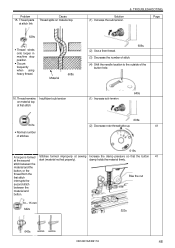
Service Manual - Page 53
... Decrease brake strength.
47
CB3-B916A/B917A Thread cutter Insufficient thread tension when final (1) Increase tension at sewing start" . Final stitch
skips
Cause Looper misses thread. Page 46
631s
•...is aligned 30
machine stop position.
• Stitches are properly formed.
Approx. 2 mm
331s
(2) Move the movable knife away from the machine.
13.
Thread cutter errors (...
Service Manual - Page 54
... - 15 mm 642s
523s
643s
64302s 64303s
CB3-B916A/B917A
48
TROUBLESHOOTING Page
(2) Use a finer thread.
606s
(3) Decrease the number of stitch.
(4) Shift the needle location to the outside of stitches
606s
(2) Decrease rotor thread take-up.
41
619s
A looper is formed Stitches formed improperly at sewing Increase the clamp pressure so that the...
Service Manual - Page 55
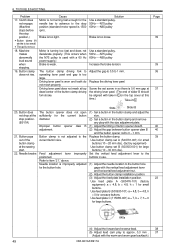
... buttons. stop position.) • Button clamp lift stroke is too small. • Thread is not turning fast enough for large
start.
buttons in the button clamp and adjust ...with the worm and worm gear backlash.)
49
CB3-B916A/B917A Machine makes abnormally loud sound when stopping.
19.
... plate. Driving lever pawl does not mesh at the sewing
Use button clamp set screw in so there is ...
Similar Questions

Why Won't My Needle Thread..machine Is Only 1 Month Old.
(Posted by cyndibrown01 9 years ago)


Need To Know How To Thread Machine
received from friend who lost instruction book don't know how to the thread goe's to needle
received from friend who lost instruction book don't know how to the thread goe's to needle
(Posted by ardellaforsyth 11 years ago)