Brother International CB3-B917 Support and Manuals
Get Help and Manuals for this Brother International item

View All Support Options Below
Free Brother International CB3-B917 manuals!
Problems with Brother International CB3-B917?
Ask a Question
Free Brother International CB3-B917 manuals!
Problems with Brother International CB3-B917?
Ask a Question
Most Recent Brother International CB3-B917 Questions


Brother Presser Arm
press arm does not lift after sewing button on what could be the problem
press arm does not lift after sewing button on what could be the problem
(Posted by rarebirdhandbags 10 years ago)
Popular Brother International CB3-B917 Manual Pages
Service Manual - Page 3
...correct operation.
Insufficient power supply capacity may cause problems with correct operation. If using a work that they cannot move. Notes on safety
WARNING
Do not put your hand into your eyes or onto your Brother dealer or a qualified electrician for the sewing machine's electrical consumption. The sewing machine weighs more people.
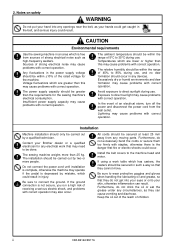
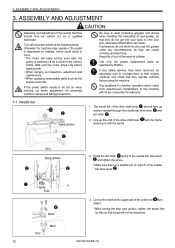
CAUTION
Environmental requirements
Use the...
Service Manual - Page 4
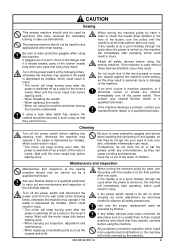
... result. Any problems in order to wear protective goggles and gloves when handling the lubricating oil and grease, so that they operate correctly before starting any cleaning work . • When threading the needle • When replacing the needle • When not using the machine and when leaving the machine unattended
If using the sewing machine.
If the...
Service Manual - Page 5
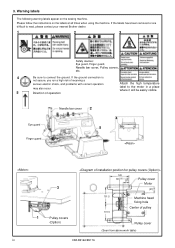
... times when using the machine. If the labels have been removed or are difficult to read, please contact your nearest Brother dealer.
1
2
3
Safety devices: Eye guard, Finger guard, Needle bar cover, Pulley covers, etc.
4
Be sure to the motor in a place where it will be easily visible. Please follow the instructions on the sewing machine. 3.
Service Manual - Page 16
..., otherwise the machine may operate if the pedal is switched off as specified by Brother. V-belt
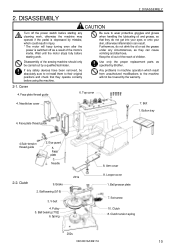
4. Top cover
4. Eye guard
5. Clutch
9. Looper cover
1. Clutch 8. DISASSEMBLY
2.
Ball bearing (7/32)
6. Spring
201s
8. Use only the proper replacement parts as a result of children. Cover
4. Face plate thread guide
4.Sub-tension thread guide
2. Clutch tension...
Service Manual - Page 21
... replacing consumable parts such as specified by little so that they can result. The screw flat of the motor's inertia.
If any circumstances, as a result of the drive shaft lever should only be excessive.
303s
Mark
15
CB3-B916A/B917A Push lightly
A
302s
Mark
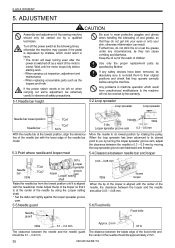
4. Wait until the motor stops fully before using the machine...
Service Manual - Page 25
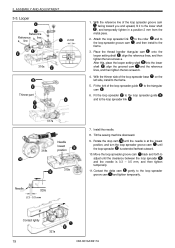
Place the thread handler triangular cam onto the looper setting shaft , align the reference lines, and then tighten the two screws a . Tilt the sewing machine downward.
9. Contact the delta cam gently to the loop spreader link .
317s
318s
Needle lowest position
319s
Needle
320s
0.3 - 0.5 mm
7. Contact lightly
19
321s
CB3-B916A/B917A Looper
Reference
Reference a line...
Service Manual - Page 34
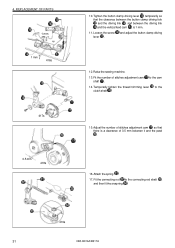
... of stitches control lever
13. Use only the proper replacement parts as specified by mistake, which result from unauthorized modifications to be left on when carrying out some adjustment, be covered by a qualified technician.
Number of the sewing machine should only be absolutely sure to re-install them to observe all safety precautions. Snap ring...
Service Manual - Page 36
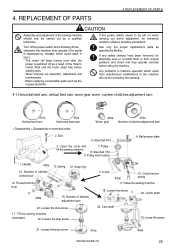
REPLACEMENT OF PARTS
6. The screw flat of the rotating hook shaft face straight down at the side
of direction of stitches control lever .
422s Mark
8. should align with the
cam positioning pin . Backlash becomes smaller 424s
CB3...the number of rotation to the stop screw at this time.
Move the sewing machine to the screw flat of the clutch.
423s
0.3 mm backlash Backlash ...
Service Manual - Page 37
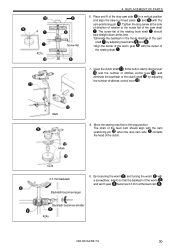
... then fit the snap ring .
419s
31
CB3-B916A/B917A Temporarily tighten the thread trimming lever clutch shaft . Fit the connecting rod to the
15. Raise the sewing machine.
13. Adjust the number of stitches adjustment cam to the cam shaft .
14. Attach the spring .
17. REPLACEMENT OF PARTS
1 mm
1 mm
416s
417s
0.5 mm
418s
10...
Service Manual - Page 38

... Adjustment of [Brake] (P.39).
21. Raise the sewing machine. 28. REPLACEMENT OF PARTS
18. Insert the brake shaft into the oval hole in the bed.
19. With the rear part of the clutch body .
20. 4. After adjustment is facing upward, and then secure it by tightening the set screw on the bottom side of the clutch...
Service Manual - Page 39
Attach the clutch tension spring .
4. Attach the installation bolt.
427s
33
CB3-B916A/B917A REPLACEMENT OF PARTS
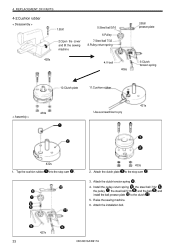
4-2.Cushion rubber
< Disassembly >
1.Bolt
2.Open the cover and tilt the sewing machine
5.Steel ball 5/16
6.Pulley 7.Steel ball 7/32 8.Pulley return spring
428s
4.V-belt
406s
3.Ball presser plate
9.Clutch tension spring
10.Clutch plate
11.Cushion rubber
< ...
Service Manual - Page 40
... the bolt.
437s
CB3-B916A/B917A
34 Raise the sewing machine.
3. With the sewing machine in the start condition.
436s
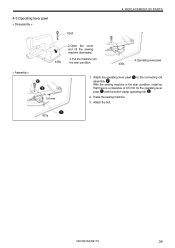
4.Operating lever pawl
0.6 mm
1. Attach the operating lever pawl to the connecting rod assembly . REPLACEMENT OF PARTS
< Assembly >
428s
2.Open the cover and tilt the sewing machine downward.
3.Put the machine into the start condition, install so that there is...
Service Manual - Page 41
...sewing machine should only be approximately 2 mm.
35
CB3... reach of the motor's inertia. Any problems in machine operation which could result in injury. ...install them to the machine will keep turning even after the
power is depressed by Brother.
Be sure to observe all safety precautions. Use only the proper replacement parts...by using the Looper setting shaft. * Set the delta cam lightly ...
Service Manual - Page 42

...the pulley separates from the stop cam are aligned.
2. CB3-B916A/B917A
36
The clearance between the pawl and the...at the final needle position.
5-10.Pawl of thread trimming lever
Thread trimming lever
0.5 mm
312s
Pawl
Number of stitches ... knife.
5-9.Number of stitches adjustment cam
Start the sewing machine by pressing the rear part of the button clamp driving fork and the driving ...
Service Manual - Page 43
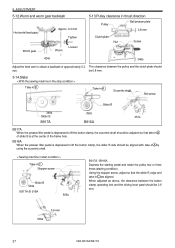
...lift the button clamp, the eccentric shaft should be aligned with take -in A
Eccentric shaft
Set screw
Slider B
349s Slider B
350s
351s
B917A
B916A
B917A
When the presser lifter pedal is... be 0.6 mm.
506s
0.6 mm
37
CB3-B916A/B917A 5. Using the stopper screw, adjust so that take -in A by using the eccentric shaft.
< Sewing machine in start condition >
Take-in C are aligned.
Brother International CB3-B917 Reviews
We have not received any reviews for Brother International yet.