
Acer AL1912 Support Question
Acer AL1912 Support Question
Find answers below for this question about Acer AL1912.Need a Acer AL1912 manual? We have 2 online manuals for this item!
Question posted by hectorkhurram on July 3rd, 2012
How To Disable Acer Al1912 Menu Button/
i want to know how to disable menu button of acer al1912 because the menu keeps on popping up..and then it goes away by it self i want to know how to turn it off so it wont come back again
Current Answers
Related Acer AL1912 Manual Pages
AL1912 Service Guide - Page 1

Acer AL1912 Service Guide
Service guide files and updates are available on the CSD web: for more information, Please refer to http://csd.acer.com.tw/
- 1 -
AL1912 Service Guide - Page 7
... MONITOR BOARD LAYOUT ...17 SOFTWARE FLOW CHART ...18 GENERAL INSTRUCTIONS ...19 SYSTEM INSTALLATION ...20 POWER/INVERTOR BOARD ...25 ELECTRICAL SPECIFICATION...26 INVERTER ELECTRICAL SPECIFICATION ...28 SAFETY ...28
Chapter 2 Operating Instruction 30
CONTROLS ...30 MAIN OSD MENU...31 OSD MESSAGE...33 PLUG AND PLAY ...35 WHITE COLOR TEMPERATURE...36 AUDIO TECHNICAL SPECIFICATION (FOR AL1912...
AL1912 Service Guide - Page 8
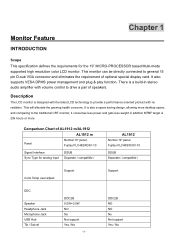
..., and comparing to general 15 pin D-sub VGA connector and eliminates the requirement of optional special display card. Monitor Feature
INTRODUCTION
Chapter 1
Scope This specification defines the requirements for analog input
DSUB Separate / compatible /
AL1912
Normal 19" panel Fujitsu FLC48SXC8V-10
DSUB Separate / compatible /
Color Temp user adjust
Support
Support
DDC
Speaker...
AL1912 Service Guide - Page 10
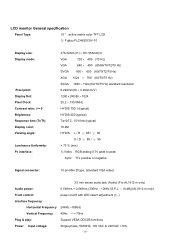
LCD monitor General specification
Panel Type:
19 " active matrix color TFT LCD
1). Fujitsu FLC48SXC8V-10
...
15 pin Mini D type, (standard VGA video)
3.5 mm stereo audio jack (Audio) (For AL1912 m only)
Audio power:
0.5Wrms + 0.5Wrms (300Hz - 10kHz (S.P.L. - 10 dB))(AL1912 m only)
Front control:
power on/off with LED select adjustment (+,-)
Interface frequency
Horizontal Frequency 24KHz...
AL1912 Service Guide - Page 14
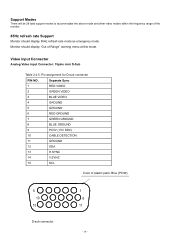
... DETECTION
11
GROUND
12
SDA
13
H.SYNC
14
V.SYNC
15
SCL
Color of Range" warning menu at this mode. Support Modes
There will be 28 total support modes to accommodate the above... mode and other video modes within the frequency range of the monitor.
85Hz refresh rate Support
Monitor should display "Out of plastic parts: Blue (PC99)
5 10
15
D-sub connector
...
AL1912 Service Guide - Page 19
... these settings, the picture can be connected. Connect the video cable from the monitor to turn the monitor on the monitor position. The power cord should be adjusted to turn on or off. AL1912 m
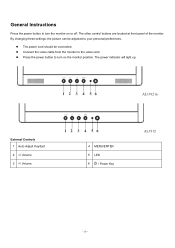
External Controls 1 Auto Adjust Key/Exit 2 / Volume
4 MENU/ENTER
5 LED
6
/ Power Key
AL1912
- 19 -
General Instructions
Press the power button to your personal preferences.
AL1912 Service Guide - Page 20

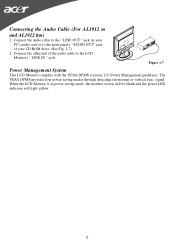
...cable to the front panel's "AUDIO OUT" jack of your PC's audio card or to the LCD Monitor's " AUDIO IN " jack.
- 20 - Make sure connections are secure. Connecting the AC Power... Connecting the Audio Cable (For AL1912 m and AL1912 bm)
Connect the audio cable to the " LINE OUT " jack on your computer. Connect the power cord to the LCD Monitor's VGA port.
System Installation
Connecting ...
AL1912 Service Guide - Page 26
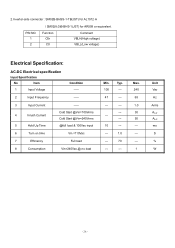
...A0-P A0-P ms S % W
- 26 - 2.Inverter-side connecter : SM02B-BHSS-1-TB(JST) for AL1912 m
PIN NO. 1 2
/ SM02(8.0)B-BHS-1(JST) for AR599 or equivalent.
Function Cth Ctl
Comment VBLH(...Time
----Cold Start @Vin=100Vrms Cold Start @Vin=240Vrms @full load & 100Vac input
6
Turn on time
Vin =110Vac
7
Efficiency
Full load
8
Consumption
Vin=240Vac,@ no load
Min. 100 47 ---
---
10...
AL1912 Service Guide - Page 28
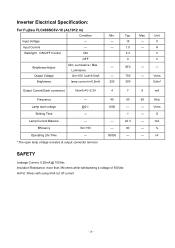
...
1
---
Backlight ON/OFF Control
ON
OFF
Brightness Adjust
Min.
mA
---
80
---
%
50000
---
--- Lamp start voltage
@0℃
Striking Time
--- Inverter Electrical Specification:
For Fujitsu FLC488SC8V-10 (AL1912 m)
Condition
Min. Unit
---
Input Current
---
---
Input Voltage
---
--- Brightness
lamp current in 6.5mA
250
Typ. 15 1.5 3.3 0
30%
750 300
Max.
AL1912 Service Guide - Page 30
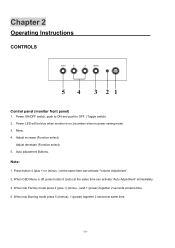
... Adjustment". 2. Adjust increase (Function select). When OSD Menu is on; When into Burning mode press 5 (menus), 1 (power) together 2 second at same time. 5. Press button 4 (plus +),(minus -) and 1 (power) together 2 seconds at same time.
- 30 - Auto adjustment Buttons. Chapter 2
Operating Instructions
CONTROLS
Control panel (monitor front panel)
1. Power ON/OFF switch, push to...
AL1912 Service Guide - Page 33

...the Hsync Frequency, Vsync Frequency or Resolution is no active signal input, will be flying. Hot-Key Menu:(For AL1912 m only)
Outline:
The description for OSD Message :
Item Auto Config Please Wait Input Not Supported Cable... is closed, press
Volume of the monitor support range, will be Mute when volume=0.
The 0-100
50
Left or Right button will be Volume
Audio will be flying.
AL1912 Service Guide - Page 36

... follow "Microsoft Windows Color Quality Specification for Liquid Crystal Display OEM's".
(http://www.microsoft.com/hwdev/tech/color/ColorTest.asp)
Audio Technical specification (For AL1912 m only)
General Description:
Output power Total harmonic distortion Input signal sensitivity Input impedance Frequency response range Difference of color setting
Color Color Coordinate
Tolerance Color...
AL1912 Service Guide - Page 46

..., that you the FRU (Field Replaceable Unit) listing in global configurations of AL1912 m. For ACER-AUTHORIZED CERVICE PROVIDERS, your Acer office may have a DIFFERENT part number code to repair or for RMA (...Return Merchandise Authorization). You MUST use the local FRU list provided by your regional Acer office on how to return it.
46 Refer to this chapter whenever ordering for parts...
AL1912 User's Guide - Page 1
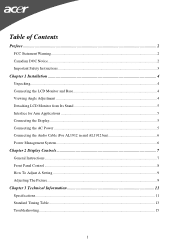
...Important Safety Instructions...3
Chapter 1 Installation ...4 Unpacking...4 Connecting the LCD Monitor and Base 4 Viewing Angle Adjustment ...4 Detaching LCD Monitor from Its Stand 5 Interface for Arm Applications ...5 Connecting the Display...5 Connecting the AC Power ...5 Connecting the Audio Cable (For AL1912 m and AL1912 bm 6 Power Management System...6
Chapter 2 Display Controls 7 General...
AL1912 User's Guide - Page 4
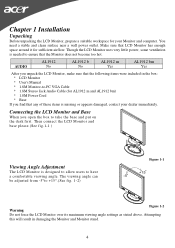
... to +15°.(See fig. 1-2)
Figure 1-1
Figure 1-2 Warning Do not force the LCD Monitor over its maximum viewing angle settings as stated above. AUDIO
AL1912 No
AL1912 b No
AL1912 m Yes
AL1912 bm Yes
After you unpack the LCD Monitor, make sure that LCD Monitor has enough space around it for your dealer immediately. The viewing angle can...
AL1912 User's Guide - Page 6
....
6 Connecting the Audio Cable (For AL1912 m and AL1912 bm)
1. The VESA DPMS provides four power saving modes through detecting a horizontal or vertical sync. Connect the other end of the audio cable to the front panel's "AUDIO OUT" jack of your PC's audio card or to the LCD Monitor's " LINE IN " jack. Connect the...
AL1912 User's Guide - Page 7
... picture can be connected.
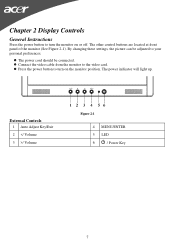
Chapter 2 Display Controls
General Instructions
Press the power button to turn on or off. External Controls 1 Auto Adjust Key/Exit 2 / Volume
Figure 2-1
4 MENU/ENTER
5 LED
6
/ Power Key
7 The other control buttons are located at front panel of the monitor (See Figure 2-1).
The power indicator will light up. The power cord should...
AL1912 User's Guide - Page 8
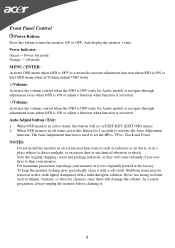
...monitor. Stubborn stains may be removed with a cloth lightly dampened with a soft cloth. To keep the monitor looking new, periodically clean it with a mild detergent solution. off mode MENU / ENTER : Activate OSD menu...Button: Press this button to set the HPos, VPos, Clock and Focus. Auto Adjust button / Exit: 1. When OSD menu is used to turn the monitor ON or OFF, And display the monitor...
AL1912 User's Guide - Page 9
... > to select the desired function. 3. Adjusts the background brightness of the screen image.
Press < or > to change the settings of the current function. 5. Press the MENU-button to select the function that you want to activate the OSD window. 2. Position
Adjust picture Focus
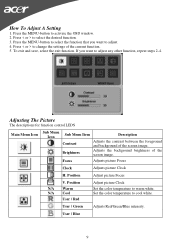
V. Adjusting The Picture
The descriptions for function control LEDS
Main...
AL1912 User's Guide - Page 15

...Monitor and then turn it does not function with the LCD Monitor, the output timing of the
"Clock" function in MS-Windows environment, except
Windows XP. If your PC system to the output timing differences among various VGA cards in OSD menu again and adjust the monitor...press the
Adjustment Control button several times. 3. PROBLEM There is outside of the LCD Monitor's synchronous range (...
Similar Questions

My Average Al1912 Does Not Have Built In Speakers. Is There A Headphone Jack Tha
(Posted by Afisch8181 1 year ago)

Acer S200hl Power Button Not Working
I have an Acer S200HL for many months, the power button is good after the purchase but after turning...
I have an Acer S200HL for many months, the power button is good after the purchase but after turning...
(Posted by jrvignacio 9 years ago)
Can Due To Bad Capacitors Black Stripes Can Appear On Monitor
(Posted by mkmittragungun 9 years ago)


Screen Says Acer On Start Up,then Goes Black,
My acer is being used to watch videos only, connected to a home theatre, It says acer on screen then...
My acer is being used to watch videos only, connected to a home theatre, It says acer on screen then...
(Posted by therhyllthing 12 years ago)