
User Guide
Page 16
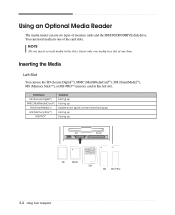
... and the IBM MICRODRIVE disk drive. You can use the SD (Secure DigitalTM), MMC (MultiMediaCardTM), SM (SmartMediaTM), MS (Memory StickTM), or MS-PROTM memory card in this left slot. NOTE Do not insert several media in a slot at one time. Inserting the Media Left Slot You can use six ...types of the card slots. Card type SD (Secure DigitalTM) MMC(MultiMediaCardTM) SM (SmartMediaTM) MS (Memory StickTM) MS-PROTM Insertion Facing up Facing up Upside down (gold contact area facing up) Facing up Facing up SD MMC SM MS MS-PRO...
... and the IBM MICRODRIVE disk drive. You can use the SD (Secure DigitalTM), MMC (MultiMediaCardTM), SM (SmartMediaTM), MS (Memory StickTM), or MS-PROTM memory card in this left slot. NOTE Do not insert several media in a slot at one time. Inserting the Media Left Slot You can use six ...types of the card slots. Card type SD (Secure DigitalTM) MMC(MultiMediaCardTM) SM (SmartMediaTM) MS (Memory StickTM) MS-PROTM Insertion Facing up Facing up Upside down (gold contact area facing up) Facing up Facing up SD MMC SM MS MS-PRO...
User Guide
Page 17
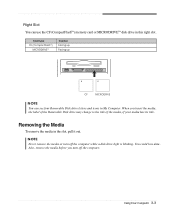
.... When you turn off the computer. Card type CF (CompactFlashTM) MICRODRIVETM Insertion Facing up Facing up CF MICRODRIVE NOTE You can use the CF (CompactFlashTM) memory card or MICRODRIVETM disk drive in the slot, pull it out. NOTE Never remove the media or turn off the computer while a disk drive light...
.... When you turn off the computer. Card type CF (CompactFlashTM) MICRODRIVETM Insertion Facing up Facing up CF MICRODRIVE NOTE You can use the CF (CompactFlashTM) memory card or MICRODRIVETM disk drive in the slot, pull it out. NOTE Never remove the media or turn off the computer while a disk drive light...
NG3 Hardware Reference
Page 4
www.emachines.com Contents Chapter 7: Sending and Receiving Faxes 63 Installing and configuring Fax 64 Installing Fax 64 Configuring Fax 65 Sending a simple fax 67 Setting up ... 69 Canceling a fax 69 Automatically retry sending a fax 69 Automatically canceling a fax 70 Chapter 8: Using Drives and Ports 71 Using the memory card reader 72 Memory card types 72 Using a memory card 73 Using the CD or DVD drive 73 Identifying drive types 73 Inserting a CD or DVD 74 Using a second monitor 75...
www.emachines.com Contents Chapter 7: Sending and Receiving Faxes 63 Installing and configuring Fax 64 Installing Fax 64 Configuring Fax 65 Sending a simple fax 67 Setting up ... 69 Canceling a fax 69 Automatically retry sending a fax 69 Automatically canceling a fax 70 Chapter 8: Using Drives and Ports 71 Using the memory card reader 72 Memory card types 72 Using a memory card 73 Using the CD or DVD drive 73 Identifying drive types 73 Inserting a CD or DVD 74 Using a second monitor 75...
NG3 Hardware Reference
Page 6
www.emachines.com Contents Updating Windows 142 BigFix 142 Managing hard drive space 143 Checking hard drive space 143 Using Disk Cleanup 143 Checking the hard drive ... bezel 156 Closing the case 157 Replacing the front bezel 157 Replacing the side panel 157 Installing memory 158 Replacing the system battery 159 Adding or replacing a CD or DVD drive 160 Replacing the memory card reader 162 Adding or replacing a hard drive 163 Replacing the rear fan 165 Replacing the power...
www.emachines.com Contents Updating Windows 142 BigFix 142 Managing hard drive space 143 Checking hard drive space 143 Using Disk Cleanup 143 Checking the hard drive ... bezel 156 Closing the case 157 Replacing the front bezel 157 Replacing the side panel 157 Installing memory 158 Replacing the system battery 159 Adding or replacing a CD or DVD drive 160 Replacing the memory card reader 162 Adding or replacing a hard drive 163 Replacing the rear fan 165 Replacing the power...
NG3 Hardware Reference
Page 7
Contents www.emachines.com DVD drives 179 File management 179 Hard drive 180 Internet 180 Keyboard 181 Media Center 182 Memory 184 Memory card reader 184 Modem (dial-up 184 Monitor 187 Mouse 188 Networks 188 Passwords 189 Power 189 Printer 189 Sound 191 Telephone support 191 Before calling eMachines Customer Care 191 Telephone numbers 192 Self-help 192 Appendix A: Safety, Regulatory, and Legal Information 193 Index 199 vi
Contents www.emachines.com DVD drives 179 File management 179 Hard drive 180 Internet 180 Keyboard 181 Media Center 182 Memory 184 Memory card reader 184 Modem (dial-up 184 Monitor 187 Mouse 188 Networks 188 Passwords 189 Power 189 Printer 189 Sound 191 Telephone support 191 Before calling eMachines Customer Care 191 Telephone numbers 192 Self-help 192 Appendix A: Safety, Regulatory, and Legal Information 193 Index 199 vi

NG3 Hardware Reference
Page 15
..., scanner, or other peripheral device" on when the hard drive is accessed. 8 Optical drive Optical drive (optional) USB port (optional) Hard drive access indicator www.emachines.com Memory card reader (optional) Power button/ Power indicator IEEE 1394 ports (optional) USB ports (optional) Microphone jack Headphone jack Model: S/No: Component Optical drive USB...
..., scanner, or other peripheral device" on when the hard drive is accessed. 8 Optical drive Optical drive (optional) USB port (optional) Hard drive access indicator www.emachines.com Memory card reader (optional) Power button/ Power indicator IEEE 1394 ports (optional) USB ports (optional) Microphone jack Headphone jack Model: S/No: Component Optical drive USB...
NG3 Hardware Reference
Page 16
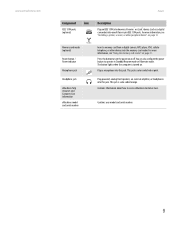
... IEEE 1394 ports. For more information, see "Using the memory card reader" on page 13. Press this jack. You can also configure the power button to access eMachines Customer Care. www.emachines.com Front Component Icon Description IEEE 1394 ports (optional) Plug...174;) device (such as a digital camcorder) into the memory card reader. Memory card reader (optional) Power button / Power indicator Microphone jack Headphone jack eMachines help resources and Customer Care information eMachines model and serial number Insert a memory card from a digital camera, MP3 player, PDA, cellular...
... IEEE 1394 ports. For more information, see "Using the memory card reader" on page 13. Press this jack. You can also configure the power button to access eMachines Customer Care. www.emachines.com Front Component Icon Description IEEE 1394 ports (optional) Plug...174;) device (such as a digital camcorder) into the memory card reader. Memory card reader (optional) Power button / Power indicator Microphone jack Headphone jack eMachines help resources and Customer Care information eMachines model and serial number Insert a memory card from a digital camera, MP3 player, PDA, cellular...
NG3 Hardware Reference
Page 78
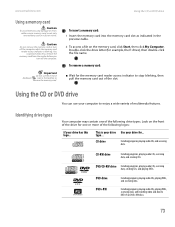
CHAPTER 8 Using Drives and Ports • Using the memory card reader • Using the CD or DVD drive • Using a second monitor • Viewing the display on a television • Using Windows Media Center • Using multimedia • Playing music and movies • Creating audio files and music libraries • Creating and editing videos • Creating music CDs and video DVDs • Creating and copying data CDs and DVDs • Advanced multimedia software features
CHAPTER 8 Using Drives and Ports • Using the memory card reader • Using the CD or DVD drive • Using a second monitor • Viewing the display on a television • Using Windows Media Center • Using multimedia • Playing music and movies • Creating audio files and music libraries • Creating and editing videos • Creating music CDs and video DVDs • Creating and copying data CDs and DVDs • Advanced multimedia software features
NG3 Hardware Reference
Page 79
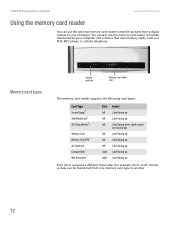
..., the E: and F: drives) so data can be transferred from a digital camera to your computer and a device that uses memory cards, such as a PDA, MP3 player, or cellular telephone. CHAPTER 8: Using Drives and Ports www.emachines.com Using the memory card reader You can use the memory card reader to transfer data between your computer.
..., the E: and F: drives) so data can be transferred from a digital camera to your computer and a device that uses memory cards, such as a PDA, MP3 player, or cellular telephone. CHAPTER 8: Using Drives and Ports www.emachines.com Using the memory card reader You can use the memory card reader to transfer data between your computer.
NG3 Hardware Reference
Page 80
.... 73 Installing programs, playing audio CDs, and accessing data. CD-RW drive Installing programs, playing audio CDs, accessing data, and creating CDs. www.emachines.com Using a memory card Caution To avoid memory card damage or errors while using a memory card, insert only one of the following logos: If your drive type... Also, remove the...
.... 73 Installing programs, playing audio CDs, and accessing data. CD-RW drive Installing programs, playing audio CDs, accessing data, and creating CDs. www.emachines.com Using a memory card Caution To avoid memory card damage or errors while using a memory card, insert only one of the following logos: If your drive type... Also, remove the...
NG3 Hardware Reference
Page 123
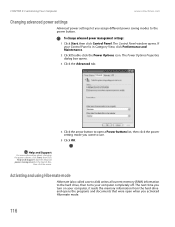
If your computer completely off. CHAPTER 9: Customizing Your Computer www.emachines.com Changing advanced power settings Advanced power settings let you want to use. 5 Click OK. Help and Support For more information about changing the power ... mode. 116 Activating and using Hibernate mode Hibernate (also called save to disk) writes all current memory (RAM) information to the power button. The next time you turn on your computer, it reads the memory information from the hard drive and opens the programs and documents that were open a Power buttons list...
If your computer completely off. CHAPTER 9: Customizing Your Computer www.emachines.com Changing advanced power settings Advanced power settings let you want to use. 5 Click OK. Help and Support For more information about changing the power ... mode. 116 Activating and using Hibernate mode Hibernate (also called save to disk) writes all current memory (RAM) information to the power button. The next time you turn on your computer, it reads the memory information from the hard drive and opens the programs and documents that were open a Power buttons list...
NG3 Hardware Reference
Page 160
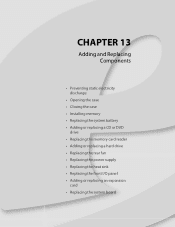
CHAPTER 13 Adding and Replacing Components • Preventing static electricity discharge • Opening the case • Closing the case • Installing memory • Replacing the system battery • Adding or replacing a CD or DVD drive • Replacing the memory card reader • Adding or replacing a hard drive • Replacing the rear fan • Replacing the power supply • Replacing the heat sink • Replacing the front I/O panel • Adding or replacing an expansion card • Replacing the system board
CHAPTER 13 Adding and Replacing Components • Preventing static electricity discharge • Opening the case • Closing the case • Installing memory • Replacing the system battery • Adding or replacing a CD or DVD drive • Replacing the memory card reader • Adding or replacing a hard drive • Replacing the rear fan • Replacing the power supply • Replacing the heat sink • Replacing the front I/O panel • Adding or replacing an expansion card • Replacing the system board
NG3 Hardware Reference
Page 165
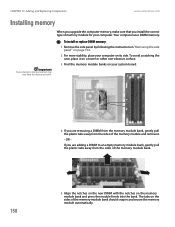
... . - CHAPTER 13: Adding and Replacing Components www.emachines.com Installing memory Important Your computer's memory location may vary from the sides of the memory module bank. 5 Align the notches on the new DIMM with the notches on the memory module bank and press the module firmly into the bank.... Your computer uses DIMM memory. To install or replace DIMM memory: 1 Remove the side panel by following the instructions in and secure the memory module automatically. The tabs on page 154. 2 For more stability, place your system board. ...
... . - CHAPTER 13: Adding and Replacing Components www.emachines.com Installing memory Important Your computer's memory location may vary from the sides of the memory module bank. 5 Align the notches on the new DIMM with the notches on the memory module bank and press the module firmly into the bank.... Your computer uses DIMM memory. To install or replace DIMM memory: 1 Remove the side panel by following the instructions in and secure the memory module automatically. The tabs on page 154. 2 For more stability, place your system board. ...
NG3 Hardware Reference
Page 166
... the restart, press and hold the F1 key. To replace the battery: 1 Restart your computer, replace the system battery. The main menu of memory in your computer. www.emachines.com Replacing the system battery 6 Replace the side panel by following the instructions in "Replacing the side panel" on page 157. 7 Return your...
... the restart, press and hold the F1 key. To replace the battery: 1 Restart your computer, replace the system battery. The main menu of memory in your computer. www.emachines.com Replacing the system battery 6 Replace the side panel by following the instructions in "Replacing the side panel" on page 157. 7 Return your...
NG3 Hardware Reference
Page 169
Screw 4 Disconnect the card reader's USB cable from your replacement component's front cover may vary from the system board. 162 To replace the memory card reader: 1 Remove the side panel by following the instructions in "Removing the side panel" on page 154. 2 Remove the front bezel by ...allow you to lay the bezel on page 156, but leave its side in the drive bay. CHAPTER 13: Adding and Replacing Components www.emachines.com Replacing the memory card reader Tips & Tricks You need a Phillips screwdriver to the system board. Important The color and shape of the case. 3 Remove ...
Screw 4 Disconnect the card reader's USB cable from your replacement component's front cover may vary from the system board. 162 To replace the memory card reader: 1 Remove the side panel by following the instructions in "Removing the side panel" on page 154. 2 Remove the front bezel by ...allow you to lay the bezel on page 156, but leave its side in the drive bay. CHAPTER 13: Adding and Replacing Components www.emachines.com Replacing the memory card reader Tips & Tricks You need a Phillips screwdriver to the system board. Important The color and shape of the case. 3 Remove ...
NG3 Hardware Reference
Page 181
... panel" on page 157. Make sure that secure the system board to the first screw). CHAPTER 13: Adding and Replacing Components www.emachines.com 11 Remove the memory from the memory slots and place it . Caution The heat sink has Thermal Interface Material (TIM) located on the left side of the system board...
... panel" on page 157. Make sure that secure the system board to the first screw). CHAPTER 13: Adding and Replacing Components www.emachines.com 11 Remove the memory from the memory slots and place it . Caution The heat sink has Thermal Interface Material (TIM) located on the left side of the system board...
NG3 Hardware Reference
Page 184
... disc label is configured correctly by following the instructions in card ■ Shut down and restart your computer. 177 You may be experiencing some temporary memory problems. Shut down and restart your computer, then enter the BIOS Setup utility by the CD or DVD drive. ■ If you are trying to... play these CDs on page 73. ■ Your computer may not be read by pressing and holding F1 while your add-in alphabetical order. www.emachines.com Troubleshooting Troubleshooting topics are listed in card.
... disc label is configured correctly by following the instructions in card ■ Shut down and restart your computer. 177 You may be experiencing some temporary memory problems. Shut down and restart your computer, then enter the BIOS Setup utility by the CD or DVD drive. ■ If you are trying to... play these CDs on page 73. ■ Your computer may not be read by pressing and holding F1 while your add-in alphabetical order. www.emachines.com Troubleshooting Troubleshooting topics are listed in card.
NG3 Hardware Reference
Page 191
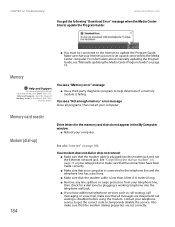
...connect ■ Make sure that the modem cable is failing. CHAPTER 14: Troubleshooting www.emachines.com You get the correct code to temporarily disable the service. You see a "Not enough memory" error message Close all messages are set up and connected to the telephone line and ... into the modem jack and not the Ethernet network jack. Contact your Internet account is disabled before using the modem. Type the keyword memory error in the My Computer window ■ Reboot your computer. Make sure that the modem dialing properties are cleared and call messaging,...
...connect ■ Make sure that the modem cable is failing. CHAPTER 14: Troubleshooting www.emachines.com You get the correct code to temporarily disable the service. You see a "Not enough memory" error message Close all messages are set up and connected to the telephone line and ... into the modem jack and not the Ethernet network jack. Contact your Internet account is disabled before using the modem. Type the keyword memory error in the My Computer window ■ Reboot your computer. Make sure that the modem dialing properties are cleared and call messaging,...
NG3 Hardware Reference
Page 197
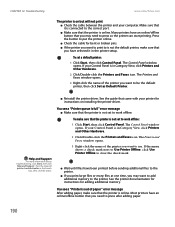
.... The Control Panel window opens. Type the keyword printer troubleshooter in the printer setup. See the printer documentation for instructions for adding additional memory. Make sure that you need to use. If the menu shows a check mark next to Use Printer Offline, click Use Printer Offline ...Check the cable for bent or broken pins. ■ If the printer you want to print to work offline. CHAPTER 14: Troubleshooting www.emachines.com The printer is on but will not print ■ Check the cable between the printer and your printer for instructions on installing the printer...
.... The Control Panel window opens. Type the keyword printer troubleshooter in the printer setup. See the printer documentation for instructions for adding additional memory. Make sure that you need to use. If the menu shows a check mark next to Use Printer Offline, click Use Printer Offline ...Check the cable for bent or broken pins. ■ If the printer you want to print to work offline. CHAPTER 14: Troubleshooting www.emachines.com The printer is on but will not print ■ Check the cable between the printer and your printer for instructions on installing the printer...
NG3 Hardware Reference
Page 206
www.emachines.com Index Index A AC power connector 10 accessing shared drives 60 shared files 61 shared folders 60 accessories safety precautions 194 accounts Internet 43 ISP ... information 90 inserting 74 playing music 84 troubleshooting 177 CD drive adding 160 identifying 73 locating drive 8 replacing 160 troubleshooting 177 using 73 cellular phone memory cards 72 Certificate of Authenticity 6 cleaning audio CD 142 case 141 CD 142 computer exterior 140 computer screen 141 DVD 142 keyboard 141 LCD panel...
www.emachines.com Index Index A AC power connector 10 accessing shared drives 60 shared files 61 shared folders 60 accessories safety precautions 194 accounts Internet 43 ISP ... information 90 inserting 74 playing music 84 troubleshooting 177 CD drive adding 160 identifying 73 locating drive 8 replacing 160 troubleshooting 177 using 73 cellular phone memory cards 72 Certificate of Authenticity 6 cleaning audio CD 142 case 141 CD 142 computer exterior 140 computer screen 141 DVD 142 keyboard 141 LCD panel...

