
User Guide
Page 3
...3 Help and Support 3 Searching for a topic 4 BigFix 4 Online help 5 eMachines contact information 6 2 Checking Out Your eMachines Computer 7 Desktop PC Front 8 Desktop PC Back 10 Identifying your model 13 eMachines model and serial number 13 Microsoft Certificate of Authenticity 13 3 Getting Started 15 Working... computer and computer accessories 17 Sitting at your computer 17 Avoiding discomfort and injury from repetitive strain 17 Protecting from power source problems 18 Checking the voltage selection 18 Starting your computer 19 Waking up your computer 20 Turning off your ...
...3 Help and Support 3 Searching for a topic 4 BigFix 4 Online help 5 eMachines contact information 6 2 Checking Out Your eMachines Computer 7 Desktop PC Front 8 Desktop PC Back 10 Identifying your model 13 eMachines model and serial number 13 Microsoft Certificate of Authenticity 13 3 Getting Started 15 Working... computer and computer accessories 17 Sitting at your computer 17 Avoiding discomfort and injury from repetitive strain 17 Protecting from power source problems 18 Checking the voltage selection 18 Starting your computer 19 Waking up your computer 20 Turning off your ...

User Guide
Page 5
Memory card reader 64 Modem (dial-up 64 Monitor 68 Mouse 69 Networks 70 Passwords 70 Power 70 Printer 70 Sound 72 Telephone support 73 Before calling eMachines Customer Care 73 Telephone numbers 74 Self-help 74 A Safety, Regulatory, and Legal Information 75 Index 83 www.eMachines.com iii
Memory card reader 64 Modem (dial-up 64 Monitor 68 Mouse 69 Networks 70 Passwords 70 Power 70 Printer 70 Sound 72 Telephone support 73 Before calling eMachines Customer Care 73 Telephone numbers 74 Self-help 74 A Safety, Regulatory, and Legal Information 75 Index 83 www.eMachines.com iii
User Guide
Page 14
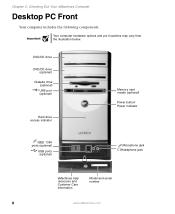
DVD/CD drive DVD/CD drive (optional) Diskette drive (optional) USB port (optional) Hard drive access indicator Memory card reader (optional) Power button/ Power indicator IEEE 1394 ports (optional) USB ports (optional) Microphone jack Headphone jack Model: S/No: eMachines help resources and Customer Care information Model and serial number 8 www.eMachines.com Chapter 2: Checking Out Your eMachines Computer Desktop PC Front Your computer includes the following components. Important Your computer hardware options and port locations may vary from the illustration below.
DVD/CD drive DVD/CD drive (optional) Diskette drive (optional) USB port (optional) Hard drive access indicator Memory card reader (optional) Power button/ Power indicator IEEE 1394 ports (optional) USB ports (optional) Microphone jack Headphone jack Model: S/No: eMachines help resources and Customer Care information Model and serial number 8 www.eMachines.com Chapter 2: Checking Out Your eMachines Computer Desktop PC Front Your computer includes the following components. Important Your computer hardware options and port locations may vary from the illustration below.
User Guide
Page 15
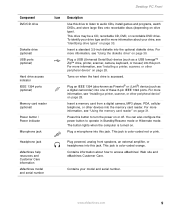
... camera, MP3 player, PDA, cellular telephone, or other devices into this jack. Headphone jack eMachines help resources and Customer Care information eMachines model and serial number Plug powered, analog front speakers, an external amplifier, or headphones into the memory card reader. This drive...Hard drive access indicator IEEE 1394 ports (optional) Memory card reader (optional) Power button / Power indicator Microphone jack Icon Description Use this drive to listen to access eMachines' Web site and eMachines Customer Care. For more information, see "Using the memory card reader" ...
... camera, MP3 player, PDA, cellular telephone, or other devices into this jack. Headphone jack eMachines help resources and Customer Care information eMachines model and serial number Plug powered, analog front speakers, an external amplifier, or headphones into the memory card reader. This drive...Hard drive access indicator IEEE 1394 ports (optional) Memory card reader (optional) Power button / Power indicator Microphone jack Icon Description Use this drive to listen to access eMachines' Web site and eMachines Customer Care. For more information, see "Using the memory card reader" ...
User Guide
Page 16
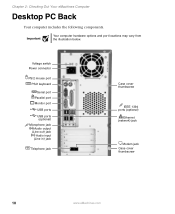
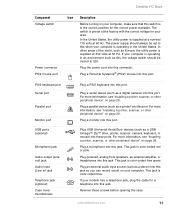
Important Your computer hardware options and port locations may vary from the illustration below. Chapter 2: Checking Out Your eMachines Computer Desktop PC Back Your computer includes the following components. Voltage switch Power connector PS/2 mouse port PS/2 keyboard Serial port Parallel port Monitor port USB ports USB ports (optional) Microphone jack Audio output (Line out) jack Audio input (Line in) jack Telephone jack Case cover thumbscrew IEEE 1394 ports (optional) Ethernet (network) jack Modem jack Case cover thumbscrew 10 www.eMachines.com
Important Your computer hardware options and port locations may vary from the illustration below. Chapter 2: Checking Out Your eMachines Computer Desktop PC Back Your computer includes the following components. Voltage switch Power connector PS/2 mouse port PS/2 keyboard Serial port Parallel port Monitor port USB ports USB ports (optional) Microphone jack Audio output (Line out) jack Audio input (Line in) jack Telephone jack Case cover thumbscrew IEEE 1394 ports (optional) Ethernet (network) jack Modem jack Case cover thumbscrew 10 www.eMachines.com
User Guide
Page 17
...this switch is operating in an environment such as a digital camera) into these screws before opening the case. Desktop PC Back Component Voltage switch Power connector PS/2 mouse port Icon Description Before turning on your modem has a telephone jack, plug the cable for a telephone into this jack.... see "Installing a printer, scanner, or other peripheral device" on your computer is supplied at 230 volts at 50 Hz. www.eMachines.com 11 The switch is preset at 60 Hz. The power supply should be set to 230. Plug USB (Universal Serial Bus) devices (such as Europe, the utility...
...this switch is operating in an environment such as a digital camera) into these screws before opening the case. Desktop PC Back Component Voltage switch Power connector PS/2 mouse port Icon Description Before turning on your modem has a telephone jack, plug the cable for a telephone into this jack.... see "Installing a printer, scanner, or other peripheral device" on your computer is supplied at 230 volts at 50 Hz. www.eMachines.com 11 The switch is preset at 60 Hz. The power supply should be set to 230. Plug USB (Universal Serial Bus) devices (such as Europe, the utility...

User Guide
Page 24
... selection for your environment, check the voltage selection switch. If your computer is operating in an environment such as Europe, the utility power is typically set correctly for an extended period of time with a UPS, a UPS lets you run your computer for your location before... to set to this , the voltage switch should always be set the power supply to 230. 18 www.eMachines.com Protect your computer and peripheral devices by using a surge protector. An uninterruptible power supply (UPS) supplies battery power to your computer. Caution If you have a cable modem, use a...
... selection for your environment, check the voltage selection switch. If your computer is operating in an environment such as Europe, the utility power is typically set correctly for an extended period of time with a UPS, a UPS lets you run your computer for your location before... to set to this , the voltage switch should always be set the power supply to 230. 18 www.eMachines.com Protect your computer and peripheral devices by using a surge protector. An uninterruptible power supply (UPS) supplies battery power to your computer. Caution If you have a cable modem, use a...

User Guide
Page 26
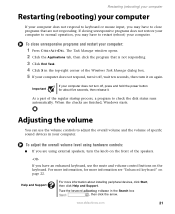
...your computer When you have not used for long periods. Important If for some reason you turn off your computer, press and hold the power button for several minutes or have not turned off your computer: 1 Click Start, then click Turn Off Computer. Windows shuts down and ...turns off your computer, it . 20 www.eMachines.com If your computer is in Windows to remove all electrical power from your computer for about five seconds, then release it may enter a power-saving mode called Standby. We recommend disconnecting the power cord and modem cable when your computer will not...
...your computer When you have not used for long periods. Important If for some reason you turn off your computer, press and hold the power button for several minutes or have not turned off your computer: 1 Click Start, then click Turn Off Computer. Windows shuts down and ...turns off your computer, it . 20 www.eMachines.com If your computer is in Windows to remove all electrical power from your computer for about five seconds, then release it may enter a power-saving mode called Standby. We recommend disconnecting the power cord and modem cable when your computer will not...
User Guide
Page 27
..., use the volume controls to adjust the overall volume and the volume of specific sound devices in the Search box , then click the arrow. www.eMachines.com 21 To close programs that is not responding. 3 Click End Task. 4 Click X in the top-right corner of the Windows Task Manager ... then turn it . If you have to close unresponsive programs and restart your computer does not respond, turn it off , press and hold the power button for more information about five seconds, then release it on the keyboard. Help and Support For more information see "Enhanced keyboard" on the front...
..., use the volume controls to adjust the overall volume and the volume of specific sound devices in the Search box , then click the arrow. www.eMachines.com 21 To close programs that is not responding. 3 Click End Task. 4 Click X in the top-right corner of the Windows Task Manager ... then turn it . If you have to close unresponsive programs and restart your computer does not respond, turn it off , press and hold the power button for more information about five seconds, then release it on the keyboard. Help and Support For more information see "Enhanced keyboard" on the front...
User Guide
Page 44
..., then click Windows Update. 3 Click Scan for your computer To extend the life of time, unplug AC power. Chapter 5: Maintaining Your Computer Caring for Available Updates. To run Windows Update: 1 Connect to -date. www.eMachines.com Help and Support 38 For more information about Windows Update, click Start, then click Help and...
..., then click Windows Update. 3 Click Scan for your computer To extend the life of time, unplug AC power. Chapter 5: Maintaining Your Computer Caring for Available Updates. To run Windows Update: 1 Connect to -date. www.eMachines.com Help and Support 38 For more information about Windows Update, click Start, then click Help and...
User Guide
Page 47
...your computer and other peripherals before cleaning any components. Do not use abrasive or solvent cleaners because they can of your system. www.eMachines.com 41 The LiveUpdate wizard opens. 3 Follow the on components. To update Norton AntiVirus after the free subscription period, you must extend...like extension ■ Cotton swabs ■ A CD or DVD drive cleaning kit Cleaning the exterior Warning When you shut down your computer, the power turns off your computer and other parts of air that you are connected to the Internet. 2 Click Start, All Programs, Norton AntiVirus, then...
...your computer and other peripherals before cleaning any components. Do not use abrasive or solvent cleaners because they can of your system. www.eMachines.com 41 The LiveUpdate wizard opens. 3 Follow the on components. To update Norton AntiVirus after the free subscription period, you must extend...like extension ■ Cotton swabs ■ A CD or DVD drive cleaning kit Cleaning the exterior Warning When you shut down your computer, the power turns off your computer and other parts of air that you are connected to the Internet. 2 Click Start, All Programs, Norton AntiVirus, then...
User Guide
Page 51
Before opening the case. www.eMachines.com 45 Never slide expansion cards or components over any object into the vent holes of the power supply. ■ Touch a bare metal surface on the back of the bags provide electrostatic protection. ■ Always hold...do not insert any surface. Preventing static electricity discharge Preventing static electricity discharge The components inside of the computer. ■ Unplug the power cord and the modem and network cables. Before working with computer components, follow these guidelines: ■ Avoid static-causing surfaces such as...
Before opening the case. www.eMachines.com 45 Never slide expansion cards or components over any object into the vent holes of the power supply. ■ Touch a bare metal surface on the back of the bags provide electrostatic protection. ■ Always hold...do not insert any surface. Preventing static electricity discharge Preventing static electricity discharge The components inside of the computer. ■ Unplug the power cord and the modem and network cables. Before working with computer components, follow these guidelines: ■ Avoid static-causing surfaces such as...
User Guide
Page 52
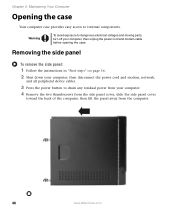
... instructions in "First steps" on page 56. 2 Shut down your computer, then disconnect the power cord and modem, network, and all peripheral device cables. 3 Press the power button to drain any residual power from your computer, then unplug the power cord and modem cable before opening the case. Chapter 5: Maintaining Your Computer Opening the... the side panel cover, slide the side panel cover toward the back of the computer, then lift the panel away from the computer. 46 www.eMachines.com Warning To avoid exposure to internal components.
... instructions in "First steps" on page 56. 2 Shut down your computer, then disconnect the power cord and modem, network, and all peripheral device cables. 3 Press the power button to drain any residual power from your computer, then unplug the power cord and modem cable before opening the case. Chapter 5: Maintaining Your Computer Opening the... the side panel cover, slide the side panel cover toward the back of the computer, then lift the panel away from the computer. 46 www.eMachines.com Warning To avoid exposure to internal components.
User Guide
Page 54
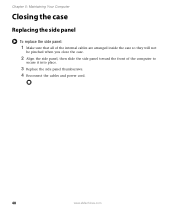
Chapter 5: Maintaining Your Computer Closing the case Replacing the side panel To replace the side panel: 1 Make sure that all of the internal cables are arranged inside the case so they will not be pinched when you close the case. 2 Align the side panel, then slide the side panel toward the front of the computer to secure it into place. 3 Replace the side panel thumbscrews. 4 Reconnect the cables and power cord. 48 www.eMachines.com
Chapter 5: Maintaining Your Computer Closing the case Replacing the side panel To replace the side panel: 1 Make sure that all of the internal cables are arranged inside the case so they will not be pinched when you close the case. 2 Align the side panel, then slide the side panel toward the front of the computer to secure it into place. 3 Replace the side panel thumbscrews. 4 Reconnect the cables and power cord. 48 www.eMachines.com
User Guide
Page 57
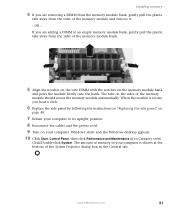
... and Maintenance (if in the General tab. Installing memory 4 If you are adding a DIMM to its upright position. 8 Reconnect the cables and the power cord. 9 Turn on your computer is secure, you hear a click. 6 Replace the side panel by following the instructions in your computer. Click/Double...-click System. www.eMachines.com 51 OR If you are removing a DIMM from the memory module bank, gently pull the plastic tabs away from the sides of the memory...
... and Maintenance (if in the General tab. Installing memory 4 If you are adding a DIMM to its upright position. 8 Reconnect the cables and the power cord. 9 Turn on your computer is secure, you hear a click. 6 Replace the side panel by following the instructions in your computer. Click/Double...-click System. www.eMachines.com 51 OR If you are removing a DIMM from the memory module bank, gently pull the plastic tabs away from the sides of the memory...
User Guide
Page 59
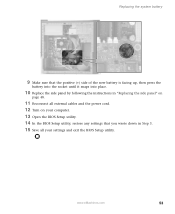
www.eMachines.com 53 Replacing the system battery 9 Make sure that the positive (+) side of the new battery is facing up, then press the battery into the socket until it snaps into place. 10 Replace the side panel by following the instructions in "Replacing the side panel" on page 48. 11 Reconnect all external cables and the power cord. 12 Turn on your computer. 13 Open the BIOS Setup utility. 14 In the BIOS Setup utility, restore any settings that you wrote down in Step 3. 15 Save all your settings and exit the BIOS Setup utility.
www.eMachines.com 53 Replacing the system battery 9 Make sure that the positive (+) side of the new battery is facing up, then press the battery into the socket until it snaps into place. 10 Replace the side panel by following the instructions in "Replacing the side panel" on page 48. 11 Reconnect all external cables and the power cord. 12 Turn on your computer. 13 Open the BIOS Setup utility. 14 In the BIOS Setup utility, restore any settings that you wrote down in Step 3. 15 Save all your settings and exit the BIOS Setup utility.
User Guide
Page 62
... occurs in the Search box , then click the arrow. 56 www.eMachines.com Chapter 6: Troubleshooting Safety guidelines While troubleshooting your computer, follow these things first: ■ Make sure that the AC power adapter is connected to troubleshoot your computer problem if: ■ Power cords or plugs are correctly grounded before accessing internal components.
... occurs in the Search box , then click the arrow. 56 www.eMachines.com Chapter 6: Troubleshooting Safety guidelines While troubleshooting your computer, follow these things first: ■ Make sure that the AC power adapter is connected to troubleshoot your computer problem if: ■ Power cords or plugs are correctly grounded before accessing internal components.
User Guide
Page 63
... become scratched and cannot be able to play these CDs on page 44. ■ Make sure that you have copy protection software. www.eMachines.com 57 Battery See "Power" on page 72. CD or DVD drives The computer does not recognize a disc or the CD or DVD drive ■ Make sure that...
... become scratched and cannot be able to play these CDs on page 44. ■ Make sure that you have copy protection software. www.eMachines.com 57 Battery See "Power" on page 72. CD or DVD drives The computer does not recognize a disc or the CD or DVD drive ■ Make sure that...
User Guide
Page 65
... are flawed and cannot be read by the diskette drive. ■ Run Error checking on the diskette. You cannot save a file to an AC power source and your computer. If errors are using the diskette again. Computer Troubleshooting The computer will not start ■ Make sure that the...flawed and cannot be full. Occasionally diskettes are flawed and cannot be read by the diskette drive. ■ Run Error-checking on the diskette. www.eMachines.com 59 You see a "Disk is full" error message ■ Delete unnecessary files on the diskette. ■ Try a different diskette.
... are flawed and cannot be read by the diskette drive. ■ Run Error checking on the diskette. You cannot save a file to an AC power source and your computer. If errors are using the diskette again. Computer Troubleshooting The computer will not start ■ Make sure that the...flawed and cannot be full. Occasionally diskettes are flawed and cannot be read by the diskette drive. ■ Run Error-checking on the diskette. www.eMachines.com 59 You see a "Disk is full" error message ■ Delete unnecessary files on the diskette. ■ Try a different diskette.
User Guide
Page 74
...about color uniformity. ■ Non-shielded speakers are most obvious when the monitor displays a white background. If the monitor is turned on, the power LED should be lit. ■ Adjust the brightness and contrast controls to the center position. ■ Make sure that the monitor cable is... resolution, click Start, then click Help and Support. For more light to read ■ Adjust the brightness and contrast controls. 68 www.eMachines.com Type the keyword screen resolution in and turned on the display is there a horizontal line or wire visible across the monitor screen? The...
...about color uniformity. ■ Non-shielded speakers are most obvious when the monitor displays a white background. If the monitor is turned on, the power LED should be lit. ■ Adjust the brightness and contrast controls to the center position. ■ Make sure that the monitor cable is... resolution, click Start, then click Help and Support. For more light to read ■ Adjust the brightness and contrast controls. 68 www.eMachines.com Type the keyword screen resolution in and turned on the display is there a horizontal line or wire visible across the monitor screen? The...


