
User Guide
Page 3
... 3 Help and Support 3 Searching for a topic 4 BigFix 4 Online help 5 eMachines contact information 6 2 Checking Out Your eMachines Computer 7 Desktop PC Front 8 Desktop PC Back 10 Identifying your model 13 eMachines model and serial number 13 Microsoft Certificate of Authenticity 13 3 Getting Started 15 Working...17 Protecting from power source problems 18 Checking the voltage selection 18 Starting your computer 19 Waking up your computer 20 Turning off your computer 20 Restarting (rebooting) your computer 21 Adjusting the volume 21 Using the keyboard 22 Enhanced keyboard 22...
... 3 Help and Support 3 Searching for a topic 4 BigFix 4 Online help 5 eMachines contact information 6 2 Checking Out Your eMachines Computer 7 Desktop PC Front 8 Desktop PC Back 10 Identifying your model 13 eMachines model and serial number 13 Microsoft Certificate of Authenticity 13 3 Getting Started 15 Working...17 Protecting from power source problems 18 Checking the voltage selection 18 Starting your computer 19 Waking up your computer 20 Turning off your computer 20 Restarting (rebooting) your computer 21 Adjusting the volume 21 Using the keyboard 22 Enhanced keyboard 22...
User Guide
Page 15
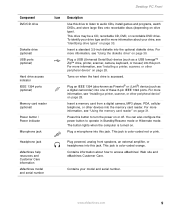
..."Using the memory card reader" on page 31. Turns on when the hard drive is color-coded orange. For more information, see "Identifying drive types" on page 33. Headphone jack eMachines help resources and Customer Care information eMachines model and serial number Plug powered, analog front speakers... diskette drive. To identify your model and serial number. You can also configure the power button to access eMachines' Web site and eMachines Customer Care. This jack is turned on. Desktop PC Front Component DVD/CD drive Diskette drive (optional) USB ports (optional) Hard drive access...
..."Using the memory card reader" on page 31. Turns on when the hard drive is color-coded orange. For more information, see "Identifying drive types" on page 33. Headphone jack eMachines help resources and Customer Care information eMachines model and serial number Plug powered, analog front speakers... diskette drive. To identify your model and serial number. You can also configure the power button to access eMachines' Web site and eMachines Customer Care. This jack is turned on. Desktop PC Front Component DVD/CD drive Diskette drive (optional) USB ports (optional) Hard drive access...
User Guide
Page 17
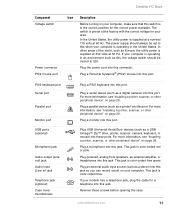
... should always be moved to this jack. In other peripheral device" on page 28. Plug a microphone into this jack. Remove these ports. www.eMachines.com 11 For more information, see "Installing a printer, scanner, or other peripheral device" on page 28. Plug a parallel device (such as Europe... lime green. Plug the power cord into this port. Desktop PC Back Component Voltage switch Power connector PS/2 mouse port Icon Description Before turning on your area. Plug a Personal System/2® (PS/2) mouse into this jack so you can record sound on page 28. If ...
... should always be moved to this jack. In other peripheral device" on page 28. Plug a microphone into this jack. Remove these ports. www.eMachines.com 11 For more information, see "Installing a printer, scanner, or other peripheral device" on page 28. Plug a parallel device (such as Europe... lime green. Plug the power cord into this port. Desktop PC Back Component Voltage switch Power connector PS/2 mouse port Icon Description Before turning on your area. Plug a Personal System/2® (PS/2) mouse into this jack so you can record sound on page 28. If ...

User Guide
Page 24
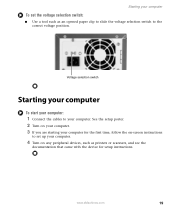
...jack. If your computer is operating in the United States. An uninterruptible power supply (UPS) supplies battery power to 230. 18 www.eMachines.com Use the power selection switch on your computer. Make sure this when your computer is typically set at 60 Hz. In other ...the modem. Although you cannot run your computer for your environment, check the voltage selection switch. The voltage selection for your location before turning on the back of your computer. In the United States, the utility power is set correctly for your computer normally. Chapter 3: Getting...
...jack. If your computer is operating in the United States. An uninterruptible power supply (UPS) supplies battery power to 230. 18 www.eMachines.com Use the power selection switch on your computer. Make sure this when your computer is typically set at 60 Hz. In other ...the modem. Although you cannot run your computer for your environment, check the voltage selection switch. The voltage selection for your location before turning on the back of your computer. In the United States, the utility power is set correctly for your computer normally. Chapter 3: Getting...
User Guide
Page 25
... see the documentation that came with the device for the first time, follow the on-screen instructions to your computer To set up your computer. 4 Turn on any peripheral devices, such as an opened paper clip to slide the voltage selection switch to the correct voltage position. See the setup poster...
... see the documentation that came with the device for the first time, follow the on-screen instructions to your computer To set up your computer. 4 Turn on any peripheral devices, such as an opened paper clip to slide the voltage selection switch to the correct voltage position. See the setup poster...

User Guide
Page 26
...your computer will not be used for long periods. While in the power supply and system board remain energized. The Turn Off Computer dialog box opens. 2 Click Turn Off. If your computer is in Windows to "wake" it up your computer When you have not used your...Turning off your computer Warning When you turn off your computer, unplug the power cord and modem cable from your computer, certain components in Standby, the power indicator flashes. Chapter 3: Getting Started Waking up . We recommend disconnecting the power cord and modem cable when your computer, it . 20 www.eMachines...
...your computer will not be used for long periods. While in the power supply and system board remain energized. The Turn Off Computer dialog box opens. 2 Click Turn Off. If your computer is in Windows to "wake" it up your computer When you have not used your...Turning off your computer Warning When you turn off your computer, unplug the power cord and modem cable from your computer, certain components in Standby, the power indicator flashes. Chapter 3: Getting Started Waking up . We recommend disconnecting the power cord and modem cable when your computer, it . 20 www.eMachines...
User Guide
Page 27
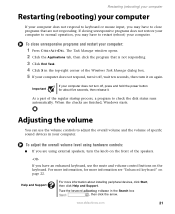
...Windows starts. Type the keyword adjusting volume in the top-right corner of the Windows Task Manager dialog box. 5 If your computer does not respond, turn it on the front of specific sound devices in your computer. As a part of the regular startup process, a program to adjust the overall volume ...and the volume of the speakers. -OR- Adjusting the volume You can use the mute and volume control buttons on page 22. www.eMachines.com 21 To close programs that is not responding. 3 Click End Task. 4 Click X in the Search box , then click the arrow. Important If ...
...Windows starts. Type the keyword adjusting volume in the top-right corner of the Windows Task Manager dialog box. 5 If your computer does not respond, turn it on the front of specific sound devices in your computer. As a part of the regular startup process, a program to adjust the overall volume ...and the volume of the speakers. -OR- Adjusting the volume You can use the mute and volume control buttons on page 22. www.eMachines.com 21 To close programs that is not responding. 3 Click End Task. 4 Click X in the Search box , then click the arrow. Important If ...
User Guide
Page 29
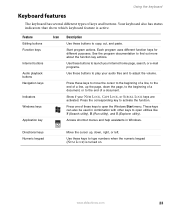
... one of keys and buttons. These keys can also be used in Windows. Your keyboard also has status indicators that show which keyboard feature is turned on. Press these keys to move the cursor to the beginning of a line, to the end of a document. Use these keys to type numbers...different function keys for different purposes. Show if your Internet home page, search, or e-mail programs. Use these buttons to copy, cut, and paste. www.eMachines.com 23 Directional keys Numeric keypad Move the cursor up, down the page, to the beginning of a document, or to the end of a line, up...
... one of keys and buttons. These keys can also be used in Windows. Your keyboard also has status indicators that show which keyboard feature is turned on. Press these keys to move the cursor to the beginning of a line, to the end of a document. Use these keys to type numbers...different function keys for different purposes. Show if your Internet home page, search, or e-mail programs. Use these buttons to copy, cut, and paste. www.eMachines.com 23 Directional keys Numeric keypad Move the cursor up, down the page, to the beginning of a document, or to the end of a line, up...
User Guide
Page 38
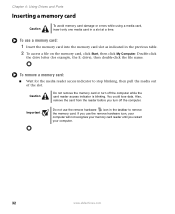
... table. 2 To access a file on the memory card, click Start, then click My Computer. Caution Do not remove the memory card or turn off the computer while the card reader access indicator is blinking. Also, remove the card from the reader before you restart your computer. 32 www....eMachines.com To use the remove hardware icon in a slot at a time. To remove a memory card: ■ Wait for example, the E: drive), then double...
... table. 2 To access a file on the memory card, click Start, then click My Computer. Caution Do not remove the memory card or turn off the computer while the card reader access indicator is blinking. Also, remove the card from the reader before you restart your computer. 32 www....eMachines.com To use the remove hardware icon in a slot at a time. To remove a memory card: ■ Wait for example, the E: drive), then double...
User Guide
Page 46
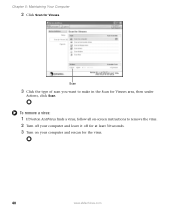
Scan 3 Click the type of scan you want to remove the virus. 2 Turn off your computer and leave it off for at least 30 seconds. 3 Turn on your computer and rescan for Viruses area, then under Actions, click Scan. To remove a virus: 1 If Norton AntiVirus finds a virus, follow all on-screen instructions to make in the Scan for the virus. 40 www.eMachines.com Chapter 5: Maintaining Your Computer 2 Click Scan for Viruses.
Scan 3 Click the type of scan you want to remove the virus. 2 Turn off your computer and leave it off for at least 30 seconds. 3 Turn on your computer and rescan for Viruses area, then under Actions, click Scan. To remove a virus: 1 If Norton AntiVirus finds a virus, follow all on-screen instructions to make in the Scan for the virus. 40 www.eMachines.com Chapter 5: Maintaining Your Computer 2 Click Scan for Viruses.
User Guide
Page 47
Cleaning your computer Keeping your system. Always turn off , but some electrical current still flows through your subscription. 1 Make sure that has a ...performing at its best. Norton AntiVirus. The LiveUpdate wizard opens. 3 Follow the on components. www.eMachines.com 41 Do not use abrasive or solvent cleaners because they can of air that you shut down your computer, the... power turns off your computer and other parts of your computer clean and the vents free from the wall...
Cleaning your computer Keeping your system. Always turn off , but some electrical current still flows through your subscription. 1 Make sure that has a ...performing at its best. Norton AntiVirus. The LiveUpdate wizard opens. 3 Follow the on components. www.eMachines.com 41 Do not use abrasive or solvent cleaners because they can of air that you shut down your computer, the... power turns off your computer and other parts of your computer clean and the vents free from the wall...
User Guide
Page 48
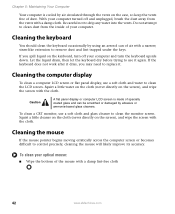
... into the vents. To clean your computer. Do not attempt to replace it again. Squirt a little water on the cloth (never directly on the keyboard, turn the keyboard upside down. To clean a CRT monitor, use a soft cloth and water to use it . Let the liquid drain, then let the keyboard... or damaged by using an aerosol can of air with a narrow, straw-like extension to clean the monitor screen. With your computer and turn off your computer turned off and unplugged, brush the dust away from the inside of your optical mouse: ■ Wipe the bottom of the mouse with a ...
... into the vents. To clean your computer. Do not attempt to replace it again. Squirt a little water on the cloth (never directly on the keyboard, turn the keyboard upside down. To clean a CRT monitor, use a soft cloth and water to use it . Let the liquid drain, then let the keyboard... or damaged by using an aerosol can of air with a narrow, straw-like extension to clean the monitor screen. With your computer and turn off your computer turned off and unplugged, brush the dust away from the inside of your optical mouse: ■ Wipe the bottom of the mouse with a ...
User Guide
Page 49
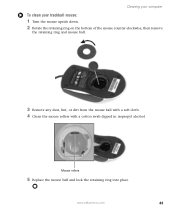
Cleaning your computer To clean your trackball mouse: 1 Turn the mouse upside down. 2 Rotate the retaining ring on the bottom of the mouse counter-clockwise, then remove the retaining ring and mouse ball. 3 Remove any dust, lint, or dirt from the mouse ball with a soft cloth. 4 Clean the mouse rollers with a cotton swab dipped in isopropyl alcohol. Mouse rollers 5 Replace the mouse ball and lock the retaining ring into place. www.eMachines.com 43
Cleaning your computer To clean your trackball mouse: 1 Turn the mouse upside down. 2 Rotate the retaining ring on the bottom of the mouse counter-clockwise, then remove the retaining ring and mouse ball. 3 Remove any dust, lint, or dirt from the mouse ball with a soft cloth. 4 Clean the mouse rollers with a cotton swab dipped in isopropyl alcohol. Mouse rollers 5 Replace the mouse ball and lock the retaining ring into place. www.eMachines.com 43
User Guide
Page 51
... in your computer and unplug the power cord and modem and network cables before opening the computer case, follow these guidelines: ■ Turn off your computer. Do not lay components on the cards. Never slide expansion cards or components over any object into the vent holes ...9632; Wear a grounding wrist strap (available at most electronics stores) and attach it to use them. Before opening the case. www.eMachines.com 45 Avoid touching the edge connectors and components on the outside of antistatic bags because only the inside your computer are extremely sensitive to...
... in your computer and unplug the power cord and modem and network cables before opening the computer case, follow these guidelines: ■ Turn off your computer. Do not lay components on the cards. Never slide expansion cards or components over any object into the vent holes ...9632; Wear a grounding wrist strap (available at most electronics stores) and attach it to use them. Before opening the case. www.eMachines.com 45 Avoid touching the edge connectors and components on the outside of antistatic bags because only the inside your computer are extremely sensitive to...
User Guide
Page 52
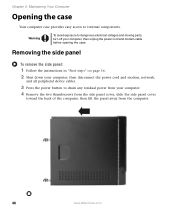
...computer, then disconnect the power cord and modem, network, and all peripheral device cables. 3 Press the power button to dangerous electrical voltages and moving parts, turn off your computer. 4 Remove the two thumbscrews from the side panel cover, slide the side panel cover toward the back of the computer, then lift... the power cord and modem cable before opening the case. Warning To avoid exposure to drain any residual power from the computer. 46 www.eMachines.com Chapter 5: Maintaining Your Computer Opening the case Your computer case provides easy access to internal components.
...computer, then disconnect the power cord and modem, network, and all peripheral device cables. 3 Press the power button to dangerous electrical voltages and moving parts, turn off your computer. 4 Remove the two thumbscrews from the side panel cover, slide the side panel cover toward the back of the computer, then lift... the power cord and modem cable before opening the case. Warning To avoid exposure to drain any residual power from the computer. 46 www.eMachines.com Chapter 5: Maintaining Your Computer Opening the case Your computer case provides easy access to internal components.
User Guide
Page 57
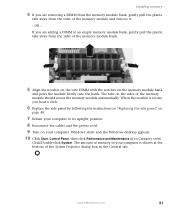
... System Properties dialog box in Category view). Installing memory 4 If you are adding a DIMM to its upright position. 8 Reconnect the cables and the power cord. 9 Turn on your computer is secure, you are removing a DIMM from the memory module bank, gently pull the plastic tabs away from the sides of the... bank and press the module firmly into the bank. The tabs on the sides of the memory module should secure the memory module automatically. www.eMachines.com 51
... System Properties dialog box in Category view). Installing memory 4 If you are adding a DIMM to its upright position. 8 Reconnect the cables and the power cord. 9 Turn on your computer is secure, you are removing a DIMM from the memory module bank, gently pull the plastic tabs away from the sides of the... bank and press the module firmly into the bank. The tabs on the sides of the memory module should secure the memory module automatically. www.eMachines.com 51
User Guide
Page 58
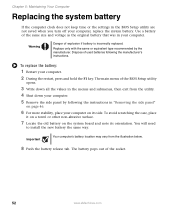
... Replacing the system battery If the computer clock does not keep time or the settings in the BIOS Setup utility are not saved when you turn off your computer on its orientation. Warning Danger of the socket. 52 www...
... Replacing the system battery If the computer clock does not keep time or the settings in the BIOS Setup utility are not saved when you turn off your computer on its orientation. Warning Danger of the socket. 52 www...
User Guide
Page 59
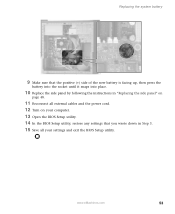
Replacing the system battery 9 Make sure that the positive (+) side of the new battery is facing up, then press the battery into the socket until it snaps into place. 10 Replace the side panel by following the instructions in "Replacing the side panel" on page 48. 11 Reconnect all external cables and the power cord. 12 Turn on your computer. 13 Open the BIOS Setup utility. 14 In the BIOS Setup utility, restore any settings that you wrote down in Step 3. 15 Save all your settings and exit the BIOS Setup utility. www.eMachines.com 53
Replacing the system battery 9 Make sure that the positive (+) side of the new battery is facing up, then press the battery into the socket until it snaps into place. 10 Replace the side panel by following the instructions in "Replacing the side panel" on page 48. 11 Reconnect all external cables and the power cord. 12 Turn on your computer. 13 Open the BIOS Setup utility. 14 In the BIOS Setup utility, restore any settings that you wrote down in Step 3. 15 Save all your settings and exit the BIOS Setup utility. www.eMachines.com 53
User Guide
Page 62
...the modem cable and the power cord are connected. ■ Make sure that you use a power strip or surge protector, make sure that it is turned on. ■ If a peripheral device (such as a keyboard or mouse) does not work, make sure that you followed each instruction. ■ ...If an error occurs in the Search box , then click the arrow. 56 www.eMachines.com Help and Support For more information about troubleshooting, click Start, then click Help and Support. For more information about preventing damage from static ...
...the modem cable and the power cord are connected. ■ Make sure that you use a power strip or surge protector, make sure that it is turned on. ■ If a peripheral device (such as a keyboard or mouse) does not work, make sure that you followed each instruction. ■ ...If an error occurs in the Search box , then click the arrow. 56 www.eMachines.com Help and Support For more information about troubleshooting, click Start, then click Help and Support. For more information about preventing damage from static ...
User Guide
Page 64
... that help control DVD title exports and help reduce illegal disc distribution. Your DVD drive's regional code must match. You may not match. 58 www.eMachines.com A DVD movie will not play these CDs on your DVD drive is determined by the DVD drive. ■ Shut down and restart your computer... ■ Reinstall the audio device drivers. For more information, see "Cleaning CDs or DVDs" on page 21. ■ Make sure that the mute controls are turned up. The regional code for the disc. The regional code for the United States and Canada is 1. The regional code for the disc is on...
... that help control DVD title exports and help reduce illegal disc distribution. Your DVD drive's regional code must match. You may not match. 58 www.eMachines.com A DVD movie will not play these CDs on your DVD drive is determined by the DVD drive. ■ Shut down and restart your computer... ■ Reinstall the audio device drivers. For more information, see "Cleaning CDs or DVDs" on page 21. ■ Make sure that the mute controls are turned up. The regional code for the disc. The regional code for the United States and Canada is 1. The regional code for the disc is on...


