
User Guide
Page 1
...Operation Procedure 12 8. How to qualified personnel WARNING: TO PREVENT FIRE OR SHOCK HAZARD, DO NOT EXPOSE THIS MONITOR TO RAIN OR MOISTURE. Appendix...20 1. RISK OF ELECTRIC SHOCK DO NOT OPEN CAUTION: To reduce the risk...Introduction ...5 5. Hardware Installation ...6 5-1. Refer servicing to use AUTO TUNE Adjustment 17 9. HIGH VOLTAGE EXISTS ON THE BACK LIGHT POWER LEAD OF THIS MONITOR. Unpacking...6 5-2. Display Controls ...11 7-1. Display Controls...11 7-2. Screen Adjustment...13 8-1. Troubleshooting Tips ...18 10. FCC Requirements...3 3. Installation...6 5-3....
...Operation Procedure 12 8. How to qualified personnel WARNING: TO PREVENT FIRE OR SHOCK HAZARD, DO NOT EXPOSE THIS MONITOR TO RAIN OR MOISTURE. Appendix...20 1. RISK OF ELECTRIC SHOCK DO NOT OPEN CAUTION: To reduce the risk...Introduction ...5 5. Hardware Installation ...6 5-1. Refer servicing to use AUTO TUNE Adjustment 17 9. HIGH VOLTAGE EXISTS ON THE BACK LIGHT POWER LEAD OF THIS MONITOR. Unpacking...6 5-2. Display Controls ...11 7-1. Display Controls...11 7-2. Screen Adjustment...13 8-1. Troubleshooting Tips ...18 10. FCC Requirements...3 3. Installation...6 5-3....

User Guide
Page 3
...Please save the original packaging for transporting longer distances or for full details. 5. Windows XP / ME / 2000 drivers for purchasing an eMachines LCD monitor. The video card must also be found on its compact size requires only minimal desktop space. There is no need to change the ... ME / 2000 CD or diskettes. Hardware Installation on page 6 for shipping. • Your LCD monitor operates on the most cluttered of your new eMachines LCD monitor.: • An LCD monitor has low radiation and less flicker than compared to your computer. If you 'll be used on low...
...Please save the original packaging for transporting longer distances or for full details. 5. Windows XP / ME / 2000 drivers for purchasing an eMachines LCD monitor. The video card must also be found on its compact size requires only minimal desktop space. There is no need to change the ... ME / 2000 CD or diskettes. Hardware Installation on page 6 for shipping. • Your LCD monitor operates on the most cluttered of your new eMachines LCD monitor.: • An LCD monitor has low radiation and less flicker than compared to your computer. If you 'll be used on low...

User Guide
Page 4
... plug the other end of the Apple / Macintosh computer. Switch on the rear of the signal cable into the MAC adapter. (Contact your existing monitor's User's Guide. 3. Hardware Installation 5-3. Ground Ground for red video signal Ground for green video signal Ground for information on a solid horizontal surface ...AC/DC adapter and then connect the AC Adapter to the Display. 15 pin D-SUB DC Jack Power Cord AC/DC Adapter Figure 5.1 LCD Monitor Hardware Setup 7 ENGLISH 5. Apple / Macintosh Computers 5b. Connect a MAC adapter (not supplied) to the video connector on power to the ...
... plug the other end of the Apple / Macintosh computer. Switch on the rear of the signal cable into the MAC adapter. (Contact your existing monitor's User's Guide. 3. Hardware Installation 5-3. Ground Ground for red video signal Ground for green video signal Ground for information on a solid horizontal surface ...AC/DC adapter and then connect the AC Adapter to the Display. 15 pin D-SUB DC Jack Power Cord AC/DC Adapter Figure 5.1 LCD Monitor Hardware Setup 7 ENGLISH 5. Apple / Macintosh Computers 5b. Connect a MAC adapter (not supplied) to the video connector on power to the ...
User Guide
Page 5
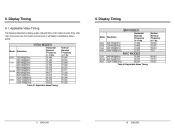
....000 56.250 60.017 72.188 75.000 60.004 70.069 75.029 6. Display Timing 6-1. If the other video modes are input, the monitor may not work or will display unsatisfactory picture quality. Applicable Video Timing The following table lists the display quality modes that the LCD...
....000 56.250 60.017 72.188 75.000 60.004 70.069 75.029 6. Display Timing 6-1. If the other video modes are input, the monitor may not work or will display unsatisfactory picture quality. Applicable Video Timing The following table lists the display quality modes that the LCD...

User Guide
Page 6
...button for sub-menu, changed data will be saved to memory. 2) SELECT : Press to make your adjustments. Pushing it again to your monitor display settings easier to the proper size and horizontal and vertical position. Use either the ▲ or▼ buttons. The LED will light...9660;:(DOWN) Press to decrease value of the selected item. When highlighted, the icons illustrate the control function to increase value of the monitor. MENU submenu or control with the power on . The contrast and brightness menu can be adjusted by simply pressing either the ▲ or...
...button for sub-menu, changed data will be saved to memory. 2) SELECT : Press to make your adjustments. Pushing it again to your monitor display settings easier to the proper size and horizontal and vertical position. Use either the ▲ or▼ buttons. The LED will light...9660;:(DOWN) Press to decrease value of the selected item. When highlighted, the icons illustrate the control function to increase value of the monitor. MENU submenu or control with the power on . The contrast and brightness menu can be adjusted by simply pressing either the ▲ or...
User Guide
Page 8
... then use the select button to scroll up and down the RGB menu to stay in the "on the monitor screen. 15 ENGLISH 8. Use the▲ and▼ buttons to select the time. (5, 15, 30, 60... SEC) POWER SAVE DELAY This feature directs the monitor to B (Blue). B-GAIN (BLUE) Select "USER" then use the▲ and▼ buttons to scroll to...confirm the current display mode. *Note: You can get the best image quality when you unpack the monitor or when you to move the OSD menu. 8. The function of the image under full-screen image...
... then use the select button to scroll up and down the RGB menu to stay in the "on the monitor screen. 15 ENGLISH 8. Use the▲ and▼ buttons to select the time. (5, 15, 30, 60... SEC) POWER SAVE DELAY This feature directs the monitor to B (Blue). B-GAIN (BLUE) Select "USER" then use the▲ and▼ buttons to scroll to...confirm the current display mode. *Note: You can get the best image quality when you unpack the monitor or when you to move the OSD menu. 8. The function of the image under full-screen image...


