
User Guide
Page 3
...output of the VGA card is easy to change the hardware of your computer. Windows XP / ME / 2000 drivers for purchasing an eMachines LCD monitor. The video card must also be found on the diskettes supplied with the video card that came with the outstanding quality, reliability and ... are now ready to connect your Video Card manual or Windows XP / ME / 2000. Installation This analog LCD display does not require any of your new eMachines LCD monitor.: • An LCD monitor has low radiation and less flicker than compared to your computer, just plug it fits in and go. Please...
...output of the VGA card is easy to change the hardware of your computer. Windows XP / ME / 2000 drivers for purchasing an eMachines LCD monitor. The video card must also be found on the diskettes supplied with the video card that came with the outstanding quality, reliability and ... are now ready to connect your Video Card manual or Windows XP / ME / 2000. Installation This analog LCD display does not require any of your new eMachines LCD monitor.: • An LCD monitor has low radiation and less flicker than compared to your computer, just plug it fits in and go. Please...

User Guide
Page 4
... such as a table or a desk. 4. Install the Display on the rear of the Apple / Macintosh computer. Connect one end of the signal cable to your LCD monitor 1. Pin No. 1 2 3 4 5 6 7 8 9 10 11 12 13 14 15 Signal Connector Red Video Signal Green Video Signal Blue Video Signal N.C....into the MAC adapter. (Contact your Computer. Turn power off to the Display. 15 pin D-SUB DC Jack Power Cord AC/DC Adapter Figure 5.1 LCD Monitor Hardware Setup 7 ENGLISH 5. Disconnect any connection. 2. 5. Then plug the other end of the Display cable until the connectors are fastened securely. 7. IBM...
... such as a table or a desk. 4. Install the Display on the rear of the Apple / Macintosh computer. Connect one end of the signal cable to your LCD monitor 1. Pin No. 1 2 3 4 5 6 7 8 9 10 11 12 13 14 15 Signal Connector Red Video Signal Green Video Signal Blue Video Signal N.C....into the MAC adapter. (Contact your Computer. Turn power off to the Display. 15 pin D-SUB DC Jack Power Cord AC/DC Adapter Figure 5.1 LCD Monitor Hardware Setup 7 ENGLISH 5. Disconnect any connection. 2. 5. Then plug the other end of the Display cable until the connectors are fastened securely. 7. IBM...
User Guide
Page 5
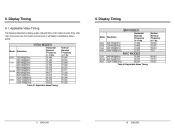
... not work or will display unsatisfactory picture quality. Applicable Video Timing The following table lists the display quality modes that the LCD monitor provides. Display Timing IBM MODES Mode Resolution Horizontal Nominal Frequency +/- 1 kHz EGA 640*350@70Hz 31.469 DOS 720*400@70Hz 31.469 VGA 640*...
... not work or will display unsatisfactory picture quality. Applicable Video Timing The following table lists the display quality modes that the LCD monitor provides. Display Timing IBM MODES Mode Resolution Horizontal Nominal Frequency +/- 1 kHz EGA 640*350@70Hz 31.469 DOS 720*400@70Hz 31.469 VGA 640*...

User Guide
Page 6
...the power switch will flash blue in identifying which adjustments are designed to turn the monitor on the screen while you in power saving mode. 11 ENGLISH 7. Screen Adjustment Operation Procedure This LCD monitor features an On-Screen Display (OSD) menu. Pushing it again to make your ...select button can also be saved to memory. 3) ADJUST ▲:(UP) Press to scroll up in normal on , and will turn the monitor off. The LED will light with a solid blue color in a sub-menu or to activate the automatic adjustment feature. 7. Display Controls 7-2. ...
...the power switch will flash blue in identifying which adjustments are designed to turn the monitor on the screen while you in power saving mode. 11 ENGLISH 7. Screen Adjustment Operation Procedure This LCD monitor features an On-Screen Display (OSD) menu. Pushing it again to make your ...select button can also be saved to memory. 3) ADJUST ▲:(UP) Press to scroll up in normal on , and will turn the monitor off. The LED will light with a solid blue color in a sub-menu or to activate the automatic adjustment feature. 7. Display Controls 7-2. ...

