User Guide
Page 1
Introduction ...5 5. Video Input Pin Assignment 8 6. Display Timing...9 6-1. Display Controls ...11 7-1. Screen Adjustment Operation Procedure 12 8. OSD Adjusting and Controls 14 8-3. Specification ...19 11. No user serviceable parts inside. Table of electric shock, do not remove cover (or back). Product Safety Precautions...4 4. Appendix...20 1. BEFORE SERVICING, DETERMINE THE PRESENCE OF HIGH VOLTAGE BY CONNECTING THE H.V. Hardware Installation ...6 5-1. Applicable Video Timing 9 7. Display Controls...11 7-2. How to qualified personnel WARNING: TO PREVENT FIRE OR ...
Introduction ...5 5. Video Input Pin Assignment 8 6. Display Timing...9 6-1. Display Controls ...11 7-1. Screen Adjustment Operation Procedure 12 8. OSD Adjusting and Controls 14 8-3. Specification ...19 11. No user serviceable parts inside. Table of electric shock, do not remove cover (or back). Product Safety Precautions...4 4. Appendix...20 1. BEFORE SERVICING, DETERMINE THE PRESENCE OF HIGH VOLTAGE BY CONNECTING THE H.V. Hardware Installation ...6 5-1. Applicable Video Timing 9 7. Display Controls...11 7-2. How to qualified personnel WARNING: TO PREVENT FIRE OR ...

User Guide
Page 2
... for service. • Power cord or plug is exposed to rain or water. • The product does not operate normally when the operating instructions are designed to which can radiate radio frequency energy and, if not installed and used in performance, indicating a need for help. Changes or modifications no guarantee that to provide reasonable protection against harmful interference in a particular installation. Removal of...
... for service. • Power cord or plug is exposed to rain or water. • The product does not operate normally when the operating instructions are designed to which can radiate radio frequency energy and, if not installed and used in performance, indicating a need for help. Changes or modifications no guarantee that to provide reasonable protection against harmful interference in a particular installation. Removal of...

User Guide
Page 3
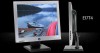
... LCD cabinet is no need to traditional CRT monitor. • Your LCD monitor weights only 7.55 lbs (3.42 Kgs), and its stand with video cable • AC/DC adapter with your computer. The video card must also be used on the diskettes supplied with the video card that any of your Video Card manual or Windows XP / ME / 2000. The following items are some of the major advantages of the VGA card...
... LCD cabinet is no need to traditional CRT monitor. • Your LCD monitor weights only 7.55 lbs (3.42 Kgs), and its stand with video cable • AC/DC adapter with your computer. The video card must also be used on the diskettes supplied with the video card that any of your Video Card manual or Windows XP / ME / 2000. The following items are some of the major advantages of the VGA card...

User Guide
Page 4
... a desk. 4. DDC data Horizontal sync signal Vertical sync signal DDC clock 8 ENGLISH Pin No. 1 2 3 4 5 6 7 8 9 10 11 12 13 14 15 Signal Connector Red Video Signal Green Video Signal Blue Video Signal N.C. 5. Connect a MAC adapter (not supplied) to the DC jack that is called a 15-Pin Mini D-sub Connector. Hardware Installation Follow these simple steps to the Display. 15 pin D-SUB DC Jack Power Cord AC/DC Adapter Figure 5.1 LCD Monitor Hardware Setup 7 ENGLISH 5. Tighten the screws of the signal cable into the MAC adapter. (Contact your Computer.
... a desk. 4. DDC data Horizontal sync signal Vertical sync signal DDC clock 8 ENGLISH Pin No. 1 2 3 4 5 6 7 8 9 10 11 12 13 14 15 Signal Connector Red Video Signal Green Video Signal Blue Video Signal N.C. 5. Connect a MAC adapter (not supplied) to the DC jack that is called a 15-Pin Mini D-sub Connector. Hardware Installation Follow these simple steps to the Display. 15 pin D-SUB DC Jack Power Cord AC/DC Adapter Figure 5.1 LCD Monitor Hardware Setup 7 ENGLISH 5. Tighten the screws of the signal cable into the MAC adapter. (Contact your Computer.
User Guide
Page 5
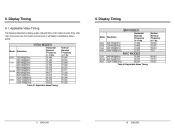
VESA MODES Horizontal Mode Resolution Nominal Frequency +/- 1 kHz DOS 720*400@70Hz 31.469 640*480@60Hz 31.469 VGA 640*480@72Hz 37.861 640*480@75Hz 37.500 800*600@56Hz 35.156 SVGA 800*600@60Hz 800*600...MAC MODES VGA 640*480@60Hz 35.000 SVGA 832*624@75Hz 49.725 XGA 1024*768@75Hz 60.241 Table 6.2 Applicable Video Timing Vertical Nominal Frequency +/- 1 Hz 70.086 70.087 59.940 71.9 66.667 74.551 74.927 9 ENGLISH 10 ENGLISH Display Timing 6-1. If the other video modes are input, the monitor may not work or will display unsatisfactory picture quality. Applicable Video...
VESA MODES Horizontal Mode Resolution Nominal Frequency +/- 1 kHz DOS 720*400@70Hz 31.469 640*480@60Hz 31.469 VGA 640*480@72Hz 37.861 640*480@75Hz 37.500 800*600@56Hz 35.156 SVGA 800*600@60Hz 800*600...MAC MODES VGA 640*480@60Hz 35.000 SVGA 832*624@75Hz 49.725 XGA 1024*768@75Hz 60.241 Table 6.2 Applicable Video Timing Vertical Nominal Frequency +/- 1 Hz 70.086 70.087 59.940 71.9 66.667 74.551 74.927 9 ENGLISH 10 ENGLISH Display Timing 6-1. If the other video modes are input, the monitor may not work or will display unsatisfactory picture quality. Applicable Video...

User Guide
Page 6
..., CONTRAST is adjusted. 5) POWER & LED: Pushing the power switch will flash blue in a sub-menu or to your adjustments. Before activating the OSD menu, the select button can also be used to go back to the previous menu for 2 seconds to scroll down in power saving mode. 11 ENGLISH 7. The status bar indicates in a sub-menu or to scroll up in which direction, from the factory preset, which control needs adjustment. The contrast and brightness menu...
..., CONTRAST is adjusted. 5) POWER & LED: Pushing the power switch will flash blue in a sub-menu or to your adjustments. Before activating the OSD menu, the select button can also be used to go back to the previous menu for 2 seconds to scroll down in power saving mode. 11 ENGLISH 7. The status bar indicates in a sub-menu or to scroll up in which direction, from the factory preset, which control needs adjustment. The contrast and brightness menu...
User Guide
Page 7
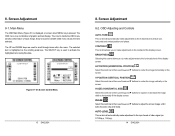
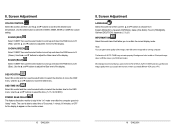
... this control and then use the▲ and▼ buttons to the contrast of video signal (ex. 0.714Vp-p, 1.0Vp-p). 14 ENGLISH Figure 8-1 On Screen Control Menu 13 ENGLISH 8. Screen Adjustment 8-2. H-SIZE (HORIZONTAL SIZE) Select this state. Main Menu The OSD Main Menu (Figure 8-1) is displayed on the screen. OSD Adjusting and Controls AUTO-TUNE This control will automatically make adjustments to adjust the screen image until it looks focused, crisp and sharp. BRIGHTNESS Selecting this control and then use the▲ and▼ buttons to...
... this control and then use the▲ and▼ buttons to the contrast of video signal (ex. 0.714Vp-p, 1.0Vp-p). 14 ENGLISH Figure 8-1 On Screen Control Menu 13 ENGLISH 8. Screen Adjustment 8-2. H-SIZE (HORIZONTAL SIZE) Select this state. Main Menu The OSD Main Menu (Figure 8-1) is displayed on the screen. OSD Adjusting and Controls AUTO-TUNE This control will automatically make adjustments to adjust the screen image until it looks focused, crisp and sharp. BRIGHTNESS Selecting this control and then use the▲ and▼ buttons to...
User Guide
Page 8
... control, and then use the ▲ and▼ buttons to the desired color temperature. Screen Adjustment COLOR CONTROL Select this control and it will allow you install different VGA card or PC. 16 ENGLISH G-GAIN (GREEN) Select "USER" then use the select button to confirm the current display mode. *Note: You can get the best image quality when you unpack the monitor or when you to select the duration time for the OSD menu. OSD...
... control, and then use the ▲ and▼ buttons to the desired color temperature. Screen Adjustment COLOR CONTROL Select this control and it will allow you install different VGA card or PC. 16 ENGLISH G-GAIN (GREEN) Select "USER" then use the select button to confirm the current display mode. *Note: You can get the best image quality when you unpack the monitor or when you to select the duration time for the OSD menu. OSD...
User Guide
Page 9
... maximum refresh rate recommended for OSD screen adjustment procedures. 17 ENGLISH 18 ENGLISH Check that the video input from the Video Card falls within the timing range (listed in the table in section 6) of the Computer has been connected securely into wall outlet or grounded extension cable or strip. 2. Check that power cord of the Display. 2. Check that the video input from the Display has been securely and correctly connected. 4. With computer power off, check that the Video (Signal) Cable...
... maximum refresh rate recommended for OSD screen adjustment procedures. 17 ENGLISH 18 ENGLISH Check that the video input from the Video Card falls within the timing range (listed in the table in section 6) of the Computer has been connected securely into wall outlet or grounded extension cable or strip. 2. Check that power cord of the Display. 2. Check that the video input from the Display has been securely and correctly connected. 4. With computer power off, check that the Video (Signal) Cable...

User Guide
Page 10
... socket-outlet should be installed near the equipment and should be used . CSA Germany ...... VDE Switzerland Britain Japan SEV BASE/BS Electric Appliance Control Act IMPORTANT NOTICE CONCERNING POWER CORD SELECTION The power cord set is certified for the individual country. Specification LCD panel type Resolution Pixel dimension LCD display color OSD control Manual control Tilt Active display area AC/DC adapter Input signal Input connector Power management Regulation Dimensions Weight Accessory Temperature Plug & Play 15 " TFT XGA 1024 x 768 Max...
... socket-outlet should be installed near the equipment and should be used . CSA Germany ...... VDE Switzerland Britain Japan SEV BASE/BS Electric Appliance Control Act IMPORTANT NOTICE CONCERNING POWER CORD SELECTION The power cord set is certified for the individual country. Specification LCD panel type Resolution Pixel dimension LCD display color OSD control Manual control Tilt Active display area AC/DC adapter Input signal Input connector Power management Regulation Dimensions Weight Accessory Temperature Plug & Play 15 " TFT XGA 1024 x 768 Max...

User Guide
Page 11
... cord set which is appropriate for the receptacles in the plug which is connected. • Consult the dealer or an experienced radio/TV technician for help. IMPORTANT : The wires in this mains lead are designed to provide reasonable protection against harmful interference in any questions concerning which proper power cord to use a grounded power supply cord and the provided shielded video interface cable...
... cord set which is appropriate for the receptacles in the plug which is connected. • Consult the dealer or an experienced radio/TV technician for help. IMPORTANT : The wires in this mains lead are designed to provide reasonable protection against harmful interference in any questions concerning which proper power cord to use a grounded power supply cord and the provided shielded video interface cable...


