
User Guide
Page 1
...'t use this computer, make sure that the total amperage rating of any kind on the product. 6 This computer should never be connected to replace your obsolete outlet. This product should not be placed in this manual. 3 Do not use an extension cord with a 3-wire grounding type ...plug, a plug having a third (grounding) pin. i If you are unable to insert or replace your obsolete outlet, contact your electrician to the AC power source indicated on your computer from overheating, do not block or cover these instructions for...
...'t use this computer, make sure that the total amperage rating of any kind on the product. 6 This computer should never be connected to replace your obsolete outlet. This product should not be placed in this manual. 3 Do not use an extension cord with a 3-wire grounding type ...plug, a plug having a third (grounding) pin. i If you are unable to insert or replace your obsolete outlet, contact your electrician to the AC power source indicated on your computer from overheating, do not block or cover these instructions for...
User Guide
Page 2
... be unplugged before the main system unit cover is removed. (Separe le cordon d'alimentation et puis enleve le couvercle.) 2 Once removed, the cover must be replaced and screwed in position before the power supply cord is damaged or frayed. 2 If liquid has been spilled into the product. 3 If the product has...
... be unplugged before the main system unit cover is removed. (Separe le cordon d'alimentation et puis enleve le couvercle.) 2 Once removed, the cover must be replaced and screwed in position before the power supply cord is damaged or frayed. 2 If liquid has been spilled into the product. 3 If the product has...

User Guide
Page 8
... Common Problems Power ...A-1 Hard Disk Drive ...A-1 Optical Drive ...A-2 Audio ...A-2 Floppy Disk Drive A-3 Display & Monitor A-3 Keyboard ...A-4 Mouse ...A-4 Appendix B. Chapter 4 Installing and Removing Drives Removing the Cover 4-1 Replacing the Cover 4-3 Installing an Expansion Card 4-4 Installing an Additional Hard Disk Drive 4-6 Installing the 5.25-inch Device in the Peripheral Bay 4-9 Chapter 5 Using the Restore...
... Common Problems Power ...A-1 Hard Disk Drive ...A-1 Optical Drive ...A-2 Audio ...A-2 Floppy Disk Drive A-3 Display & Monitor A-3 Keyboard ...A-4 Mouse ...A-4 Appendix B. Chapter 4 Installing and Removing Drives Removing the Cover 4-1 Replacing the Cover 4-3 Installing an Expansion Card 4-4 Installing an Additional Hard Disk Drive 4-6 Installing the 5.25-inch Device in the Peripheral Bay 4-9 Chapter 5 Using the Restore...
User Guide
Page 25
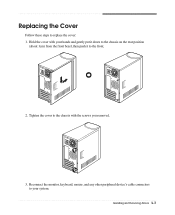
Installing and Removing Drives 4-3 Tighten the cover to replace the cover: 1. Replacing the Cover Follow these steps to the chassis with your hands and gently put it down to the chassis on the rear position (about 1cm) from the front bezel, then push it to your system. Reconnect the monitor, keyboard, mouse, and any other peripheral device's cable connectors to the front. 2. Hold the cover with the screws you removed. 3.
Installing and Removing Drives 4-3 Tighten the cover to replace the cover: 1. Replacing the Cover Follow these steps to the chassis with your hands and gently put it down to the chassis on the rear position (about 1cm) from the front bezel, then push it to your system. Reconnect the monitor, keyboard, mouse, and any other peripheral device's cable connectors to the front. 2. Hold the cover with the screws you removed. 3.
User Guide
Page 27
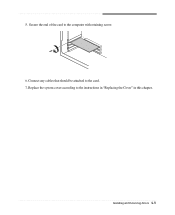
Installing and Removing Drives 4-5 Connect any cables that should be attached to the instructions in "Replacing the Cover" in this chapter. 5. Replace the system cover according to the card. 7. Secure the end of the card to the computer with retaining screw. 6.
Installing and Removing Drives 4-5 Connect any cables that should be attached to the instructions in "Replacing the Cover" in this chapter. 5. Replace the system cover according to the card. 7. Secure the end of the card to the computer with retaining screw. 6.

User Guide
Page 30
7. Connect the power and hard disk drive cable to the instructions in "Replacing the Cover" in this chapter. 4-8 Installing and Removing Drives Replace the system cover according to your hard disk drive. (If you removed the hard disk drive cable from the motherboard, replace it with the retaining screw, as shown below. 8. Slide the HDD bracket into the chassis and secure it .) 9.
7. Connect the power and hard disk drive cable to the instructions in "Replacing the Cover" in this chapter. 4-8 Installing and Removing Drives Replace the system cover according to your hard disk drive. (If you removed the hard disk drive cable from the motherboard, replace it with the retaining screw, as shown below. 8. Slide the HDD bracket into the chassis and secure it .) 9.
User Guide
Page 36
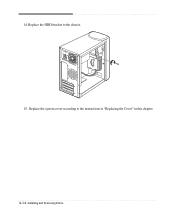
Replace the system cover according to the chassis. 15. Replace the HDD bracket to the instructions in "Replacing the Cover" in this chapter. 4-14 Installing and Removing Drives 14.
Replace the system cover according to the chassis. 15. Replace the HDD bracket to the instructions in "Replacing the Cover" in this chapter. 4-14 Installing and Removing Drives 14.

User Guide
Page 39
...executable file for your hard disk. 8. To register with the Restore CD. You can update drivers in the optical drive. 7. message appears, replace the Restore CD #2 with #2 in the Drivers folder of you lose drivers, install these by using your computer, follow the displayed messages. message ...appears, replace the Restore CD #1 with #3 (if there is completed, remove the Restore CD from your hard disk. 10. If you Restore CDs. In this...
...executable file for your hard disk. 8. To register with the Restore CD. You can update drivers in the optical drive. 7. message appears, replace the Restore CD #2 with #2 in the Drivers folder of you lose drivers, install these by using your computer, follow the displayed messages. message ...appears, replace the Restore CD #1 with #3 (if there is completed, remove the Restore CD from your hard disk. 10. If you Restore CDs. In this...
User Guide
Page 46
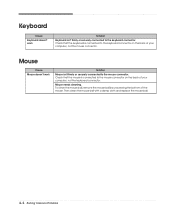
.... Check that the mouse is connected to the keyboard connector on the back of the mouse. Then clean the mouse ball with a damp cloth and replace the mouse ball. A-4 Solving Common Problems Keyboard Cause Keyboard doesn't work Solution Mouse isn't firmly or securely connected to the mouse connector. Check that the...
.... Check that the mouse is connected to the keyboard connector on the back of the mouse. Then clean the mouse ball with a damp cloth and replace the mouse ball. A-4 Solving Common Problems Keyboard Cause Keyboard doesn't work Solution Mouse isn't firmly or securely connected to the mouse connector. Check that the...
User Guide
Page 47
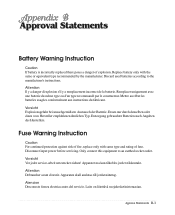
... bei unsachgemäß em Austausch der Batterie. Fuse Warning Instruction Caution For continued protection against risk of fire, replace only with the same or equivalent type recommended by the manufacturer. Only connect this equipment to the manufacturer's instructions. ...uniquement avec une batterie du méme type ou d'un type recommandé par le constructeur. Apparatet ma kun tilkobles jordet stikkontakt. Replace battery only with same type and rating of explosion. Laite on liitettävä suojakosketinistoraasian. Attention Il y a danger d'explosion s'...
... bei unsachgemäß em Austausch der Batterie. Fuse Warning Instruction Caution For continued protection against risk of fire, replace only with the same or equivalent type recommended by the manufacturer. Only connect this equipment to the manufacturer's instructions. ...uniquement avec une batterie du méme type ou d'un type recommandé par le constructeur. Apparatet ma kun tilkobles jordet stikkontakt. Replace battery only with same type and rating of explosion. Laite on liitettävä suojakosketinistoraasian. Attention Il y a danger d'explosion s'...


