
User Guide
Page 26
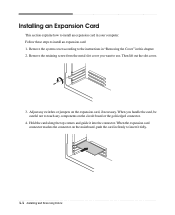
Follow these steps to touch any switches or jumpers on the expansion card, if necessary. Adjust any components on the mainboard, push the card in your computer. When you want to the instructions in "...
Follow these steps to touch any switches or jumpers on the expansion card, if necessary. Adjust any components on the mainboard, push the card in your computer. When you want to the instructions in "...

User Guide
Page 29
With using the screws, secure the hard disk drive to CS (Cable Select). 5. Slide the hard disk drive into the HDD bracket. 6. Installing and Removing Drives 4-7 4. Set the jumper of the new hard disk drive to the HDD bracket.
With using the screws, secure the hard disk drive to CS (Cable Select). 5. Slide the hard disk drive into the HDD bracket. 6. Installing and Removing Drives 4-7 4. Set the jumper of the new hard disk drive to the HDD bracket.

User Guide
Page 33
... optional drive you can use , remove it from the front panel. Make sure the jumper of your computer. NOTES Like a hard disk drive, most optional devices have jumpers that covers the 5.25-inch drive bay you set to CS (Cable Select). To install an additional device in the empty ...bay below the optical drive, you want to CS, your finger. 7. If there is set the jumper of E-IDE cable marked "SLAVE." 6. Remove the faceplate cover from the chassis using your system recognizes the device according to location of the cable ...
... optional drive you can use , remove it from the front panel. Make sure the jumper of your computer. NOTES Like a hard disk drive, most optional devices have jumpers that covers the 5.25-inch drive bay you set to CS (Cable Select). To install an additional device in the empty ...bay below the optical drive, you want to CS, your finger. 7. If there is set the jumper of E-IDE cable marked "SLAVE." 6. Remove the faceplate cover from the chassis using your system recognizes the device according to location of the cable ...


