

User Guide
Page 8
... the Cover 4-3 Installing an Expansion Card 4-4 Installing an Additional Hard Disk Drive 4-6 Installing the 5.25-inch Device in the Peripheral Bay 4-9 Chapter 5 Using the Restore CDs Restoring Your Original Software 5-1 Chapter 6 Using the PowerDVD About DVD ...6-1 Playing the PowerDVD 6-1 How to Run the PowerDVD 6-1 Buttons of the PowerDVD 6-2 Appendix A. Approval Statements...
... the Cover 4-3 Installing an Expansion Card 4-4 Installing an Additional Hard Disk Drive 4-6 Installing the 5.25-inch Device in the Peripheral Bay 4-9 Chapter 5 Using the Restore CDs Restoring Your Original Software 5-1 Chapter 6 Using the PowerDVD About DVD ...6-1 Playing the PowerDVD 6-1 How to Run the PowerDVD 6-1 Buttons of the PowerDVD 6-2 Appendix A. Approval Statements...

User Guide
Page 14
...Turning Off the Computer To turn on your computer. 3. When the Turn Off Computer dialog box is booting, the computer will be booted with Restore CD. In this case, the "Microsoft Windows Startup Menu" menu will load Microsoft ® Windows ® . Before turning off the monitor and any... connected to your computer is displayed, click Turn Off to turn off . NOTE If the Restore CD is in the optical drive (D:) while your computer. 2. To start Windows, remove the Restore CD and restart the computer. Click the Start button, and then click Turn Off Computer. 3. Turn ...
...Turning Off the Computer To turn on your computer. 3. When the Turn Off Computer dialog box is booting, the computer will be booted with Restore CD. In this case, the "Microsoft Windows Startup Menu" menu will load Microsoft ® Windows ® . Before turning off the monitor and any... connected to your computer is displayed, click Turn Off to turn off . NOTE If the Restore CD is in the optical drive (D:) while your computer. 2. To start Windows, remove the Restore CD and restart the computer. Click the Start button, and then click Turn Off Computer. 3. Turn ...
User Guide
Page 18
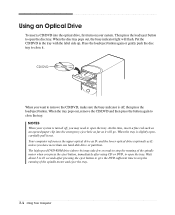
...-ROM drive (above 6x) may need to close the tray. When the tray pops out, remove the CD/DVD and then press the button again to stop the running of the spindle motor and eject the tray....Using Your Computer When the disc tray pops out, the busy indicator light will go. CD/DVD When you want to remove the CD/DVD, make sure the busy indicator is off , you may take few seconds to ...; Then press the load/eject button to open , carefully pull it . Using an Optical Drive To insert a CD/DVD into the emergency eject hole as far as E: unless you have more than one hard disk drive or partition....
...-ROM drive (above 6x) may need to close the tray. When the tray pops out, remove the CD/DVD and then press the button again to stop the running of the spindle motor and eject the tray....Using Your Computer When the disc tray pops out, the busy indicator light will go. CD/DVD When you want to remove the CD/DVD, make sure the busy indicator is off , you may take few seconds to ...; Then press the load/eject button to open , carefully pull it . Using an Optical Drive To insert a CD/DVD into the emergency eject hole as far as E: unless you have more than one hard disk drive or partition....
User Guide
Page 31
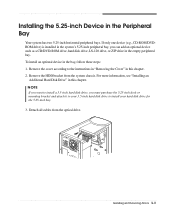
... the system chassis. Installing and Removing Drives 4-9 NOTE If you want to install a 3.5-inch hard disk drive, you can add an optional device such as a CD/DVD-ROM drive, hard disk drive, LS-120 drive, or ZIP drive in this chapter. 2. Installing the 5.25-inch Device in the bay, follow these... purchase the 5.25-inch dock or mounting bracket and attach it to your hard disk drive for the 5.25-inch bay. 3. If only one device (e.g., CD-ROM/DVDROM drive) is installed in this chapter.
... the system chassis. Installing and Removing Drives 4-9 NOTE If you want to install a 3.5-inch hard disk drive, you can add an optional device such as a CD/DVD-ROM drive, hard disk drive, LS-120 drive, or ZIP drive in this chapter. 2. Installing the 5.25-inch Device in the bay, follow these... purchase the 5.25-inch dock or mounting bracket and attach it to your hard disk drive for the 5.25-inch bay. 3. If only one device (e.g., CD-ROM/DVDROM drive) is installed in this chapter.
User Guide
Page 37
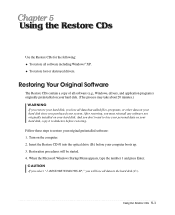
... Windows® XP. Follow these steps to lose your personal data on your system. To restore lost or destroyed drivers. Insert the Restore CD #1 into the optical drive (D:) before restoring. And you don't want to restore your hard disk. When the Microsoft Windows Startup Menu appears... must reinstall any software not originally installed on the computer. 2. Turn on your original preinstalled software: 1. Using the Restore CDs 5-1 CAUTION If you will be started. 4. Using the Restore CDs Use the Restore CDs for the following: To restore all data in the hard disk (C:).
... Windows® XP. Follow these steps to lose your personal data on your system. To restore lost or destroyed drivers. Insert the Restore CD #1 into the optical drive (D:) before restoring. And you don't want to restore your hard disk. When the Microsoft Windows Startup Menu appears... must reinstall any software not originally installed on the computer. 2. Turn on your original preinstalled software: 1. Using the Restore CDs 5-1 CAUTION If you will be started. 4. Using the Restore CDs Use the Restore CDs for the following: To restore all data in the hard disk (C:).
User Guide
Page 38
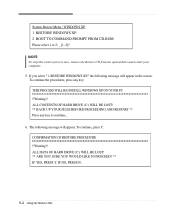
RESTORE WINDOWS XP," the following message will appear in the screen. To continue, press Y. IF NO, PRESS N. 5-2 Using the Restore CDs CONFIRMATION OF RESTORE PROCEDURE !!Warning!! The following message will appear. ALL DATA OF HARD DRIVE (C:) WILL BE LOST! ** ARE YOU SURE YOU ...WILL BE LOST! ** BACK UP YOUR FILES BEFORE PROCEEDING AND RESTART ** Press any key. NOTE To stop this restore process now, remove the Restore CD from the optical drive and restart your computer. 5. THIS PROCESS WILL RE-INSTALL WINDOWS XP ON YOUR PC !!Warning!! To continue the procedures, press any...
RESTORE WINDOWS XP," the following message will appear in the screen. To continue, press Y. IF NO, PRESS N. 5-2 Using the Restore CDs CONFIRMATION OF RESTORE PROCEDURE !!Warning!! The following message will appear. ALL DATA OF HARD DRIVE (C:) WILL BE LOST! ** ARE YOU SURE YOU ...WILL BE LOST! ** BACK UP YOUR FILES BEFORE PROCEEDING AND RESTART ** Press any key. NOTE To stop this restore process now, remove the Restore CD from the optical drive and restart your computer. 5. THIS PROCESS WILL RE-INSTALL WINDOWS XP ON YOUR PC !!Warning!! To continue the procedures, press any...

User Guide
Page 39
... to your computer. In this case, the "Microsoft Windows Startup Menu" menu will start. To register with Microsoft for using the Restore CDs. NOTE The drivers for installation, use it to your personal information. You can update drivers in the optical drive. When the "Insert next...enter to continue. 9. NOTE Depending on the model, your computer is no executable installation file. If you Restore CDs. The restoration process will appear. message appears, replace the Restore CD #1 with #2 in the Device Manager window if there is booting, the computer will be booted with #3 (if...
... to your computer. In this case, the "Microsoft Windows Startup Menu" menu will start. To register with Microsoft for using the Restore CDs. NOTE The drivers for installation, use it to your personal information. You can update drivers in the optical drive. When the "Insert next...enter to continue. 9. NOTE Depending on the model, your computer is no executable installation file. If you Restore CDs. The restoration process will appear. message appears, replace the Restore CD #1 with #2 in the Device Manager window if there is booting, the computer will be booted with #3 (if...

User Guide
Page 40
Blank 5-4 Using the Restore CDs
Blank 5-4 Using the Restore CDs
User Guide
Page 41
..., play button on the PowerDVD. And press the play the PowerDVD as follow: Click the Start button, point to All Programs, point to emachines PowerDVD, and then click PowerDVD. Chapter 1 Dual-layer DVDs can enjoy higher-resolution pictures, more channels of digital sound, richer graphics, and... that supports 16:9 widescreen and the screen is available only on a single side. NOTE When you can hold 4.7 gigabytes of a current CD. Using the PowerDVD NOTE The PowerDVD is changed automatically to the widescreen mode, the display may operate improperly for an instant after the resolution ...
..., play button on the PowerDVD. And press the play the PowerDVD as follow: Click the Start button, point to All Programs, point to emachines PowerDVD, and then click PowerDVD. Chapter 1 Dual-layer DVDs can enjoy higher-resolution pictures, more channels of digital sound, richer graphics, and... that supports 16:9 widescreen and the screen is available only on a single side. NOTE When you can hold 4.7 gigabytes of a current CD. Using the PowerDVD NOTE The PowerDVD is changed automatically to the widescreen mode, the display may operate improperly for an instant after the resolution ...
User Guide
Page 42
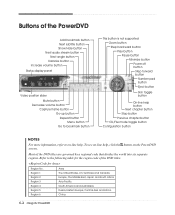
... off button Step forward button Number pad button Eject button Skin toggle button On-line help button Next chapter button Stop button Previous chapter button CD/File mode toggle button Configuration button NOTES For more information, refer to the following table for the region code of the DVD titles are governed...
... off button Step forward button Number pad button Eject button Skin toggle button On-line help button Next chapter button Stop button Previous chapter button CD/File mode toggle button Configuration button NOTES For more information, refer to the following table for the region code of the DVD titles are governed...
User Guide
Page 44
..., gently but firmly press down to Entertainment, and then click Volume Control. Eject the CD/DVD, turn on the CD/DVD should be facing up or down on the CD/DVD to Entertainment, and then click Volume Control. Audio has been muted. The high speed DVD-ROM drive takes few seconds to stop... to All Programs, point to Accessories, point to stop the running of the spindle motor when you can control the audio volume level by using CD or DVD, to the computer. Turn off the computer, wait at least 30 seconds, and then turn it operates well, the...
..., gently but firmly press down to Entertainment, and then click Volume Control. Eject the CD/DVD, turn on the CD/DVD should be facing up or down on the CD/DVD to Entertainment, and then click Volume Control. Audio has been muted. The high speed DVD-ROM drive takes few seconds to stop... to All Programs, point to Accessories, point to stop the running of the spindle motor when you can control the audio volume level by using CD or DVD, to the computer. Turn off the computer, wait at least 30 seconds, and then turn it operates well, the...
User Guide
Page 48
... interventien doit etre effectuee par un personnel qualifie. Do not attempt to rain or moisture. Le rayon laser utilisé dans le lecteur CD-ROM est invisible à l'ceil nu. B-2 Approva Statements No user-serviceable parts inside of electric shock, do not place your eyes....224; l'humidité. When the power switch is no hazardous LASER radiation with International Electrotechnical Commission (IEC) Publication 825]. Da der im CD-ROM Laufwerk benutzte Laser gefährlich für die Augen ist, sollten Sie kenieswegs versuchen das Gehäuse . Achtung Um die Gefahr...
... interventien doit etre effectuee par un personnel qualifie. Do not attempt to rain or moisture. Le rayon laser utilisé dans le lecteur CD-ROM est invisible à l'ceil nu. B-2 Approva Statements No user-serviceable parts inside of electric shock, do not place your eyes....224; l'humidité. When the power switch is no hazardous LASER radiation with International Electrotechnical Commission (IEC) Publication 825]. Da der im CD-ROM Laufwerk benutzte Laser gefährlich für die Augen ist, sollten Sie kenieswegs versuchen das Gehäuse . Achtung Um die Gefahr...

